

How to Delete App Backup Files in Windows 10?
Do you know how to delete app backup files in Windows 10 PC to release more free space on your PC? In this post, you’ll learn some ideas to clean app backup files.
By Lucas / Updated on July 11, 2025
What are App backup files?
Some users find that though they’ve installed new programs on other locations, the C drive will still be in the space crisis caused by the accumulation of numerous program files. How does this happen? What files will still be stored on the C drive?
The answer is the App backup files and relevant data files. When you apply an update to an existing program on your PC, the prior version of the software is stored on the disk. These prior versions of the program accumulate and consume hard drive space over time, leaving you wondering why your disk is running out of space.
In addition, all computer programs generate temporary files and cache files in order to function correctly and on demand by the user. All of these files are kept on a specific hard drive, where they continue to expand in size and consume available space.
How to delete app backup files in Windows 10/11?
Since too many app backup files will occupy too much free space on your disk, we will provide you with a comprehensive tutorial that includes some options for deleting app backup files in Windows 10. You may quickly erase all of the app backup files to save up disk space, and there are some other tricks to help you release more available space on your system drive.
Method 1. Delete app backup files manually
Step 1. Press “Win”+ “R” keys on your keyboard to open the Run dialog.
Step 2. Type %localappdata% in the search bar, and click “OK”.

Step 3. Find the “Temp” folder, and open it.
Step 4. Select all files and delete them.
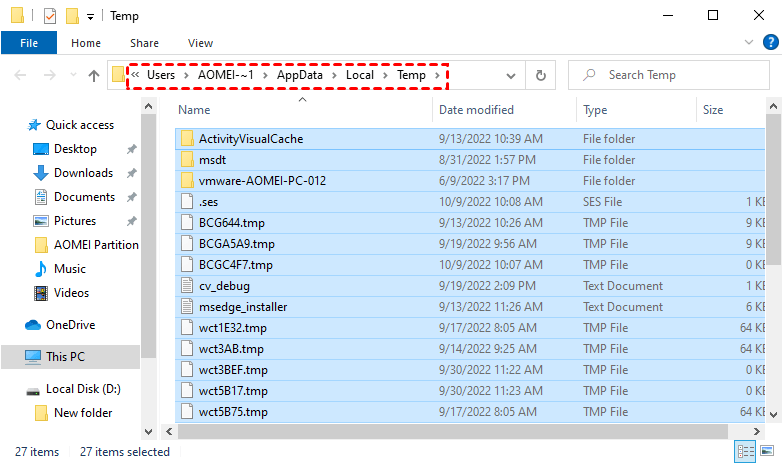
These files are only cache files, so it’s safe to remove them. Most apps have their directory files and backup files in AppData\Local\Packages. You can remove the target large backup files in this path, but some files might cause the resetting settings to the default parameters while others might not work properly.
Method 2. Use Disk Cleanup to clear app backup files
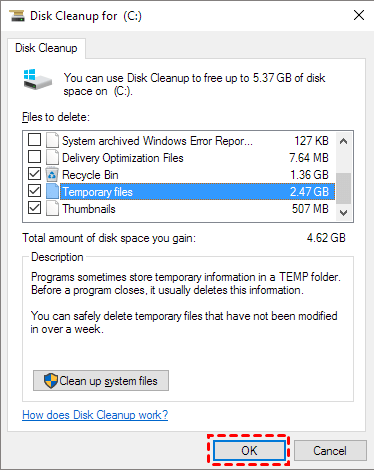
Step 1. Press Windows Key + S and enter disk cleanup. Select Disk Cleanup from the list of results.
Step 2. Select the C drive and click OK. Wait while the application scans your PC.
Step 3. Make sure to check Temporary files and then click on OK. If you want, you can select other file types.
Method 3. Use file history to delete backup files
This way can safely delete outdated files of apps and your system, you don’t need to manually recognize those files.
Step 1. Open “Control Panel”, and “file history” in the search box and select them. Then, in the File History window, click “Advanced settings”.

Step 2. Select “Clean up versions”. You can delete the app backups on any folder right from older than 1 month to older than 2 years.
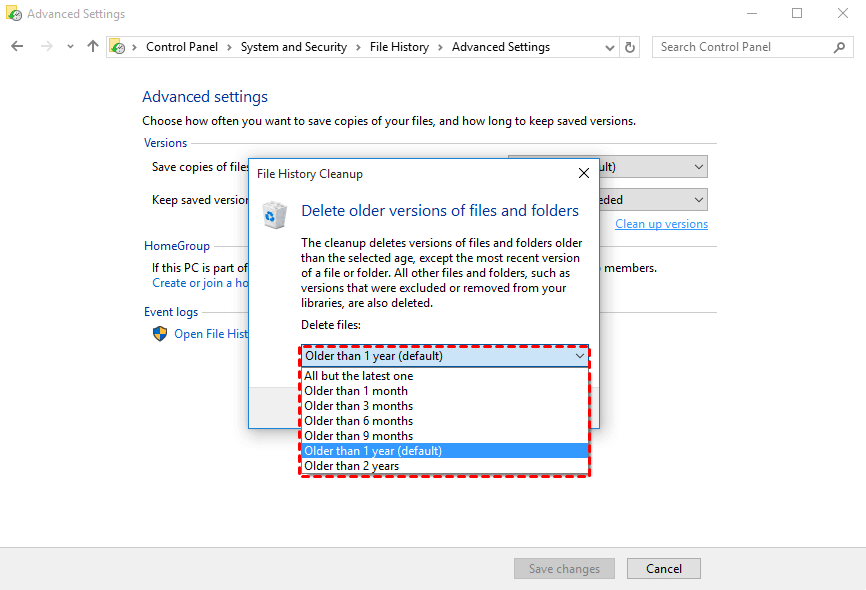
Step 3. Select the option and press the “Clean up” button.
How do you deep clean outdated files in Windows?
With the above 3 ways, you can clean unwanted files from Windows 10. In fact, we suggest users regularly clear junk files to keep the computer and disks in a nice status. But honestly, to completely clean all junk files manually is difficult because you may delete important files and make a big mistake to crash your system. Therefore, here we recommend you use a reliable PC cleaner—PartitionAssistant Cleanup.
It is a free disk and partition manager for Windows 11/10/8/8.1/7 system. The “Clean Junk Files” function can deeply scan the system and the disks to filter all useless data files and list them to show users and users can choose to remove them with one click.
Free Up Disk Space To Keep Your PC Running Smoothly and Efficiently
Step 1. Initiate Clean Junk Files. Install and launch PartitionAssistant Cleanup. Click the "Clean Junk Files" tab.

Step 2. Start scan junk files. Click the "Scan Now" button to start the process of scanning junk files.

Step 3. After the scan process is finished. All system junk files (including recycle bin files, temporary files, log files, invalid shortcuts, and so on) and registry junk files (including DLL registry, system registry, and program registry) will be displayed.

Step 4. You can also click the button behind to view the junk files details.

Step 5. And, you can click the button behind to locate the file.

Step 6. Select junk files to start cleanup. By default, the program will select some junk files to clean up, for example, temporary files, log files, and so on. You can also manually check to select more or uncheck to deselect fewer listed junk files. Or, click "Select All" to select all junk files to clean up if you need to clean up all.
After selecting junk files that are not needed anymore, you can click the "Clean Now"button to start the cleanup.

Step 7. Cleanup completed. The process of the cleanup might take time, and the selected files will be cleaned up. After the process is finished, you will get a cleanup completed window displaying how many files you have cleaned and not yet cleaned.

Further reading: How to extend drive space?
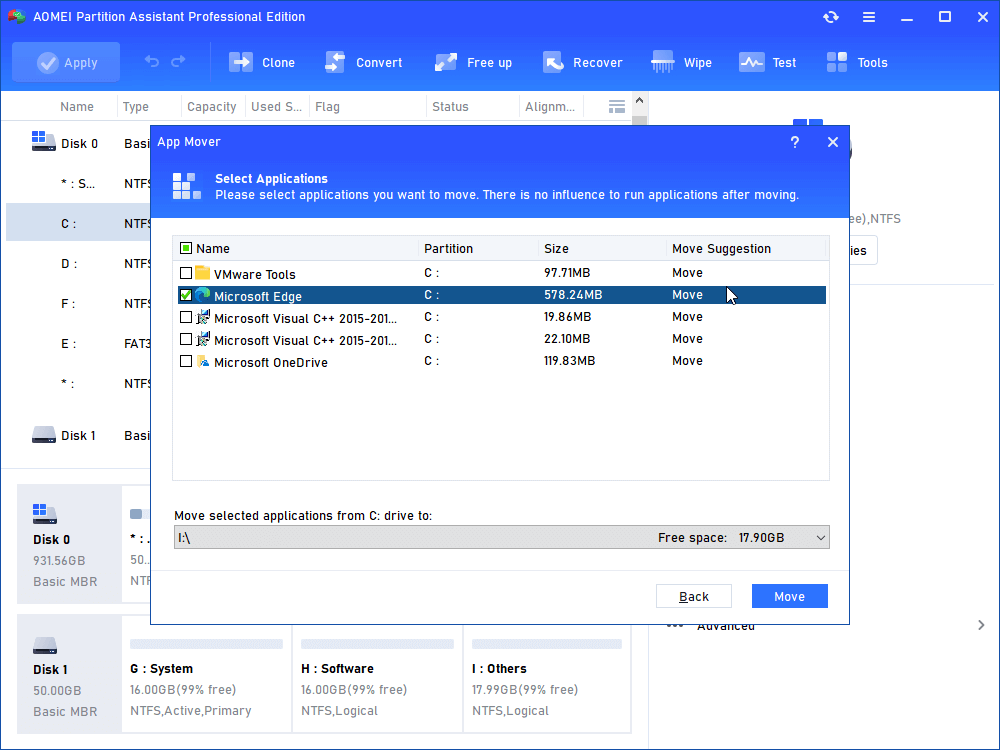
If you want to release more drive space on your PC, you can try AOMEI Partition Assistant, to try the “App Mover” function to move some installed apps to another location.
Ending lines
This post shows how to delete app backup files in Windows 10, if you need, you can also delete Windows 10 system backup files. PartitionAssistant Cleanup can help you easily and securely fix disk space insufficiency issue.

