What’s Default Partition Style in Windows 11?
Learn what the default partition style in Windows 11 is, and how to set the partition style for Windows 11 with a handy tool.
By Lucas / Updated on January 19, 2024
What is the default partition style used in Windows 11?
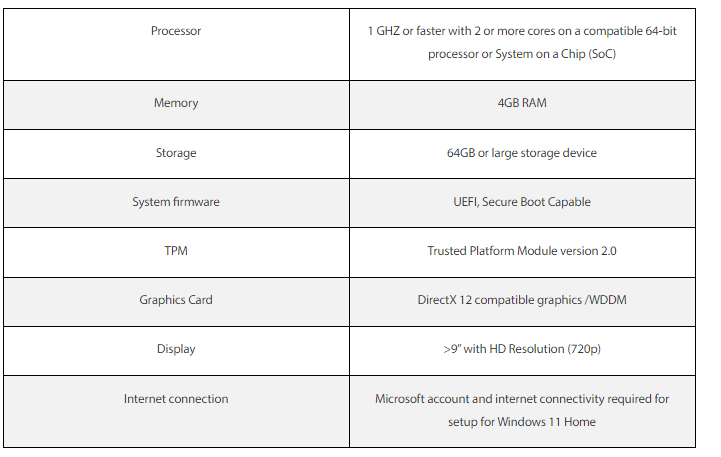
We all know that Windows 11 put forward higher requirements for the hardware of the device. Now 22H2 version is on the way, some users guess that the requirements of the Windows 11 system might allow more devices to run it on the PC. However, according to the official information, the basic requirements of the system are still the same.
So, if you meet the ‘This PC can’t run Windows 11’ warning after checking your computer with the Microsoft check tool or see ‘Cannot be installed to this disk’ during the installation of Windows 11, which means your PC is still unqualified. And the reason for these two warnings show is the partition style: The default partition style in Windows 11 is GPT type because UEFI is a necessary condition of this OS.
What's the difference between GPT and MBR partition styles?
But, what makes GPT and MBR partition styles different from each other? Why MBR can’t be the default partition style in Windows 11
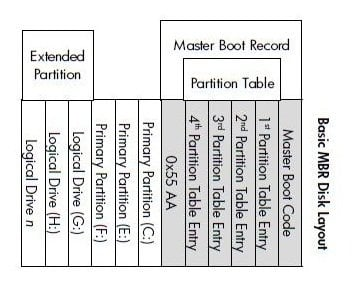
MBR itself is not a certain partition, but a type in which each partition is allocated to a hard disk. All partitions on an MBR disk belong to the MBR partition table. MBR disk can be recognized by most new and old operating systems. It is a traditionally commonly used mode. However, the number of primary partitions on a hard disk cannot exceed 4, and the maximum capacity cannot exceed 2.1TB.
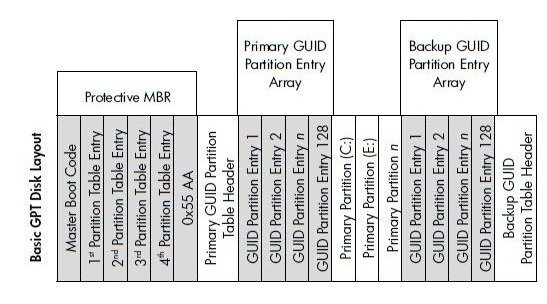
GPT itself is not a certain partition, but a mode in which each partition is allocated on a hard disk. All partitions on a GPT disk are GPT partitions. GPT disk storage data is more stable and is an advanced mode. There is no limit on the number of primary partitions and the capacity (maximum up to 18000TB in the market). But Win7 (8) can only read and write GPT disks, and only on motherboards that support UEFI BIOS, can you install a 64-bit OS on a GPT disk.
UEFI (Unified Extensible Firmware Interface) is the advanced version of EFI (Extensible Firmware Interface). Windows 11 asks for UEFI mode. On the EFI system, Windows can only install on GPT disks, mainly because the BIOS mode corresponds to the MBR partition table, and the EFI mode corresponds to the GPT partition table.
Only a GPT disk which is used as a system disk there would have an EFI partition as an OS boot partition. Thus, if you’re using an MBR disk as your system disk, you’ll face many problems when you upgrade or install Windows 11.
How to convert a disk to Windows 11 default partition type
Users can convert the disk partition type for Windows 11. Usually, you have two options, doing the conversion via Windows built-in tool or a third-party tool. So, in this part, we’ll show these two ways to help you set your disk.
1. Convert partition style via Disk Management
Disk Management has the converting feature for Windows users. However, this might be better for a new disk. This function needs users to clear all partitions on that disk, you’ll lose all data on the disk. Make sure you have made a backup before you choose this tool.
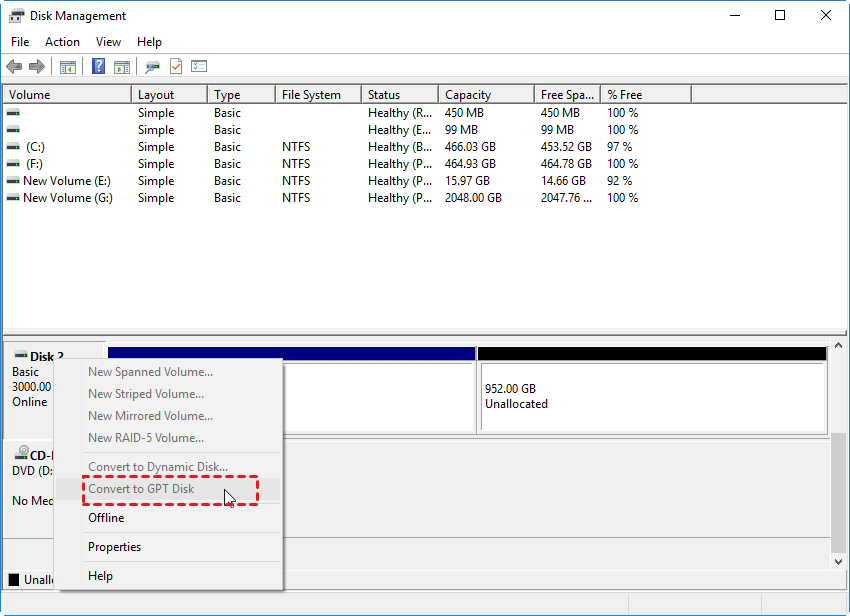
Step 1. Right-click “This PC”, click “Manage”, and choose “Disk Management”.
Step 2. Right-click the disk you want to convert, select “Delete Volume”.

Step 3. After you clean the disk, right-click the target disk again, select “Convert to GPT disk”.
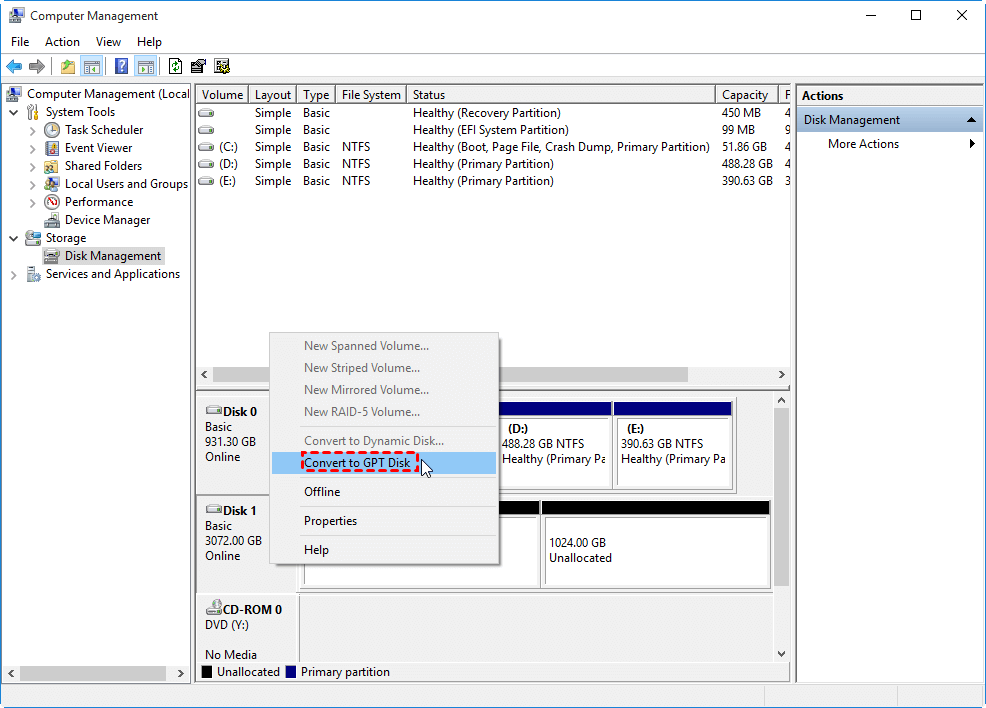
And sometimes, the “Convert to GPT Disk” button is greyed out in the menu. Except for the reason we’ve said there’re partitions on the target disk, the other reason is the opted disk has system files.
2. Convert to GPT without any data loss
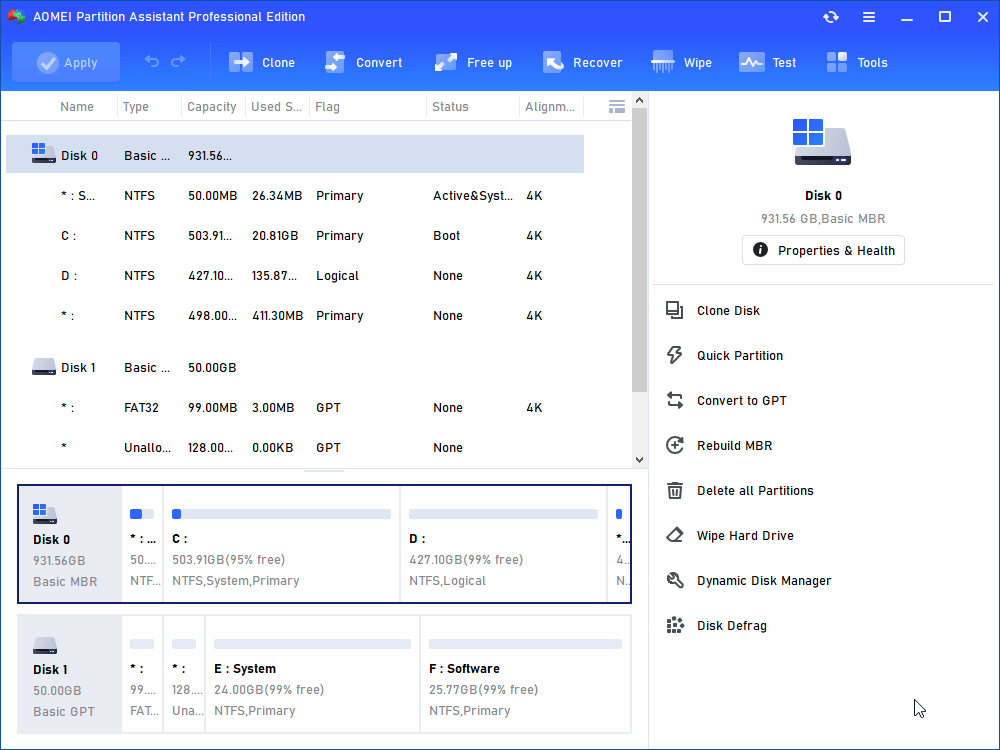
To avoid such limitations in Disk Management, we suggest you try AOMEI Partition Assistant Professional, it is a versatile disk and partition manager devised for Windows users to manage their disks. You can convert the target disk from MBR to GPT without any data loss, even it is a system disk.
1. To avoid data loss caused by wrong operations, back up everything necessary in advance.
2. Don’t forget to change the boot mode after the conversion.
Step 1. Install and launch the program. In the main window, you should right-click on the disk that you want to convert and choose "Convert to GPT" or directly click the disk and choose "Convert to GPT" from the right column
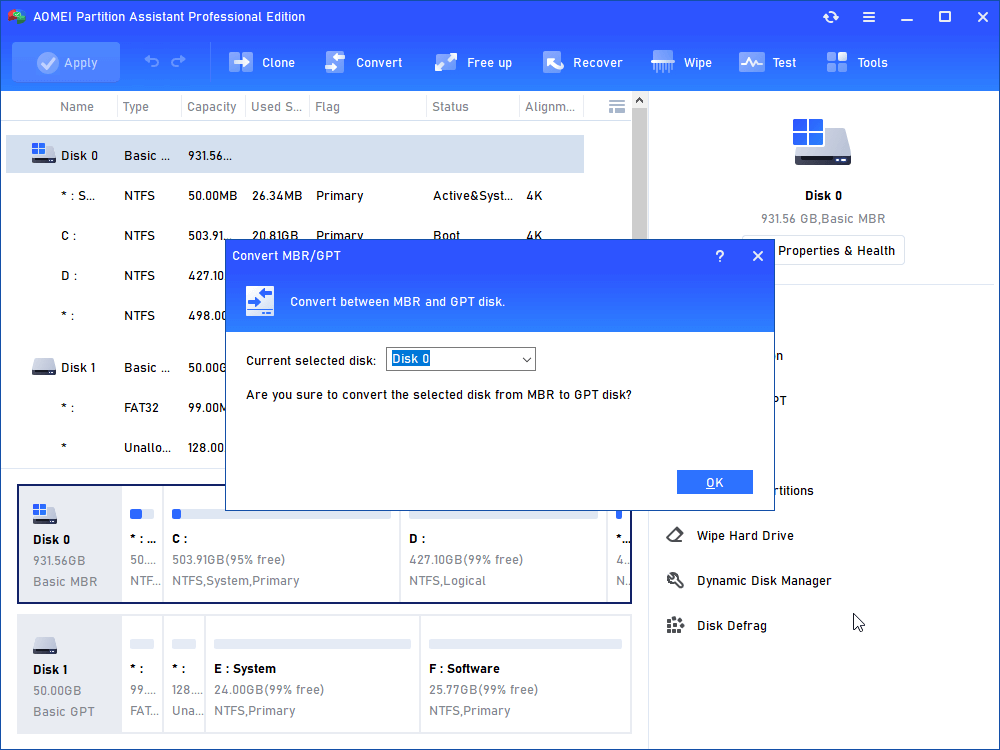
Step 2. Click “OK” to confirm.
Step 3. Click “Apply” to commit your operation.
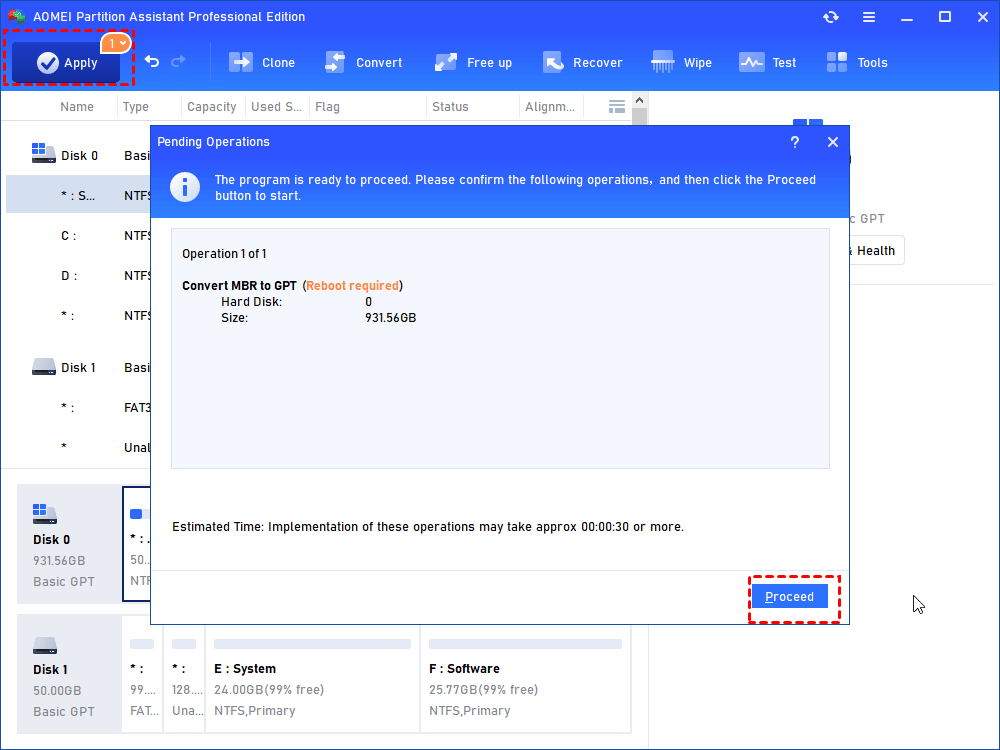
After the conversion, you can change the boot mode from Legacy to UEFI.
How to check the computer boot mode?
Since Windows 11 requires UEFI boot mode, so, you need to check what boot mode your PC currently uses.
Step 1. Press the Windows + R keys at the same time. Type MSInfo32 in the Run box and hit Enter.
Step 2. This operation will open the System Information window. Find the BIOS Mode, check whether it displays as UEFI or Legacy.

If your computer's boot mode is UEFI, it will appear as such. If your computer's boot mode is BIOS, it will display as Legacy.
How to change the boot mode to UEFI
To convert the boot mode to UEFI, follow the instructions outlined here. This technique will not affect your data.
Step 1. Shut down and restart your computer.
Step 2. Continue hitting the F2 key until the BIOS Setup Utility screen appears.
Step 3. Select Boot from the Boot menu, then use the up and down arrows to select UEFI mode and press Enter.
Step 4. To save your changes and exit the screen, hit F10.
How to enable Secure Boot for Windows 11
After you've converted the boot mode to UEFI, you need to enable Secure Boot. It is also a must for users who wish to upgrade to Windows 11.
Step 1. Type Advanced startup in the Windows search box. Then choose Change Advanced Startup Options.
Step 2. On the first screen, select Recovery > Advanced Startup. Click the Restart Now button.
Step 3. Your computer will restart with the following screen; click Troubleshoot.
Step 4. Under Troubleshoot, select Advanced options.
Step 5. Select UEFI Firmware Settings.
Step 6. After selecting UEFI Firmware Settings, the machine will reboot or prompt you to restart it. When you click Restart, the computer will boot into BIOS and display new BIOS settings.
Step 7. Under the BIOS settings, select the Security tab.
Step 8. Use the Up and Down arrows to choose the secure boot option, then set it to Enabled.
Final words
Changing to the default partition style of Windows 11 is not a difficult operation if you select the correct tool according to your needs. AOMEI Partition Assistant also has other practical functions: clone MBR disk to GPT disk, move programs, migrate OS… And Windows Server users can use Sever edition to manage their devices.

