[Full Guide] How Can I Mount NTFS On Mac?
Users can discover how to gain NTFS write support for Mac. This overview explains the best methods for mounting drives on macOS to ensure seamless file editing and full disk compatibility.
By Irene / Updated on January 4, 2026
Reddit: How to mount NTFS on Mac?
Mount NTFS on Mac
Does anyone know how to install NTFS for Mac? I am unable to use my Seagate Hard Drive on my MacBook. I tried enabling system extensions as instructed by the NTFS instructions; however, I encountered error messages. Any help would be appreciated. Thanks.
- Question from www.reddit.com
Mounting NTFS on a Mac means setting up a Windows-formatted NTFS drive so it can be fully used on macOS. In a common Reddit case, a user shared that their Seagate external hard drive could not be used on a MacBook after connecting it. Although the drive was detected, it could not be written to, which led the user to install NTFS for Mac software.
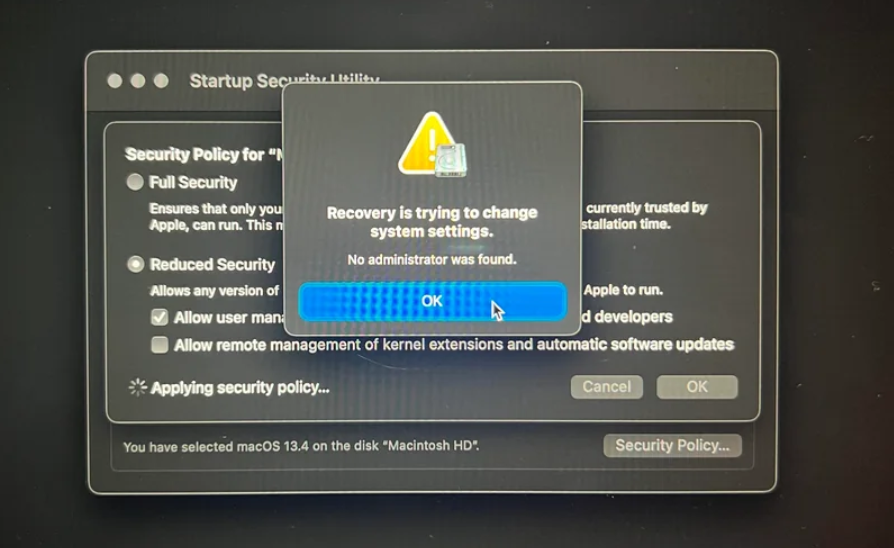
Following the software instructions, the user tried to enable system extensions, which are required for NTFS drivers to work properly. However, during this process, macOS showed an error message saying that Recovery was trying to change system settings related to Startup Security. This message usually appears on newer Macs when the system blocks changes for security reasons.
Reddit users replied that this issue does not mean the drive or software is broken. Instead, it happens because macOS requires extra permission to load third-party NTFS drivers. To successfully mount the NTFS drive with full read and write access, users often need to restart the Mac into Recovery Mode and adjust the security policy to allow system extensions. Once these settings are correctly configured, the NTFS drive can mount normally and become fully usable on a Mac.
🔥Use the best software to mount NTFS on Mac
If you see the error message saying "Recovery is trying to change system settings" in Startup Security Utility, it may be time to use a more reliable alternative. PartitionAssistant NTFS for Mac is one of the best tools for mounting NTFS drives on a Mac because it works smoothly with macOS security rules. Unlike some untrusted NTFS software that can trigger error messages about “Recovery is trying to change system settings in Startup Security Changes,” PartitionAssistant uses properly signed system extensions or modern macOS frameworks. This means it does not require risky changes to the system and can load its NTFS driver safely.
As a result, Mac users can connect Windows-formatted drives and gain full read and write access without running into errors or system warnings. The software combines ease of use with stability, making it a reliable choice for anyone who needs to use NTFS drives on a Mac.
Part 1. Correctly configure the Security Policy in iOS Recovery Mode
If you want to mount NTFS Mac write access, you need to first correctly configure the Security Policy in iOS Recovery Mode. Here are the steps:
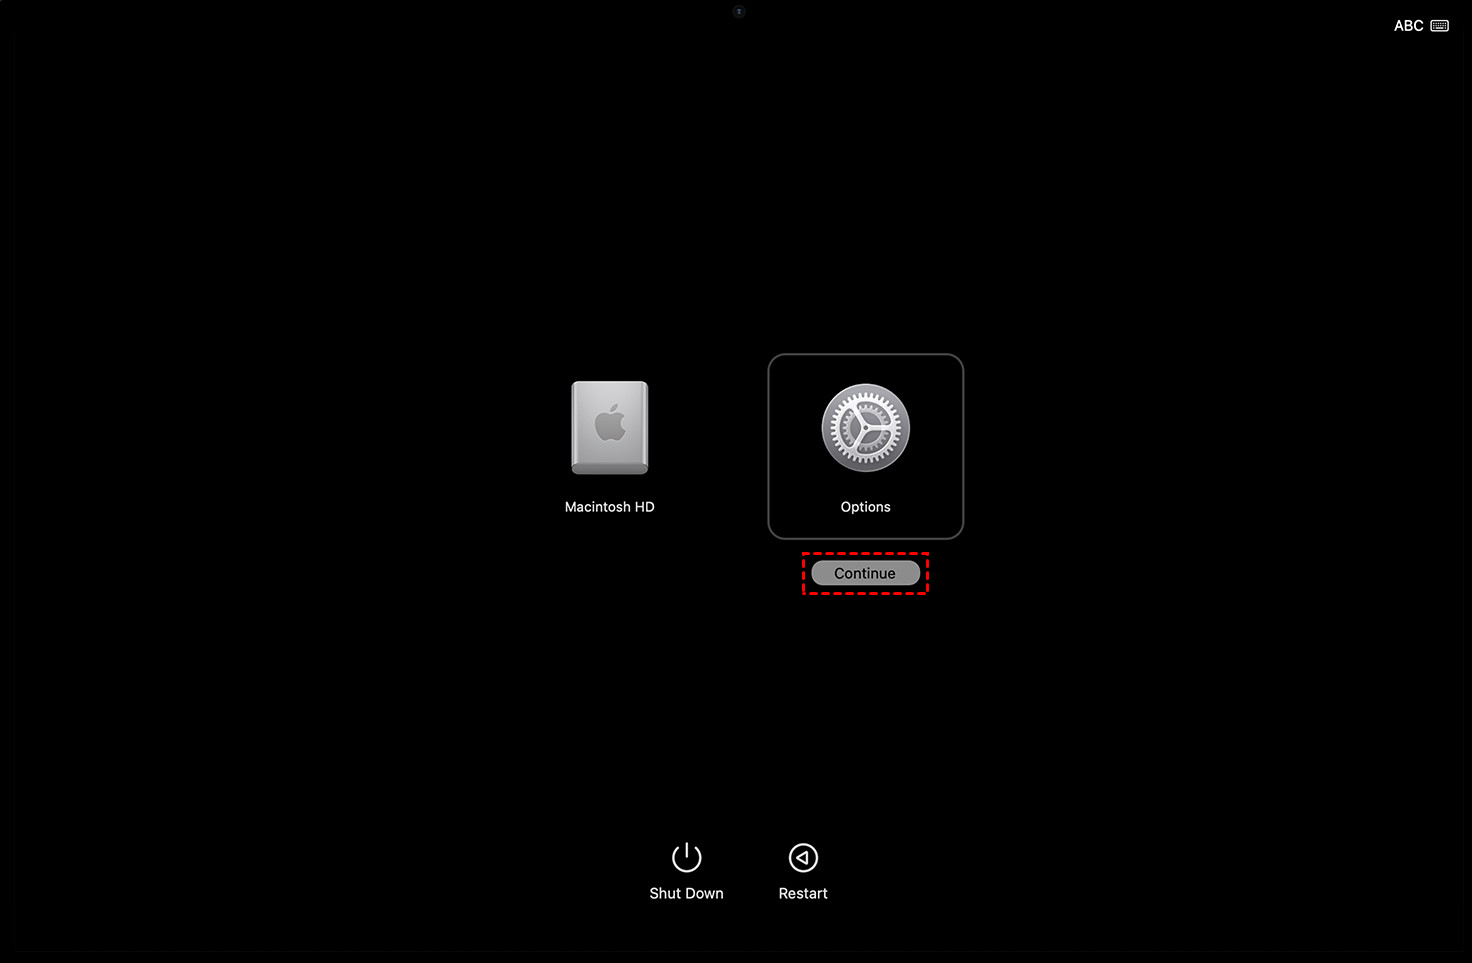
Step 1. Enter Recovery Mode Completely shut down your Mac, then press and hold the power button until the Startup Options screen appears, click the "Options" gear icon, and then click "Continue" to boot into macOS Recovery Mode.
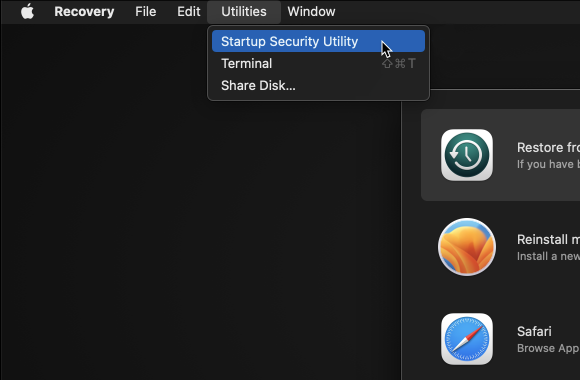
Step 2. Open the Startup Security Utility In the top menu bar, click "Utilities" and select "Startup Security Utility", then choose your administrator account and enter the password if prompted to open the security settings for your startup disk.
Step 3. Configure Security Policy Click "Security Policy", select "Reduced Security", and check the box for "Allow user management of kernel extensions from identified developers"; optionally, check the second box for remote management if needed.
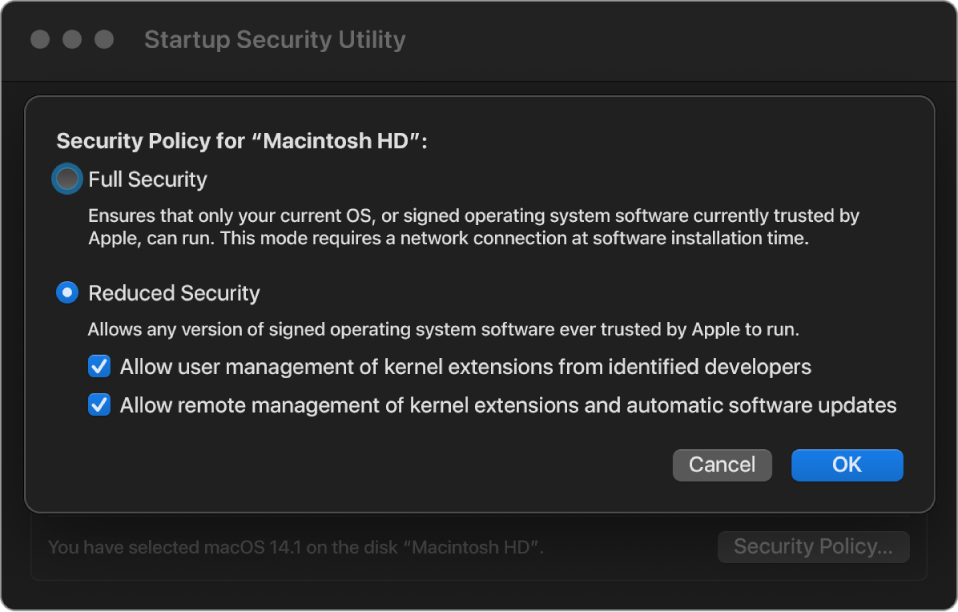
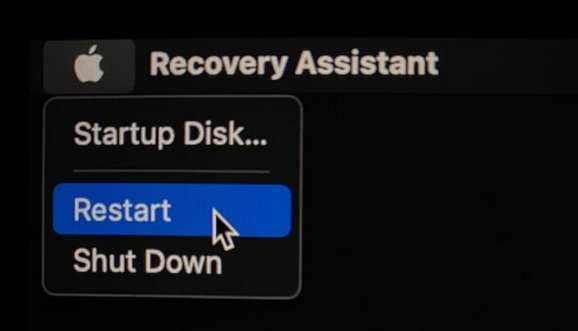
Step 4. Save and Exit Click "OK" to save your changes, close the Startup Security Utility window, then click the Apple icon and select "Restart" to boot back into macOS.
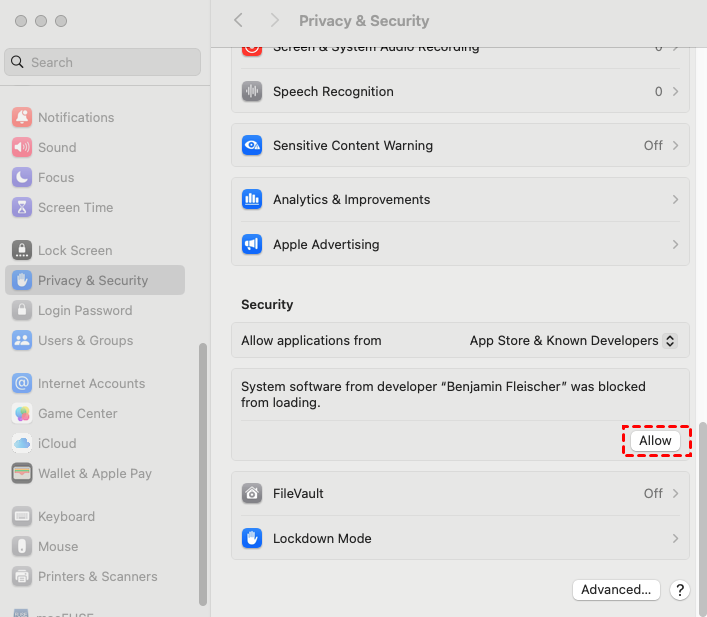
Step 5. Adjust Privacy & Security Open System Settings, go to "Privacy & Security", click "Allow" under the Security section, follow any on-screen instructions, and restart your Mac if prompted, then you can use PartitionAssistant NTFS for Mac to mount and write to NTFS drives.
Part 2. Run PartitionAssistant NTFS for Mac to read and write files
After configuring the Security Policy in iOS Recovery Mode, you can now follow to learn how to write to NTFS on Mac with this powerful software. PartitionAssistant NTFS for Mac gives you full read and write access to NTFS drives, allowing you to copy, move, and edit files easily without any complicated workarounds.
It is fully compatible with the latest macOS versions and uses a stable, reliable driver that keeps your system safe and running smoothly. The interface is simple and intuitive, so even beginners can mount drives, format external hard drive partitions, and manage files quickly. The software can handle large files and multiple drives, making it ideal for professional use, backups, and media storage. By using PartitionAssistant NTFS for Mac, you avoid risky Terminal commands and unstable free solutions, saving time and protecting your data. Fast, stable, and user-friendly, it is one of the best choices for anyone who needs full NTFS access on a Mac.
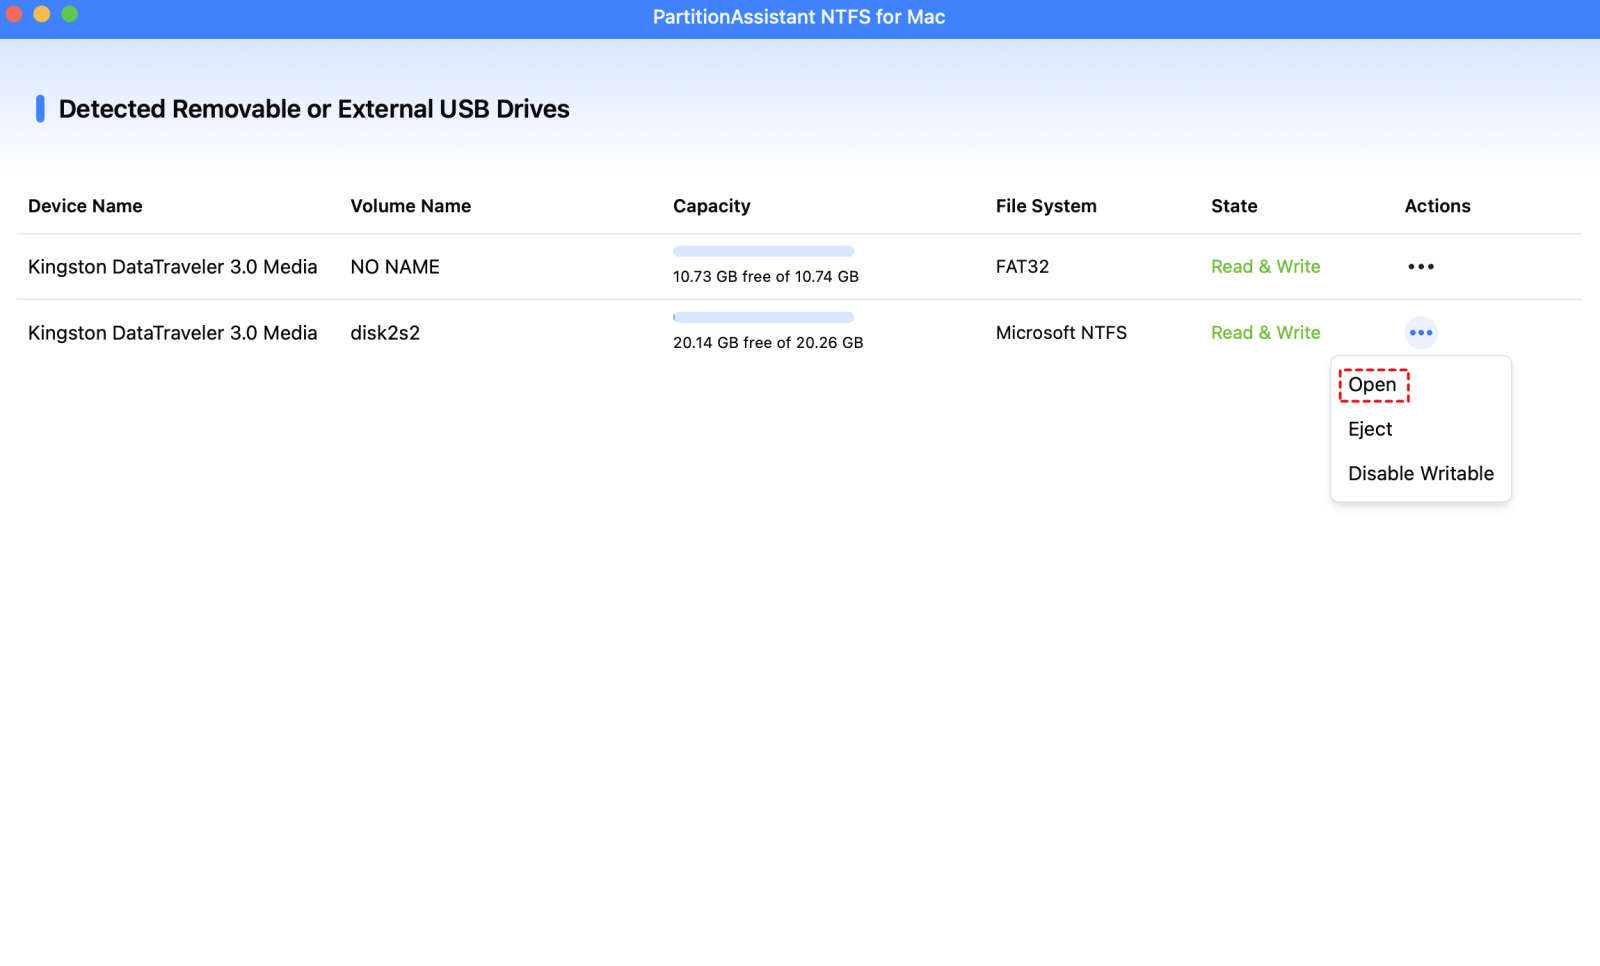
Step 1. Install and launch PartitionAssistant NTFS for Mac, then connect your external hard drive. All connected drives will be mounted and displayed, giving you full access permissions on the drive.

Step 2. Select the drive you want to mount NTFS on Mac and click "Open".
Now you can also copy, delete, and rename files on the external hard drive.
After all operations are complete, please click "Eject" to disconnect the external hard drive from your Mac. But the permissions are enabled, you can still access your NTFS on your Mac.
The software includes a "Safe Eject" button that ensures permissions stay intact when unplugging the drive, preventing issues the next time you use it.
- ★Related article: What Does Eject Mean on Mac
Conclusion
Mounting NTFS drives on a Mac doesn’t have to be complicated. By adjusting the Security Policy in Recovery Mode and using PartitionAssistant NTFS for Mac, you can easily get full read and write access to your Windows-formatted drives. The software is simple, stable, and works well with the latest macOS versions, letting you copy, move, and manage files without any errors. With PartitionAssistant NTFS for Mac, you can safely use your external drives on a Mac and enjoy a smooth, hassle-free experience every time.
FAQs
1. Can macOS write to NTFS drives by default?
No, macOS can only read NTFS drives by default. To write data to an NTFS drive, you need third-party NTFS software like PartitionAssistant NTFS for Mac.
2. How do I mount an NTFS drive on Mac?
You can mount an NTFS drive on Mac by connecting the drive and using a third-party NTFS driver. The software will allow full read and write access without errors.
3. Why can’t I copy files to my NTFS drive on Mac?
If your NTFS drive is read-only, it is because macOS does not allow writing to NTFS natively. Installing an NTFS driver and configuring the system security settings in Recovery Mode can fix this.
4. Is it safe to use NTFS software on Mac?
Yes, trusted software like PartitionAssistant NTFS for Mac is safe. It uses signed drivers or modern macOS frameworks, allowing full NTFS access without causing system errors.
5. Do I need to change system security to use NTFS on Mac?
Yes, on newer Macs, you may need to adjust the Security Policy in Recovery Mode to allow loading of third-party kernel extensions. Once configured, NTFS drives can be mounted and used normally.

