How to Create Recovery Drive Windows 11
It is always a good idea to create recovery drive Windows 11 in case of any hardware failure or unexpected boot issues happened in your computer. Refer to this post to learn how to create Windows 11 recovery drive to help you get out of such problems.
By Hedy / Updated on May 12, 2023
Why need to create recovery drive Windows 11?
A Windows 11 recovery drive refers to a bootable disk (CD/DVD) or USB flash drive that leads you to Windows Recovery Environment (WinRE) for a series of operations. Usually, you may need to create recovery drive Windows 11 when you encounter some tricky problems (like reset this PC not working) on your Windows 11 computer, even if your PC is unbootable.
The remarkable merit of using a recovery drive is that it contains many advanced recovery options, such as Startup Repair, Safe Mode, System Restore, and Command Prompt, with which you can troubleshoot many system errors and even reinstall Windows 11.
[Stepwise] How to create recovery drive Windows 11?
To make a recovery drive in Windows 11, we recommend you use an empty USB flash drive that has at least 16 GB. And then follow the below content to learn how to create recovery USB Windows 11 without downloading other tools.
Important: Please note that the recovery USB will not back up any personal files and third-party apps you installed by yourself.
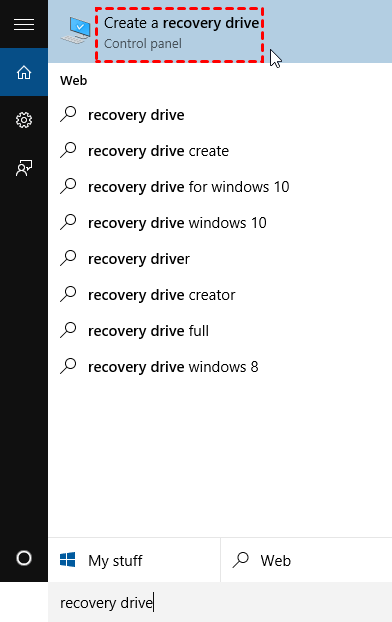
Step 1. Connect the prepared USB drive to your PC. Type "recovery drive" in the search bar and select “Create a recovery drive” from the result.
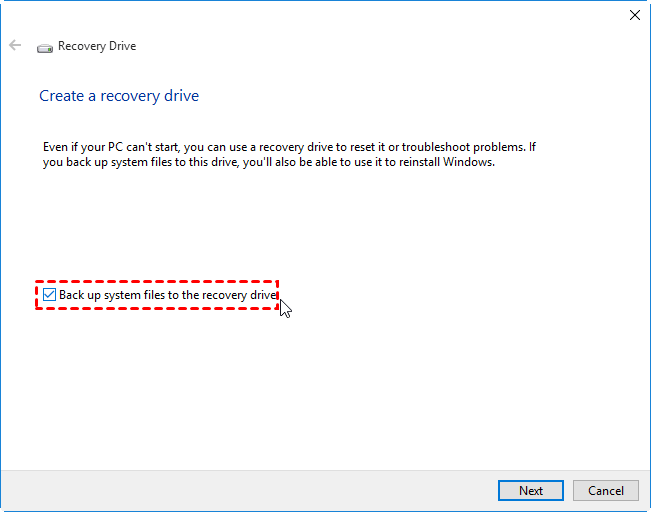
Step 2. When the tool opens, tick the "Back up system files to the recovery drive" option and select "Next".
Step 3. Select your USB, and then select "Next". Click "Create" to begin to create a recovery drive windows 11. The specified files need to be copied to the recovery USB, so this process might take a while.
Error: Create recovery drive Windows 11 failed
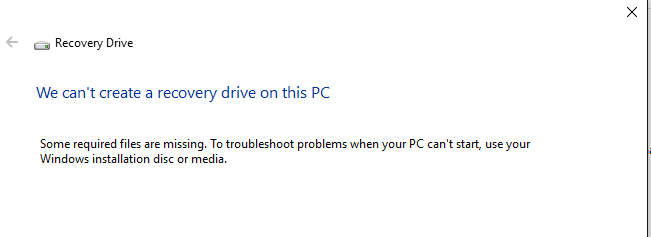
However, numerous users complained that they often failed to create a recovery USB Windows 11. During the creation process, they often receive an error message saying "We can't create a recovery drive on this PC" with a specific description, such as "Some required files are missing", "Recovery drive not working", "Create Recovery drive stuck", and so on.
The failure of making a recovery disk may be caused by various factors. For instance, your USB is not well-connected or not formatted; the USB is corrupted; the winre.wim file is missing; there are viruses and malware; etc.
Although you can check and fix these errors one by one, it's laborious and time-consuming. Therefore, there is an easier workaround in the next part, which can also help you resolve many tough issues when your PC is unbootable.
Alternative way to create Windows 11 bootable repair disk (Recommended)
A powerful Windows 11 repair creation tool named AOMEI Partition Assistant Professional should be the best alternative way to make a Windows 11 repair USB. This software is not only compatible with Windows 11, but also with Windows 10/8/8.1/7/XP/Vista systems. Thus, you can create a recovery disk from another computer.
When you launch AOMEI software on a running PC, you can see a range of features on the interface, with which you can deal with different problems. One of the functions is called "Make Bootable Media" which allows you to make a USB bootable with AOMEI Partition Assistant preinstalled on it.
Once you boot from this drive, you will enter into the AOMEI operating interface automatically, then you can begin to use all the features based on your situation.
Below is a demo version and steps to create recovery drive windows 11 via AOMEI Partition Assistant.
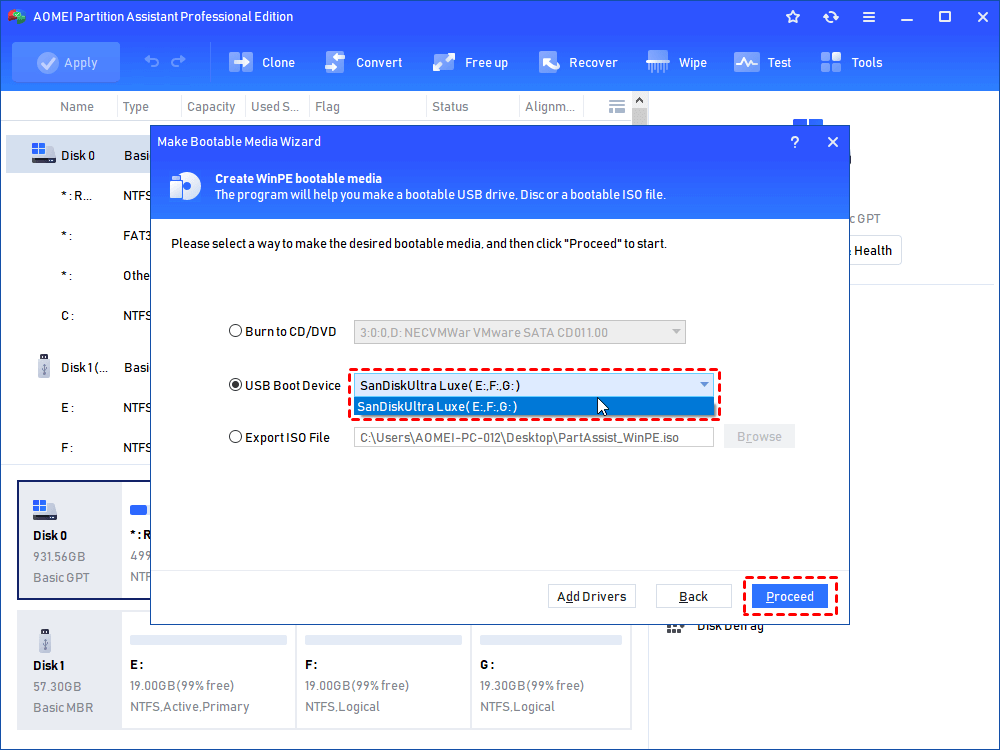
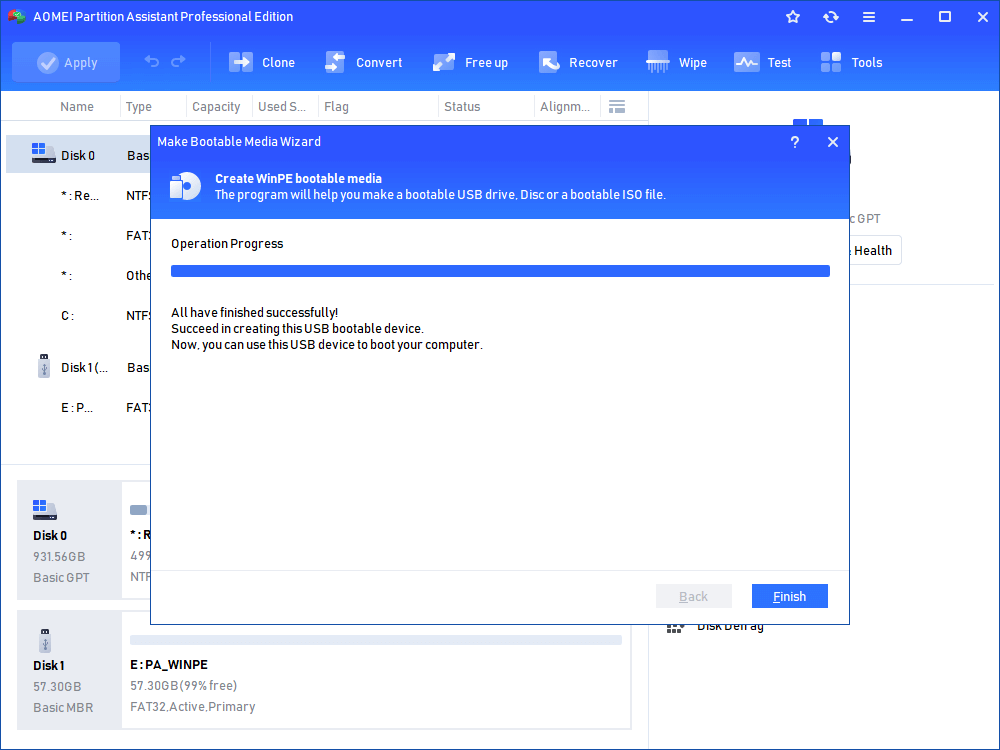
Step 1. Insert the prepared USB flash drive into a running computer. Install and run AOMEI Partition Assistant Professional. Click "Tools"> "Make Bootable Media" in the top panel and click "Next".

Step 2. Choose your prepared USB in "USB Boot Device" section and click "Proceed" to create Windows 11 recovery drive.
Step 3. Wait for the operation process patiently, click "Finish", and then, you will get a bootable repair USB for Windows 11.
After that, you can use it to do some repairing tasks including:
➹ Delete/format/clone/resize/move partition
➹ Rebuilding corrupted MBR
➹ Check disk errors
➹ Wipe hard drive clean for reuse
➹ ......
Conclusion
As you can see, it's easy to create recovery drive Windows 11. Now, you can follow the tutorial and create one on your own so that you can restore and reset your system in case of any future corruptions. To evade the creation failure of recovery USB with Windows built-in feature, this post provides you with a third-party tool called AOMEI Partition Assistant Professional to help you make a bootable repair disk.

