How to Speed Up Windows 11? [5 Advanced Methods]
How to speed up Windows 11 when it loads and runs slowly after upgrading from Windows 10? Here methods are worth trying.
By AOMEI / Updated on September 14, 2024
Why does the Windows 11 perform slow?
Windows 11 was finally out in the October, 5th in 2021 and has brought along many new features such as the centered Start menu and Taskbar, which makes many users decide to upgrade Windows 7, 8, or Windows 10 to the newest operating system. However, some of them find the Windows 11 runs slowly and are urgent to know how to speed up Windows 11 laptop or desktop.
That’s exactly what we will talk about in this post. First of all, you may want to know the common reasons for a slowed-down Windows 11 device.
⇒Malware and viruses- If you always download and install apps from untrusted source, there are chances that some malware or viruses are automatically install (often silently) and infect your computer.
⇒Running out of RAM- The Random Access Memory (RAM) is stored on a memory chip typically on the motherboard. It is the hub of storage for all active and running programs/processes. The computer will use the information stored in RAM to complete task while simultaneously receiving and performing other functions. When it is used up, the Windows 11 computer will slow down since it does not have the necessary storage to complete the task.
⇒Too many fragments- The disk partition fragmentation will occur when a file is broken up into pieces to fit on the disk and those files are constantly being written, deleted or resized. If each file is spread out over several location, it will take longer to read and write, as a consequence, the Windows 11 computer will slow down.
⇒Running out of boot partition space - If the boot partition, usually the C drive, is full of all kinds of programs/applications, apart from the operating system, the Windows 11 cannot run or load smoothly, either.
⇒Running out of disk drive space - When all the disk space is used up, like the RAM space, the computer performance will be affected undoubtedly.
3 Effective methods to speed up Windows 11
From above, we learn the possible causes behind the Windows 11 slowing down issue. Now, it’s time to take some measures. In the first place, you can try some easy tricks: run a reliable anti-virus tool to eliminate the potential malware and viruses, uninstall unnecessary apps, etc. If they do not make obvious difference, please try the following methods to speed up Windows 11 computer.
Method 1. Free up RAM on Windows 11
To free up RAM on the Windows 11 computer and make it faster, the following ways are recommended.
1.1. Track Memory and Clean Up Processes
It is advised to monitor the computer RAM usage so that you don’t deplete your supply before you really need it. You can navigate to the task manager to check the process. Here you can see which programs are running and what kind of space they are taking up.
Step 1. Hold the “Ctrl+Alt+Del” keys to open the Task Manager.
Step 2. Select the “Processes” tab.
Step 3. Click the “Memory” column to view how much space each program is taking up. You can also click on “RAM” to sort them by the amount of memory they're taking.
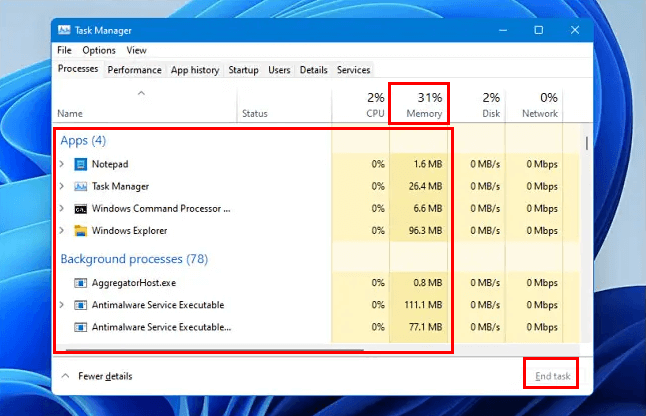
Then you can choose to end the program that is taking up the most time and space on your computer.
1.2.Disable Startup programs you don’t Need
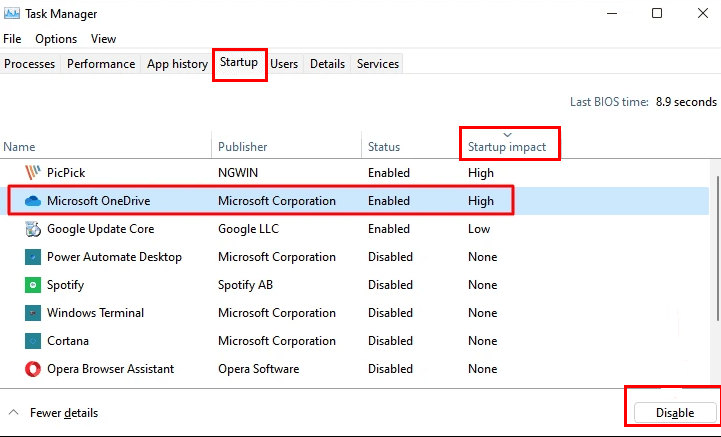
If there are too many programs loading automatically once the computer is booted up every time, each of them will eat up a little bit of RAM in the background without your consent, resulting in slow computer performance. In such a case, you can disable some unnecessary programs from the "Startup" tab in Task Manager.
Step 1. Select the "Startup" tab from the Task Manager.
Step 2. Click "Startup impact" to organize the programs from high to low usage.
Step 3. Right-click any programs that you don’t need and click on "Disable".
1.3. Turn off Visual Effects
By default, Windows 11 uses animation effects for controls and elements. If your computer has less than 4GB of RAM, you had better disable the Visual effects since the visual elements of Windows 11 take up a lot of RAM resource and slow down the devices.
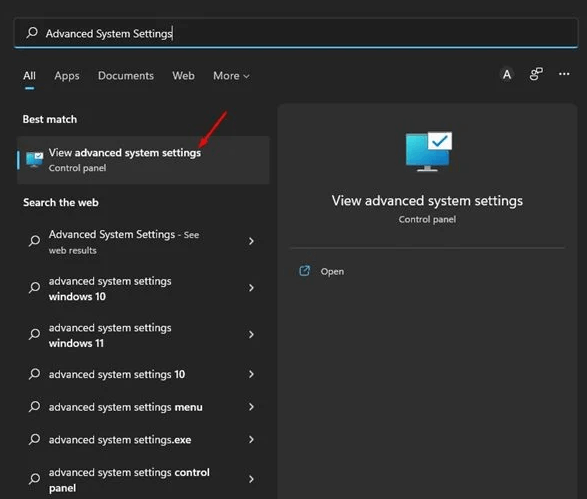
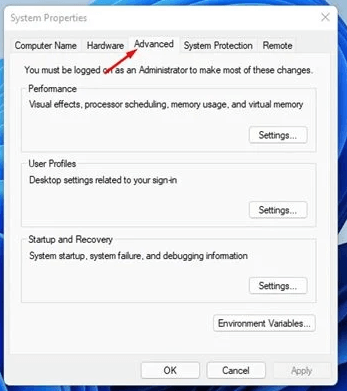
Step 1. Click on the Windows 11 search and type in Advanced System Settings. Next, open the "View Advanced System Settings" option from the list.
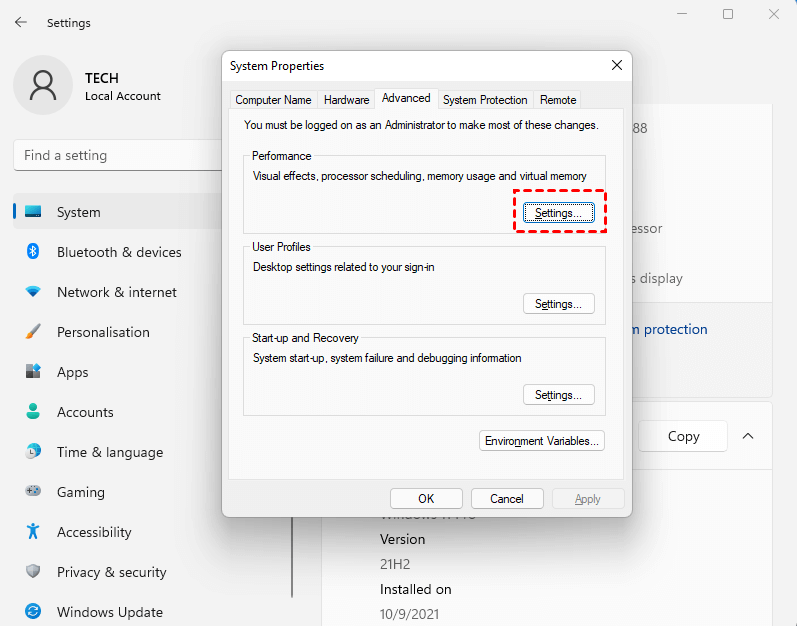
Step 2. On the System Properties popup window, access to the "Advanced" tab.
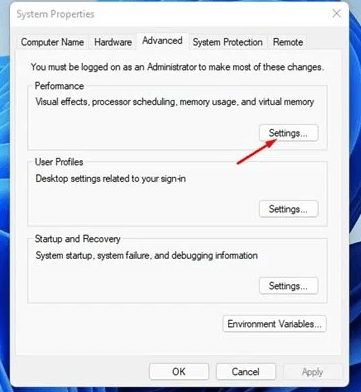
Step 3. Click on the "Settings" button under the "Performance".
Step 4. On the Performance option, you can select the "Adjust for best performance". Or check or uncheck the following visual elements as you need.
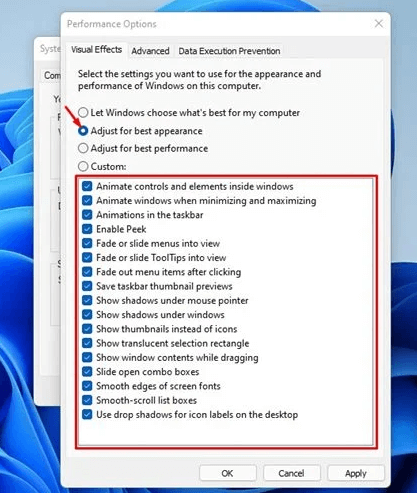
After making the changes, click on the "Apply" button then on "OK". Then you will retrieve more RAM storage.
Method 2. Increase virtual memory
Apart from freeing up RAM, you can also increase virtual memory in Windows 11 to speed up Windows 11 computer.
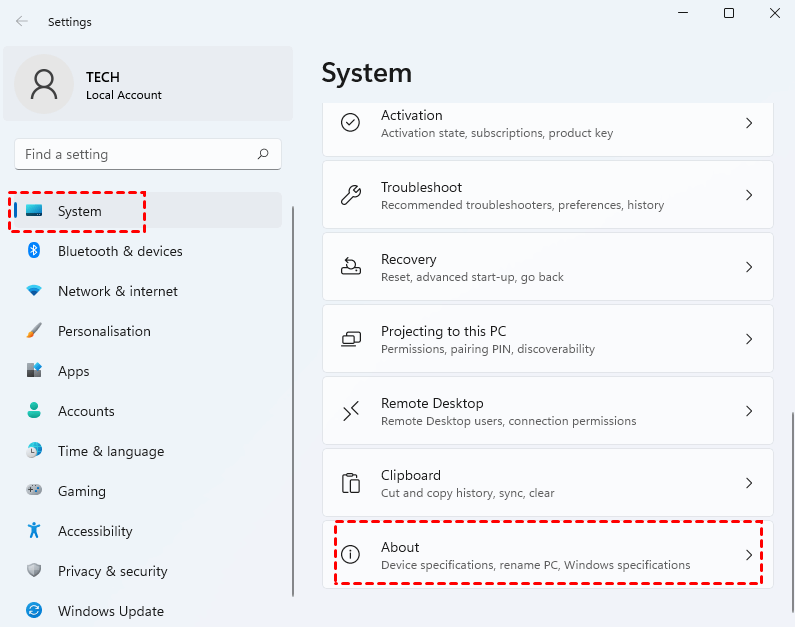
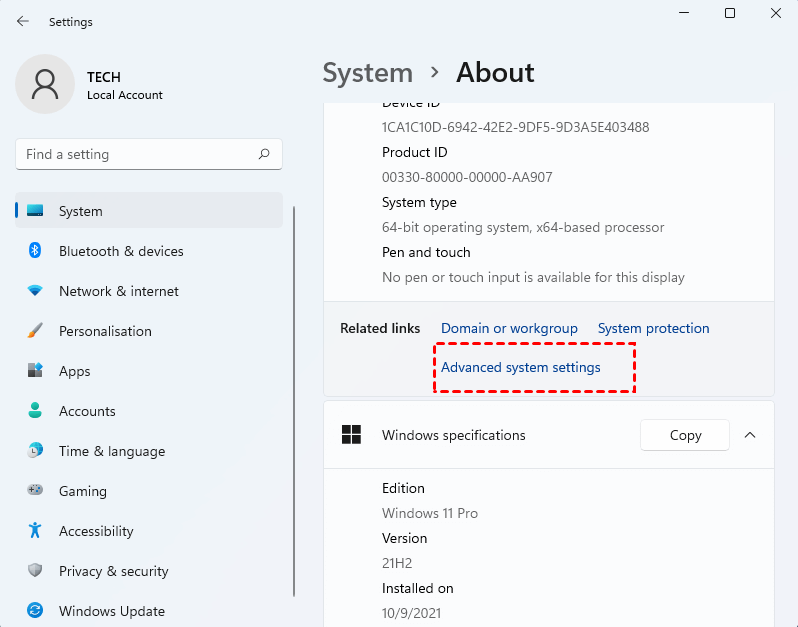
Step 1. Open Settings on your Windows 11 computer, click on "System" option and access to "About Section".
Step 2. Click on "Advanced system settings" on the right pane.
Step 3. Access to "Advanced" and locate the "Performance" section. Click on "Settings" in the Performance section.
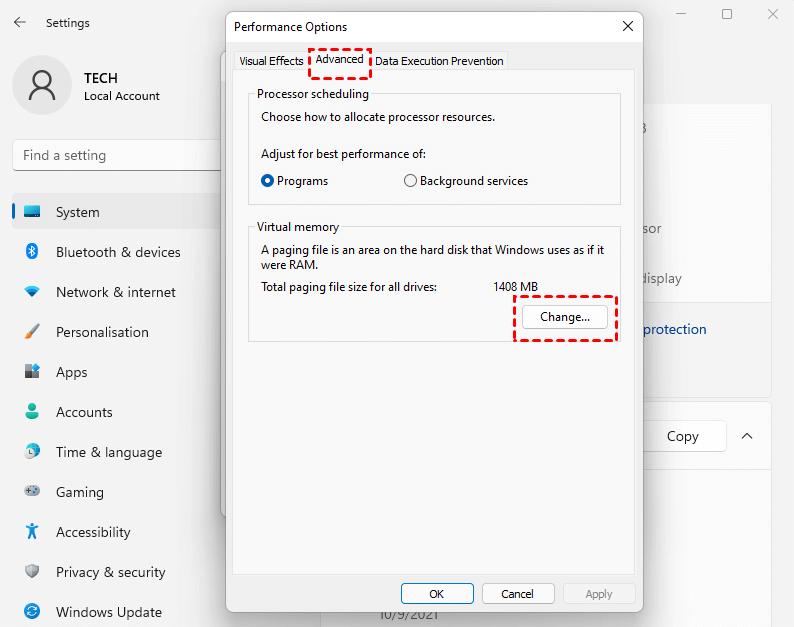
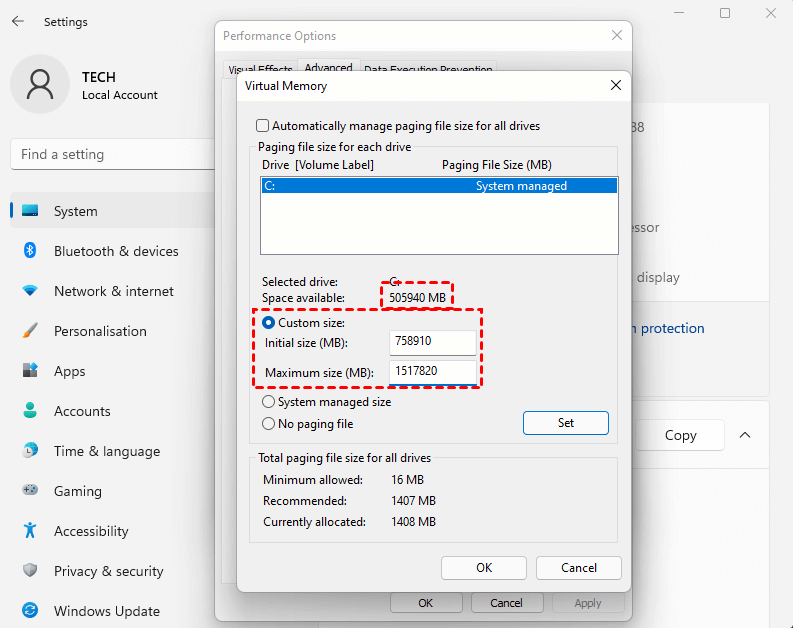
Step 4. Go to the Advanced tab again. Click the "Change" button under the Virtual memory section.
Step 5. Uncheck the "Automatically manage paging files size for all drives".
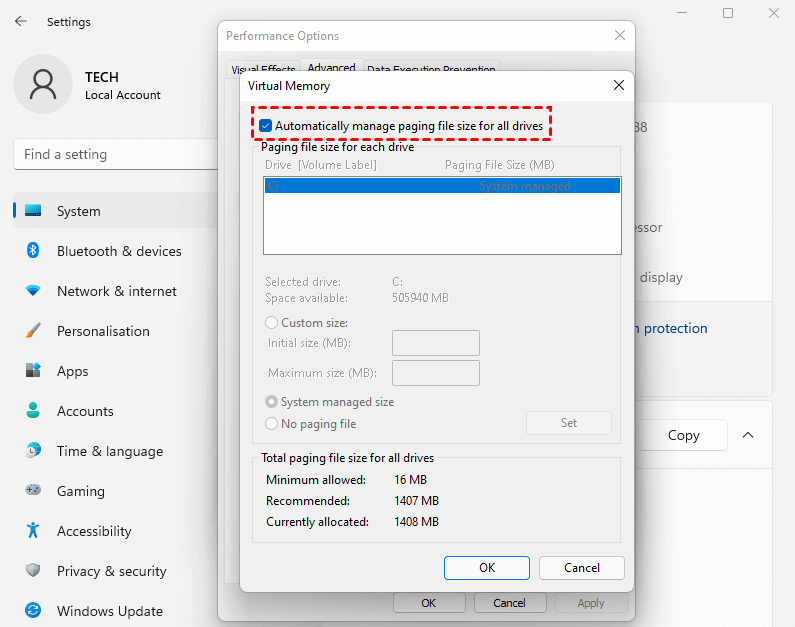
Step 6. Select the "Custom size" option. Change the Initial size and Maximum size for your virtual memory.
- Note:✎...
- The initial and maximum sizes are specified in megabytes. You had better adjust the initial size of the virtual memory as one and a half times the total available memory, and set the maximum size as three times the available memory.
Then click on "Set" and “OK” in this window. At last, you need to click on the "OK" button once again to make the change take effects.
Method 3. Defrag the Windows 11 hard drive
Windows 11 comes with a built-in tool to defragment your storage device. To do so, follow the steps below:
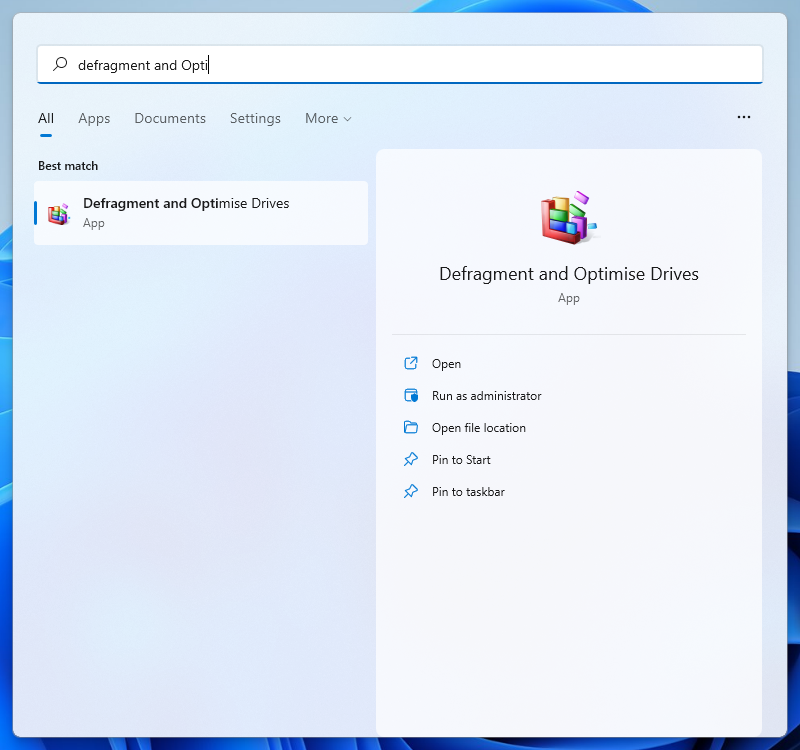
Step 1. Type "Defragment" in the search box, and open the "Defragment and Optimise Drives" app.
Step 2. Here, you can see the current status of the periodic defragmentation of your storage, their current status of fragmentation, and the last analysis of the drives. It will take a few minutes to analyze your drive, wait till it is completed.
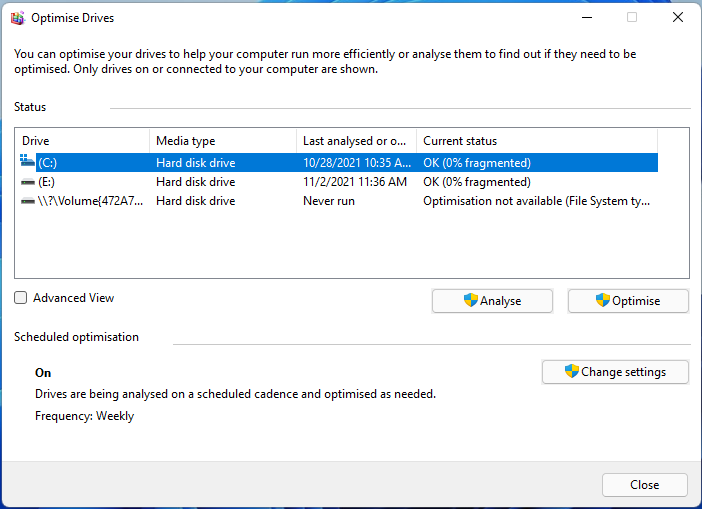
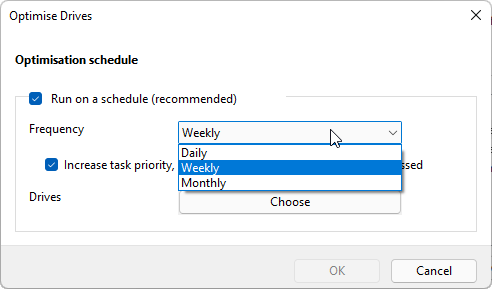
Step 3. After the analysis is completed, if the "Current Status" columns display "OK" next to your selected drive, your drive does not need defragment the drive. To manually defrag one of the drives, select it and click on the "Optimize" to start the defragmentation. Defragmenting the drive will help speed up the Windows 11 boot and load. You can also turn on “Scheduled optimization” to defrag and optimize your drives as scheduled in daily, weekly and monthly.
If you think the options cannot meet your specific requirements, you can switch to a more professional tool named AOMEI Partition Assistant Professional.This partition manager provides the disk defrag as well, but more powerful with more schedule options. Now, you can download the demo version and have a try.
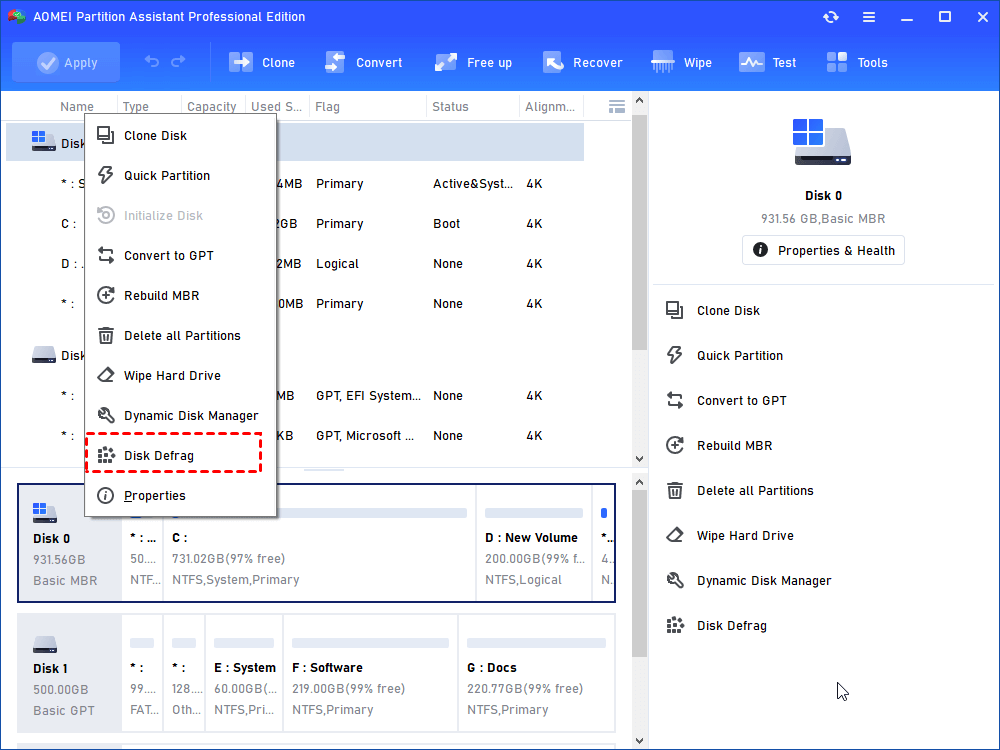
Step 1. Install and run AOMEI Partition Assistant Professional. Right-click on the disk and choose “Disk Defrag”.
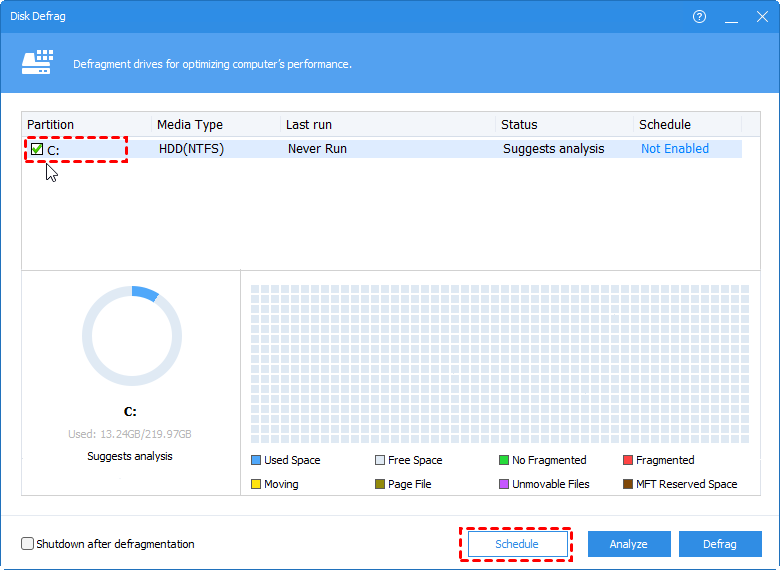
Step 2. In the "Disk Defrag" window, hit "Schedule".
Step 3. Now, select the drive you want to optimize and decide whether to run disk defrag at a specific time daily, weekly or monthly.
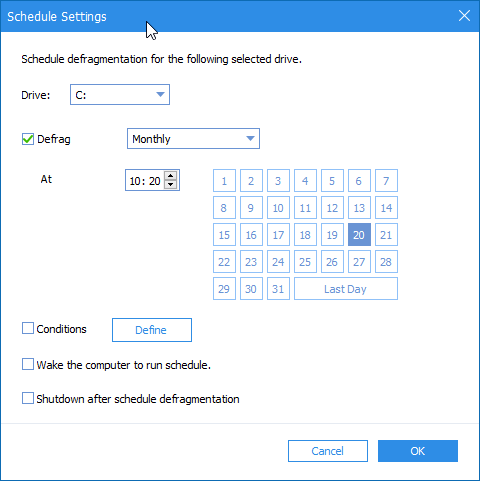
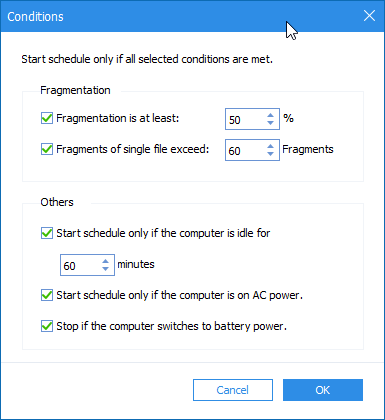
Step 4. Besides daily, weekly and monthly schedule, you can also determine whether to defrag the drive at startup or at logon. Click "Conditions", you can set conditions in which the disk defrag will be triggered as you prefer.
Method 4. Extend boot partition
To make sure the boot partition has enough free space is also an effective way to speed up Windows 11 computer. If your system partition is now running out of space, you can enlarge it with free unused space of other partitions, like D drive. For this task, the AOMEI Partition Assistant can also be a great choice since it comes with the "Allocate Free Space", allowing you to directly transfer free space from one partition to another one without losing data.
Step 1. Launch the software, right-click the drive that has enough free space, like D partition, and select "Allocate Free Space".

Step 2. Then, you can set how much space you want to transfer from D to C in MB, and click on “OK”.

Step 3. Click "Apply" and "Proceed" to commit the pending operation.

Wait for the process to be finished. After that, your Window 11 computer performance will be enhanced. Besides, if there is already some unallocated space on the hard drive, you can also combine it into C drive via the "Merge Partitions".
Method 5. Upgrade Windows 11 hard disk
If your Windows 11 was installed on a traditional hard disk drive and has been used for a long time, it is possible that the hard drive is almost full and old. Then it needs to be replaced with a new larger one, or upgraded to a faster SSD, especially you are eager to speed up Windows 11 for gaming. But how to finish the disk upgrade or replacement? Does that mean re-installing everything including the Windows 11 operating system?
That depends. If you don’t want to perform a clean install with costing much time and effort, you can also turn to AOMEI Partition Assistant Professional. It has the "Disk Clone Wizard". enabling you to clone one disk to another one without losing any data. Moreover, the cloned disk is bootable as well so you can boot from the new disk successfully. The detailed steps are listed:
- Preparations:✎...
- Cloning process will erase all data on the destination hard drive, so back up everything important in advanced. For this task, the free AOMEI Backupper is recommended.
- Connect the destination hard drive to your Windows computer and make sure it is detected.
- To make sure you can boot from the cloned disk afterwards, you can convert the disk to GPT/MBR, making it same as the source disk’s. Or you will have to change the boot mode between Legacy Bios and UEFI to be compatible with the boot disk partition style..
Step 1. Install and launch AOMEI Partition Assistant, click "Clone" in the main interface, and select "Clone Disk".

Step 2. Choose the hard disk that you need to clone as the source disk and click "Next".

Step 3. Select another drive as the destination disk, and then click "Next".

Step 4. Then, you can check the source and destination disk in the next window or change to "Sector to Sector clone", and click the "Confirm" button to continue if there is no problem.

Here, you can also click the "Settings" button to adjust the partition size on the destination disk or tick "4k alignment" to improve the reading and writing speed of the SSD.

Step 6. You can preview the disk cloning operation by viewing the "Pending Operations". To commit the "Pending Operations", please click "Apply" and "Proceed".

After you have cloned Windows 11 disk to the new hard drive successfully as above, now you can change the boot order in BIOS menu to boot Windows from the destination disk.

The “Disk Clone Wizard” is proper for whoever wants to replace the entire hard drive. If you just want to migrate OS to a new hard drive while keeping other files in the current disk, then the "Migrate OS" is a nice feature.
Summary
So, with so many options we have listed to help you make Windows 11 faster, now you should know how to speed up Windows 11 computer and other Windows devices. Sometimes, the regular maintenance (such as cleaning caches, defragmenting hard drive, etc) can even work wonders.

