A Comprehensive Guide: How to Create VHD in Windows 10/11
A detailed tutorial on creating a VHD for backups, testing, or multi-booting. We cover troubleshooting, using native Windows tools, and an advanced method to create a VHD file from a physical disk for easy P2V migration.
By Lucas / Updated on November 12, 2025
Virtual Hard Disks (VHDs) represent a powerful and flexible approach to storage management in Windows. By encapsulating an entire hard disk partition within a single file, VHDs offer an elegant solution for multi-boot setups, software testing, and system backups. Whether you are an IT professional or a tech-savvy user, learning how to create VHD files is a valuable skill.
This detailed guide will walk you through the process of creating a VHD using various methods. We will address common issues that might prevent VHD creation and provide step-by-step instructions for using both native Windows utilities and an advanced third-party tool that can even create a VHD file from a physical disk.
Why Can't I Create a VHD?
Occasionally, you might run into issues when attempting to create a virtual disk. This section explores the common reasons why the VHD creation process might fail, so you can troubleshoot effectively.
The most frequent barrier is a lack of administrative privileges. System-level tasks, including the creation and management of virtual disks, require elevated permissions to execute. If you are not running the tool (such as Disk Management or Command Prompt) as an administrator, the option to create a VHD may be unavailable or fail when executed.
Another common problem is insufficient free space on the host drive. When you create a fixed-size VHD, the system needs to allocate the entire specified size immediately. For a dynamic VHD, it still requires enough space for the initial file structure. Lastly, problems with the "Virtual Disk" service in Windows can also prevent VHD operations from completing successfully.
How to Create VHD?
There are several reliable methods for creating a VHD in Windows. You can use the built-in graphical interface, the command line for more advanced control, or specialized software for enhanced capabilities like converting a physical disk directly into a VHD.
Method 1. Choose Windows tools to create VHD
1. Use Disk Management to create VHD
Disk Management is the standard graphical tool for managing drives in Windows, and it offers a straightforward wizard for VHD creation.
Step 1. Press the Windows key + X and select "Disk Management" from the menu. Ensure you have administrative rights.
Step 2. Once Disk Management is open, click on the "Action" menu at the top. Select "Create VHD" from the dropdown list.

Step 3. In the "Create and Attach Virtual Hard Disk" dialog box, click "Browse" to choose a location and name for your VHD file.
Step 4. Specify the virtual hard disk size. You can enter a value in MB, GB, or TB.
Choose the VHD format:
VHD: The older format, limited to 2TB.
VHDX: The newer format, more resilient and supports much larger sizes (up to 64TB). Recommended for Windows 8/10/11.
Step 5. Select the virtual hard disk type:
Fixed size: Allocates all disk space immediately. Offers better performance.
Dynamically expanding: The VHD file starts small and grows as you add data. Saves initial disk space.
Step 6. Click "OK". Windows will create and automatically attach the VHD. You will then need to initialize the disk and create a new simple volume on it before it can be used.
2. Run DiskPart to create VHD
For users who prefer the command line, DiskPart provides a powerful and scriptable way to create VHDs.
Step 1. Open Command Prompt as an administrator.
Step 2. Type diskpart and press Enter.
Step 3. Use the create vdisk command, specifying the file path, size, and type. For example:
create vdisk file="D:\VirtualDisks\MyNewVHD.vhdx" maximum=50000 type=expandable
maximum=50000 sets the max size to 50,000 MB (50 GB).
type=expandable creates a dynamically expanding disk. Use type=fixed for a fixed-size disk.
Step 4. After creation, you will need to select, attach, and format the VHD using subsequent DiskPart commands (select vdisk, attach vdisk, create partition primary, format fs=ntfs quick).
Method 2: Create VHD File from Physical Disk with AOMEI Partition Assistant Professional
While the native tools are excellent for creating empty VHDs, what if you want to create a VHD that is an exact copy of an existing physical drive? This is incredibly useful for creating a backup of your system drive or migrating a physical machine into a virtual environment (P2V). This is where a powerful tool like AOMEI Partition Assistant Professional excels.
AOMEI Partition Assistant Professional is a comprehensive disk and partition management software that simplifies complex tasks. It provides a user-friendly interface and a robust feature set that goes far beyond Windows' built-in utilities. One of its standout features is the "Disk Copy Wizard," which can be cleverly used to create a vhd file from a physical disk with all its data intact.
Step 1. Click the tab "Virtual Disk", you will see 3 options available for VHDs: create VHD, attach VHD, and detach VHD. Select the "Create VHD" option after clicking the "Virtual Disk" tab.
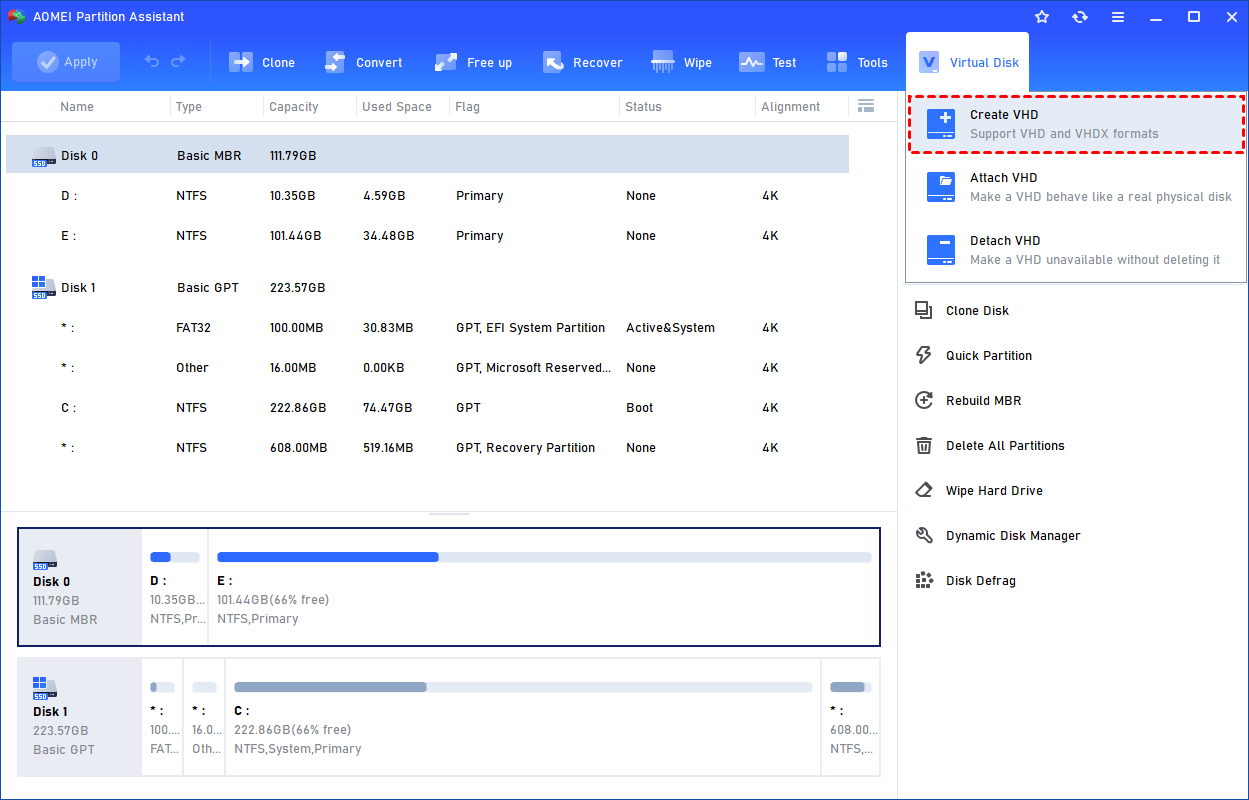
Step 2. You can specify the virtual disk location and size.
Optionally, you can click the "Advanced" option to set the virtual hard disk format and type. (By default, the VHDX format and the Dynamically expanding type are checked.)
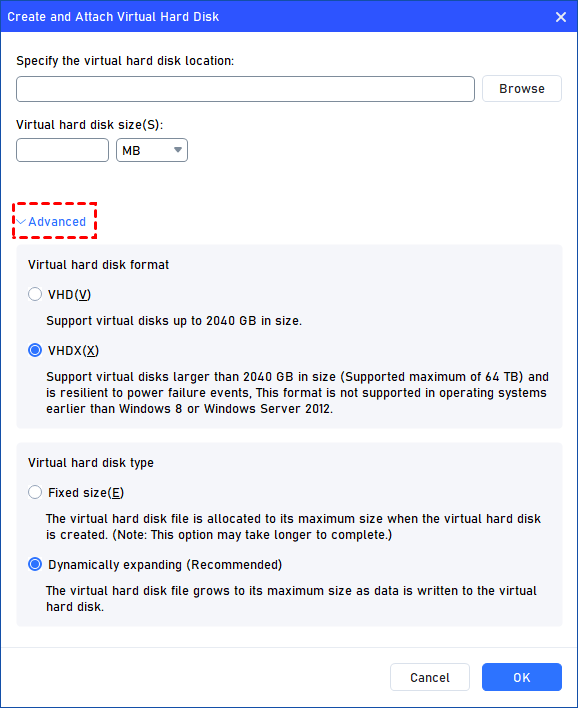
Virtual hard disk format: VHD and VHDX are supported.
For VHD, it supports virtual disks up to 2040GB in size.
For VHDX, it supports virtual disks larger than 2040GB in size. (Up to 64TB) This format is not supported in operating systems earlier than Windows 8 or Windows Server 2012.
Virtual hard disk format: Fixed size and Dynamically expanding are supported.
For fixed size, the virtual hard disk file will be allocated its maximum size when it is created. So it will take much longer to create.
For Dynamically expanding, the virtual hard disk file will grow to its maximum size as data is written to it. (Recommended)
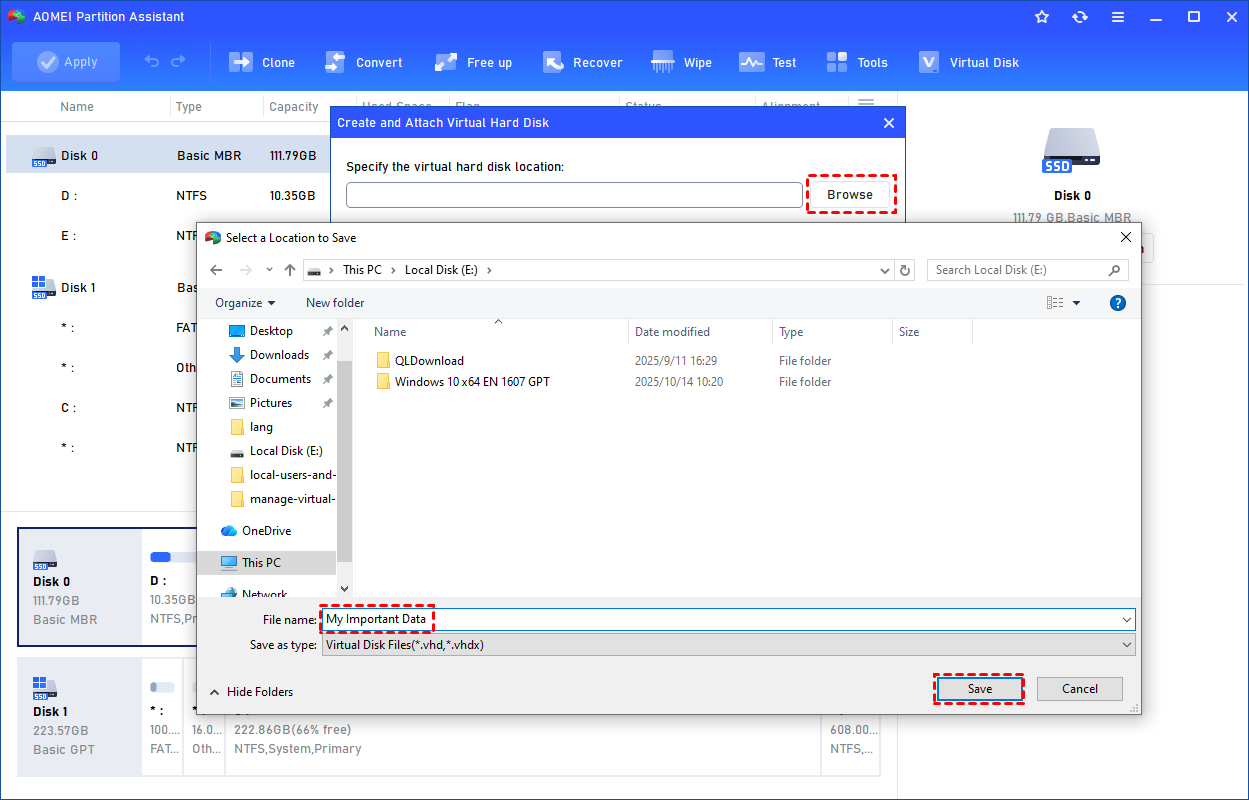
Click "Browse" to select a location to create the VHD. Please enter a file name for the virtual disk and click "Save".
Step 3. Once the virtual disk location and size are set up, you can click "OK" to start creating the VHD.

Step 4. After the reload process is finished, you will see that the VHD has been created successfully. It will be attached automatically.
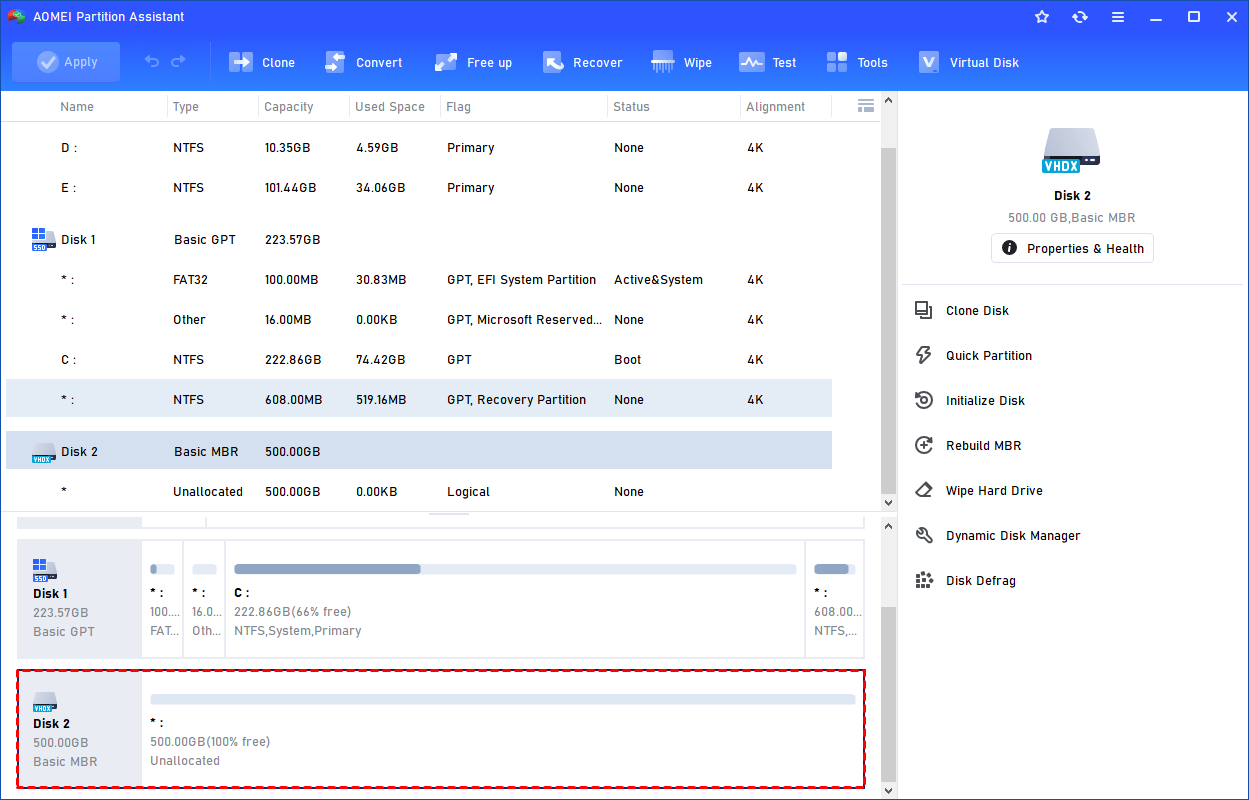
You can also view the VHD in Windows Disk Management.
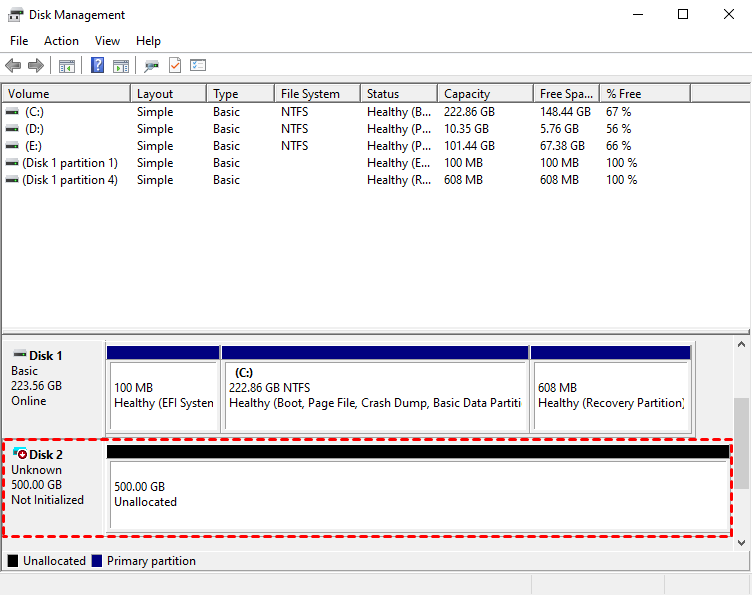
The created VHD will be uninitialized so it is empty without any data or file system. To make it useful, you need to initialize the disk, create a partition, and assign a drive letter.
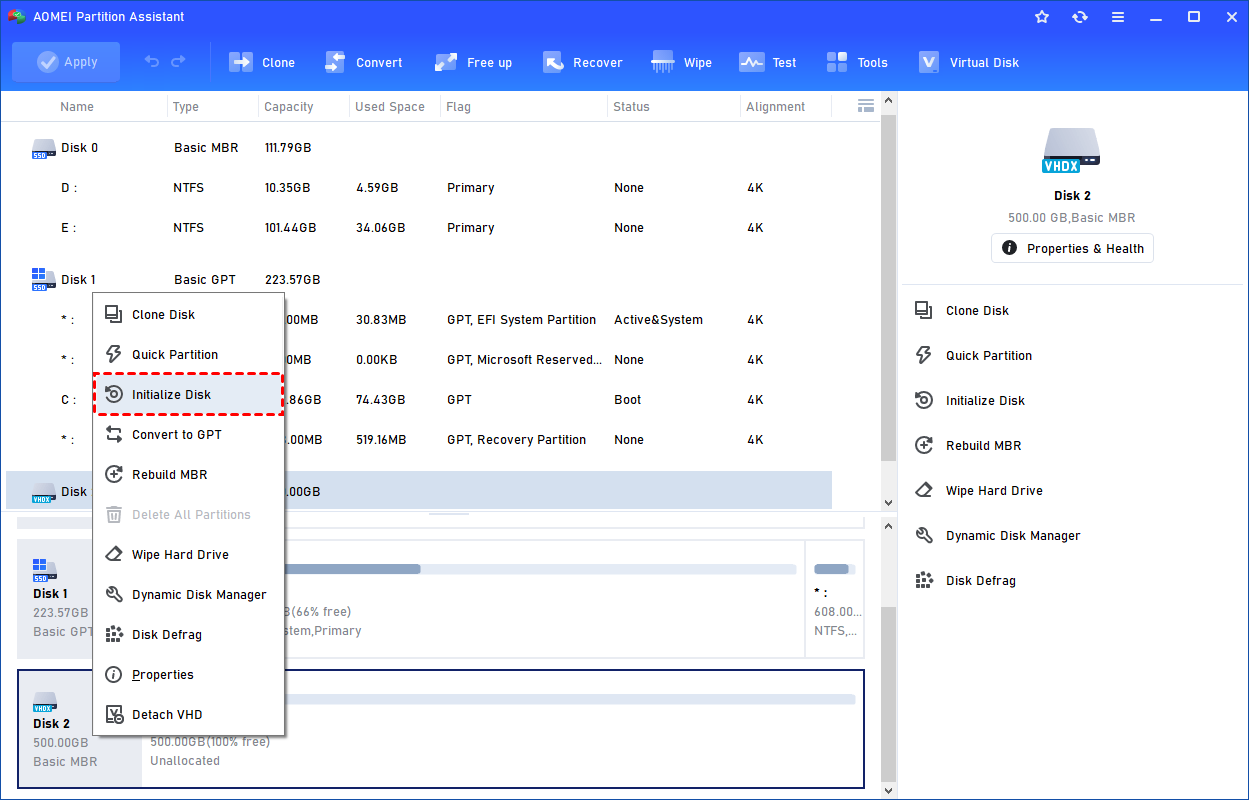
You can initialize the drive in Partition Assistant.
Or, initialize it in Windows Disk Management.

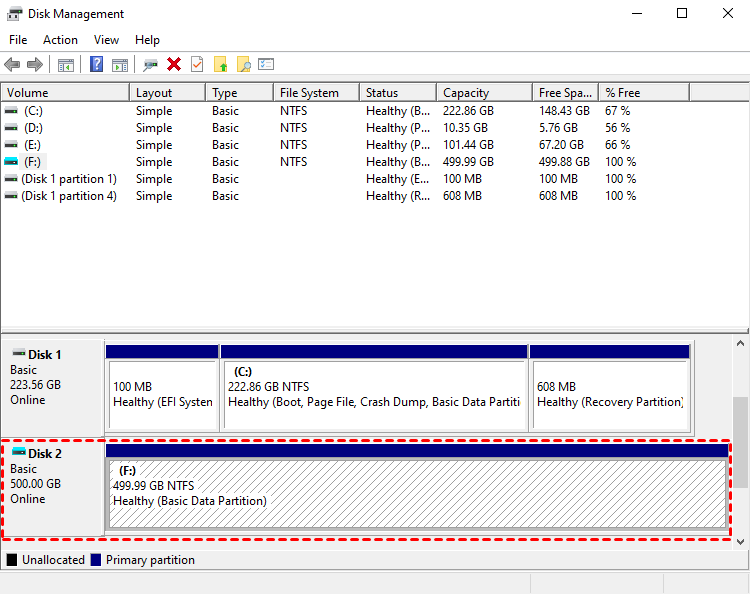
Then, you can create a partition and assign a drive letter for the partition. Finally, you can use the VHD normally.
Tips: Steps to Clone a Physical Disk to a VHD
Step 1. Create and Attach a Blank VHD: First, use Disk Management (as shown in Method 1) to create and attach a blank VHD that is large enough to hold the contents of your physical source disk.
Step 2. Launch AOMEI Partition Assistant: Download, install, and run AOMEI Partition Assistant Professional.
Step 3. Initiate Disk Copy: In the main interface, right-click the physical disk you want to clone (the source disk) and select "Clone Disk".
Step 4. Choose Clone Method: Select a clone method. "Clone Disk Quickly" is usually the best option as it only copies used space and is faster.
Step 5. Select Destination Disk: In the next window, select your attached virtual hard disk (the VHD) as the destination disk.
Step 6. Confirm and Apply: The software will show you a preview of the operation. Click the "Apply" button in the top-left corner and then "Proceed" to start the cloning process.
Once complete, your VHD will contain a perfect copy of your physical disk's partitions and data. This method of creating a VHD is a game-changer for backups and virtualization.
Beyond this powerful feature, AOMEI Partition Assistant Professional also offers many other handy functions, including OS migration to SSD, MBR/GPT conversion without data loss, partition recovery, and creating bootable media.
To sum up
Creating a VHD is a fundamental task for modern PC management, offering unparalleled flexibility for storage and system configuration. For creating new, blank virtual disks, Windows' built-in Disk Management and DiskPart tools are perfectly capable.
However, for more advanced needs, such as the crucial task of creating a VHD file from a physical disk, turning to a professional tool is the best solution. AOMEI Partition Assistant Professional not only simplifies the management of virtual disks but also provides powerful cloning capabilities that allow you to easily convert physical drives into portable and secure VHD files.

