What to Do When Shrink Volume Greyed Out in Windows 7/8/10?
When using Disk Management to shrink a volume in Windows 10/8/7, you may find shrink volume greyed out. In such case, what to do? This article will give you different solutions.
By Cherry / Updated on May 12, 2023
The Scenario
Many folks are confused that they could not shrink volume with Windows Disk Management because the Shrink Volume option is grayed out. Once, a user met the situation below:
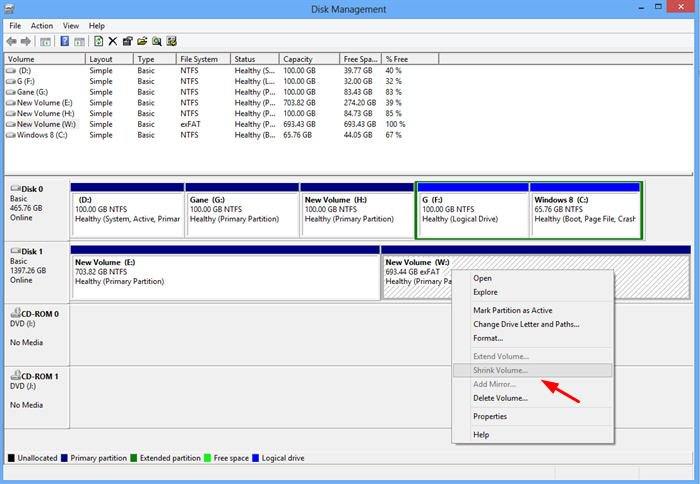
"I wish to divide my external hard drive into 2 partitions so that I can use them to store my recovery files and personal files for my Windows 7. It is a 2 TB WD Elements hard drive, and now it is formatted into one exFAT partition. It has much free space and I just want to shrink the existing partition and then create a new partition. But for some reason I can’t do that with Windows Disk Management. When I right click on the drive, the option “Shrink Volume” is grayed out so that I cannot use it." Why Disk Management Shrink Volume is grayed out?
The Reason Why Shrink Volume Grayed Out
Actually, there are some reasons leading to shrink volume greyed out.
-
Windows Disk Management does not support FAT16, FAT32, exFAT file systems, it only supports NTFS.
-
The disk fragment is also the reason that cause you unable to shrink volume.
-
If there are unmovable files at the very end of the partition which you want to shrink, the option is still greyed out.
-
If there are some virtual memory on the partition, the shrink volume may still in a down state.
The Solutions to Shrink Volume Grayed Out
If the Disk Management cannot shrink volume, you could try the following methods.
1. Check the file system of partition, because Disk Management only supports NTFS. If the disk isn’t NTFS, you can convert it to NTFS, then, use Shrink Volume of Disk Management to do it.
2. Operate a disk defrag. You can click the Start -> Computer, right click the partition you want to shrink and choose Properties. Then, switch to the Tool tab and click on the “Defragment Now”, if necessary, clickContinue, then click on Defragment Now. It may take some time to finish the disk defrag. After that, using the shrinking feature to shrink the volume.
3. If necessary, you may need to transfer virtual memory so that you can shrink volume successfully. 1) Click Start, then, right click Computer and select Properties. 2) On the left pane, click Advanced system settings. 3) Switch to the Advanced tab, click Settings under Performance. 4) Then it will pop-up Performance Options, switch to Advance tab, click “Change...” under virtual memory. 5) Clear the “Automatically manage paging file size for all drives” check box.6) select the drive you want to shrink, click No paging file, and click Set, and click OK to apply the operations. 7) Last, you need to restart your computer and then, shrink volume with the Disk Management.
4. There is another way that helps you shrink volume in a right way - disable system restore and Hibernation to clear the storage folder: click Start, type sysdm.cpl in the search bar and press Enter. Choose System Protection tab and uncheck all items inCreate restore point automatically on the selected disks, then click OK. And you can follow the steps below to disable Hibernation. First, open command line prompt by typing cmd in the start search box, run it as Administrator. Type powercfg.exe/hibernate off at the prompt, press Enter. Exit and shrink volume with Disk Management.
Although there are so many ways to help you shrink volume, it may get a lot of troubles sometimes. Even the Shrink Volume isn’t gray, you may not shrink the size as you want. You can not shrink volume if there is any unmovable file at the point. For example, if there are some files at the end of the partition, you can not shrink it even there are much more free space. Fortunately, there is a method which is very convenient and you can avoid all the problems above.
Shrink Volume with AOMEI Partition Assistant
AOMEI Partition Assistant is a very powerful third party software which can manage your disks more flexible. It supports almost all the Windows OS including Windows XP/Vista/7/8/8.1/10 and it supports resizing multiple files including FAT/FAT32/FAT16/FAT12, and NTFS as well as resizing encrypted partition. If you want to shrink volume for your partition, it could be the best software.
AOMEI Partition Assistant has different edition for different Windows OS users. If you are Windows PC users, you can use the free edition - AOMEI Partition Assistant Standard. To shrink volume, you can following the steps below:
Step1. Download the freeware, install and launch it. You will see the basic situation of your disk.
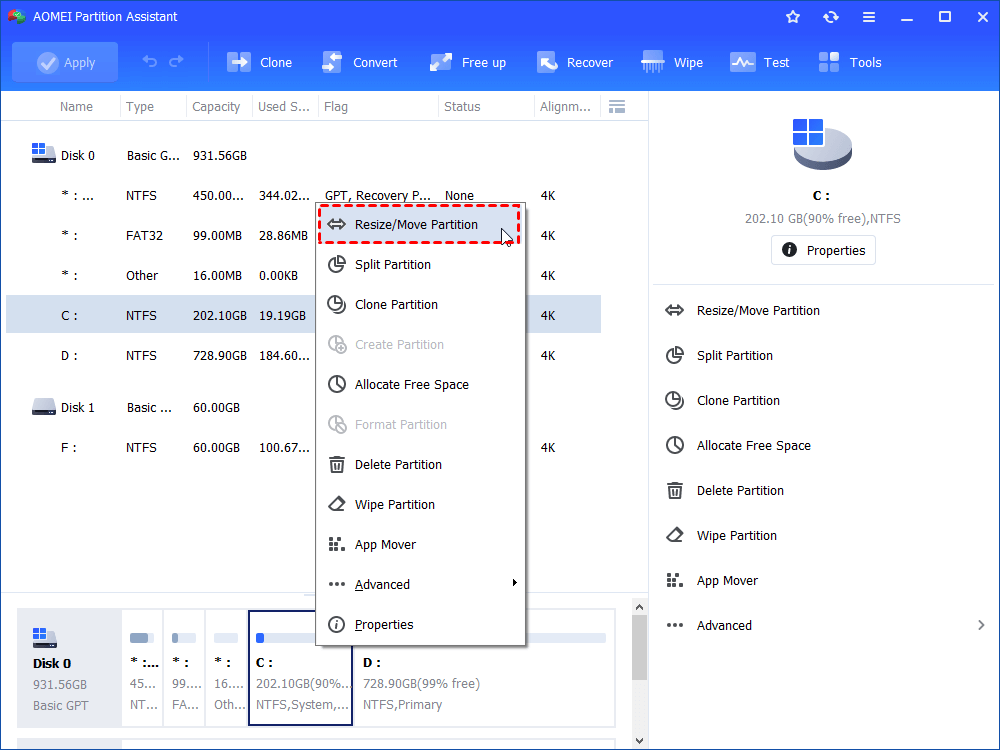
Step2. If you want to shrink partition, right click it and select Resize Partition. Take C: partition as an example, click it and select "Resize/Move Partition".
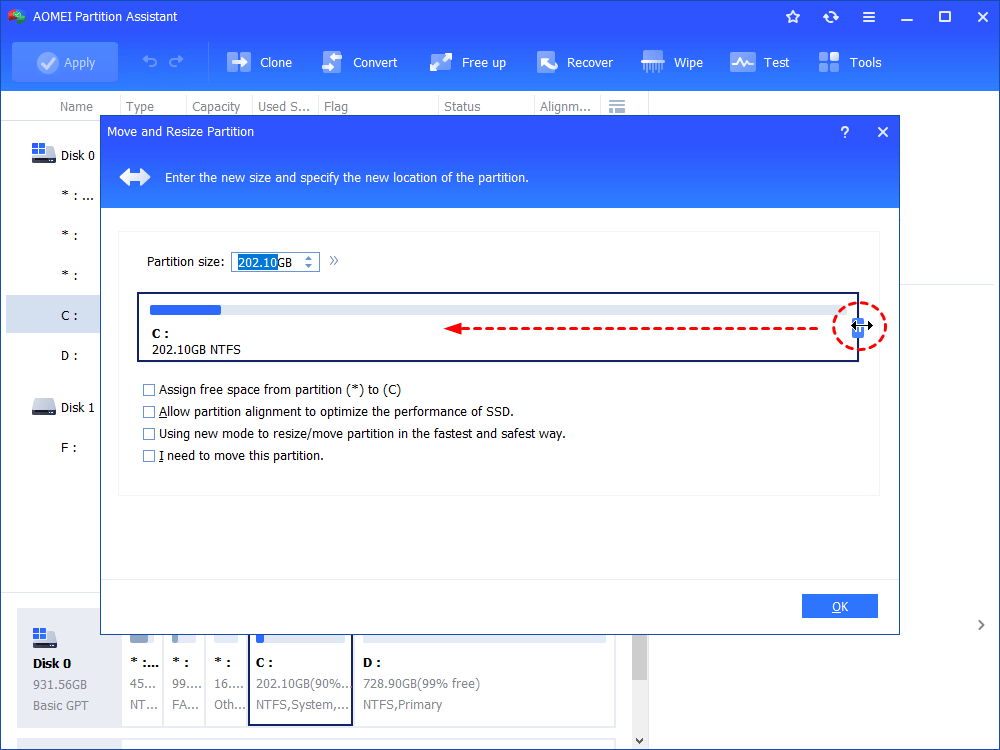
Step3. You can shrink it until there is no free space. Drag the bar to resize partition as the picture below.
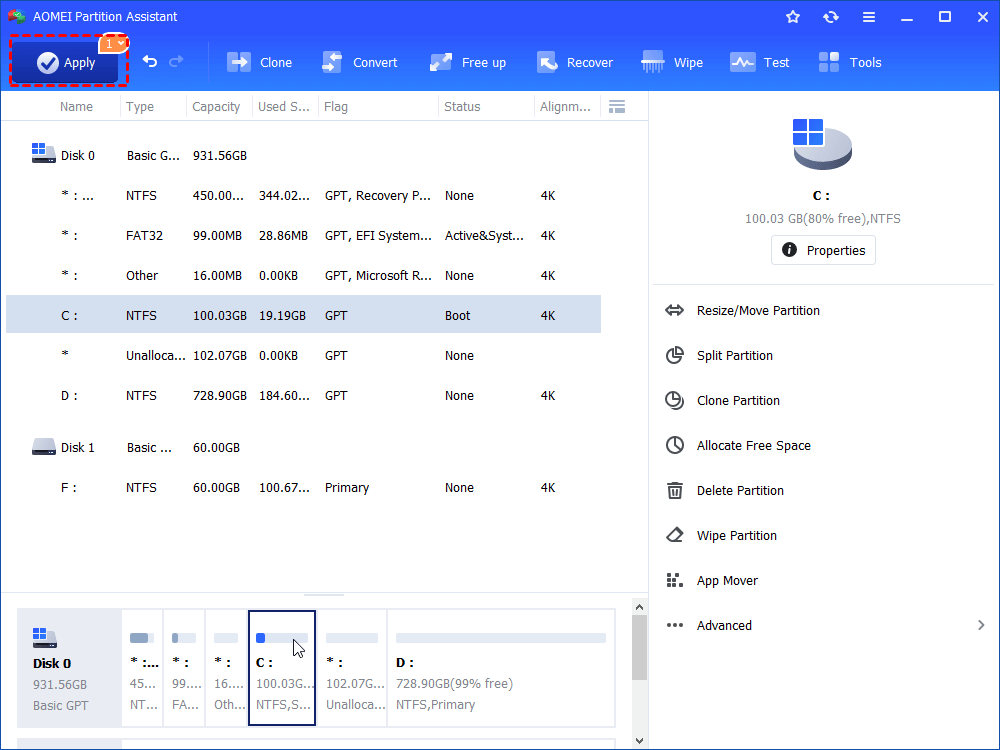
Step4. Click Apply to submit the whole operations.
Tips: Shrink the system partition will be performed under PresOS Mode.
Using AOMEI Partition Assistant Standard can avoid all the problems that Disk Management has. If the Shrink Volume grayed out, you can try it. Besides, you can use it to extend partition, merge partitions, etc. If you need advanced features such as allocate free space from one partition to another, convert NTFS to FAT32, convert primary partition to logical, and so on, you need to upgrade to AOMEI Partition Assistant Professional version. But both Standard and Professional is suitable for Windows PC users. If you are a Windows Server user, the AOMEI Partition Assistant Server version is suitable for you.

