Fix: BIOS Recognizes Windows Boot Manager But Can’t Boot into Windows
Some users find BIOS recognizes Windows boot manager but can’t boot into Windows. If you also confront this problem on your device, then this guide will help you to learn why it happens and how to fix it.
By Lucas / Updated on March 25, 2026
It can be frustrating when your computer powers on, BIOS detects the Windows Boot Manager, but you still can’t boot into Windows. This issue prevents users from accessing their operating system and can lead to data loss, work delays, and serious inconvenience. In this article, we’ll explore the reasons behind this issue, walk through multiple solutions.
Why BIOS recognizes Windows Boot Manager but can’t boot into Windows?
Understanding these causes helps guide you toward the right solution, whether it’s a quick settings tweak or a more advanced boot repair. There are several reasons why BIOS may recognize the Windows Boot Manager but fail to boot into Windows:
- Corrupted Boot Configuration Data (BCD): If the BCD file is damaged or missing, Windows can’t start.
- Incorrect boot order or mode: BIOS settings may be misconfigured (UEFI vs Legacy, or incorrect boot priority).
- Damaged system files: Critical Windows startup files may be missing or corrupted.
- Drive issues: The hard disk might be failing, or the Windows partition may not be marked as active.
- Virus or malware: Certain malware can corrupt boot files or the MBR/GPT structure.
How to Fix [BIOS Recognizes Windows Boot Manager but Can’t Boot into Windows]
Here we outline several solutions you can try, from simple to more advanced. One or more of these methods should help fix your system.
Method 1. Check BIOS settings (Boot Order and Boot Mode)
Sometimes, the simplest fix is adjusting your BIOS settings.
Step 1. Reboot your computer and enter BIOS/UEFI (usually by pressing DEL, F2, or ESC at startup).
Step 2. Go to the Boot tab and make sure your system disk is at the top of the boot priority list.
Step 3. Check whether your system uses UEFI or Legacy mode. Make sure it matches the partition style (GPT for UEFI, MBR for Legacy).
Save changes and exit.
Method 2. Run Startup Repair from Windows Recovery
When your Windows computer can’t boot, force restart the PC three times, then you will be led to Windows Recovery Environment. Then you can see the "Choose an option" window and follow the same steps in Case 1 to boot into Command Prompt.
Step 1. If it does not work, you can create a bootable disk or USB flash drive like Windows installation media or recovery USB drive to make your PC bootable in the first place.
Step 2. Boot from a Windows installation USB or DVD. Choose your language and click Next > Repair your computer > Troubleshoot > Startup Repair. Now, let the system attempt to fix boot issues automatically.

Method 3. Repair boot files with Command Prompt
Also, you can try to run CMD commands to repair Windows boot issues.
Step 1. Follow the instructions in the Second method to enter Windows Recovery Environment. But this time, you go to Repair your computer > Troubleshoot > Advanced Options > Command Prompt.
Step 2. Type the commands one by one and press Enter after each:
- bootrec /fixmbr
- bootrec /fixboot
- bootrec /scanos
- bootrec /rebuildbcd
Step 3. Restart your PC and check if Windows boots correctly.
Method 4. Try third-party boot manager -- AOMEI Partition Assistant for Boot Repair
Since your computer may not even boot successfully, you can also ask for help from third-party. If you think that the above methods are a little challenging for you because all the operations need to be done on the command line. AOMEI Partition Assistant is a reliable tool that deserves a try, which is compatible with Windows 11/10/8/7. Its intuitive Boot Repair feature effectively addresses Boot Configuration Data or BCD-related problems without the need for complicated commands.
Stage 1. Create a bootable media with AOMEI Partition Assistant on a normal computer, and then boot the problematic PC from it.
Stage 2. Perform “Boot Repair” and “Rebuild MBR” functions to fix boot issue.
Stage 3. Recover lost/missing data (Optional): If you find some files are missing after the fix, you can try to use "Recover Data" function to retrieve them.
Option 1. Boot Repair
Step 1. Prepare a blank USB and connect it to a working PC that has installed AOMEI Partition Assistant, click "Recover" >"Boot Repair" and then click the "create a bootable disk" option to create a WinPE "Boot Repair" disk.

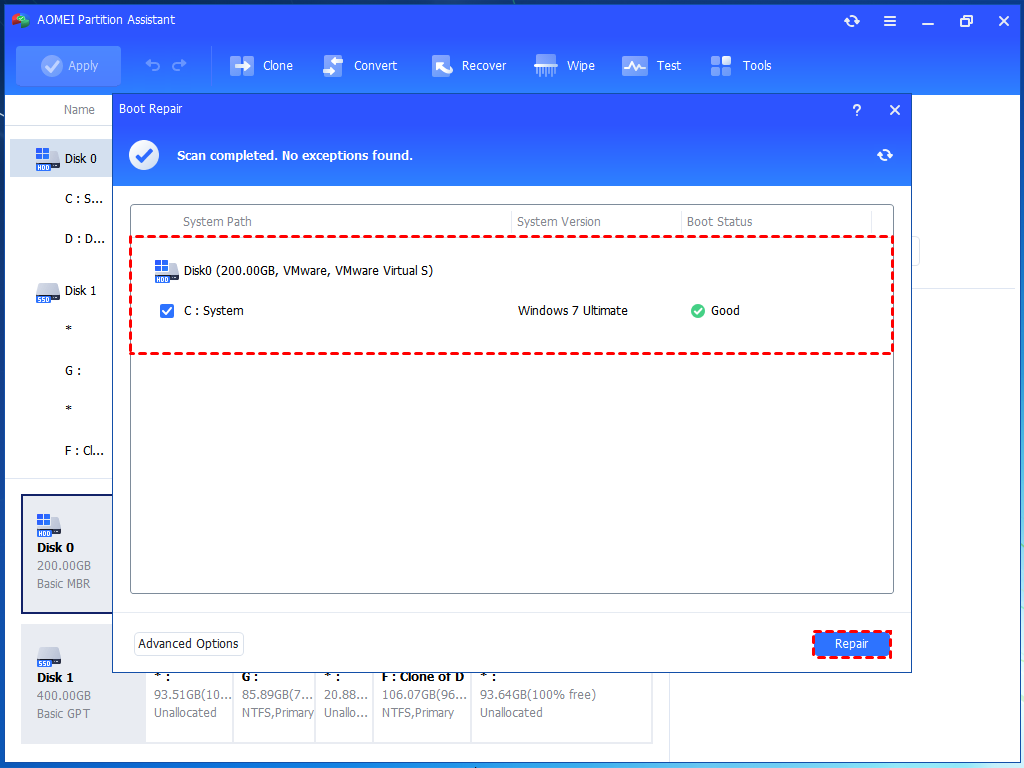
Step 2. Boot the PC that cannot boot into WinPE. It will automatically load the Boot Repair tool and start the boot entries scan process. All boot entries will be displayed.

Step 3. Select the repairable boot entries you want to repair and click the "Repair" button to start the repair.
Step 4. Once the repair is successful, you can remove the bootable disk and boot the PC from the original system drive.

Option 2. Rebuild MBR
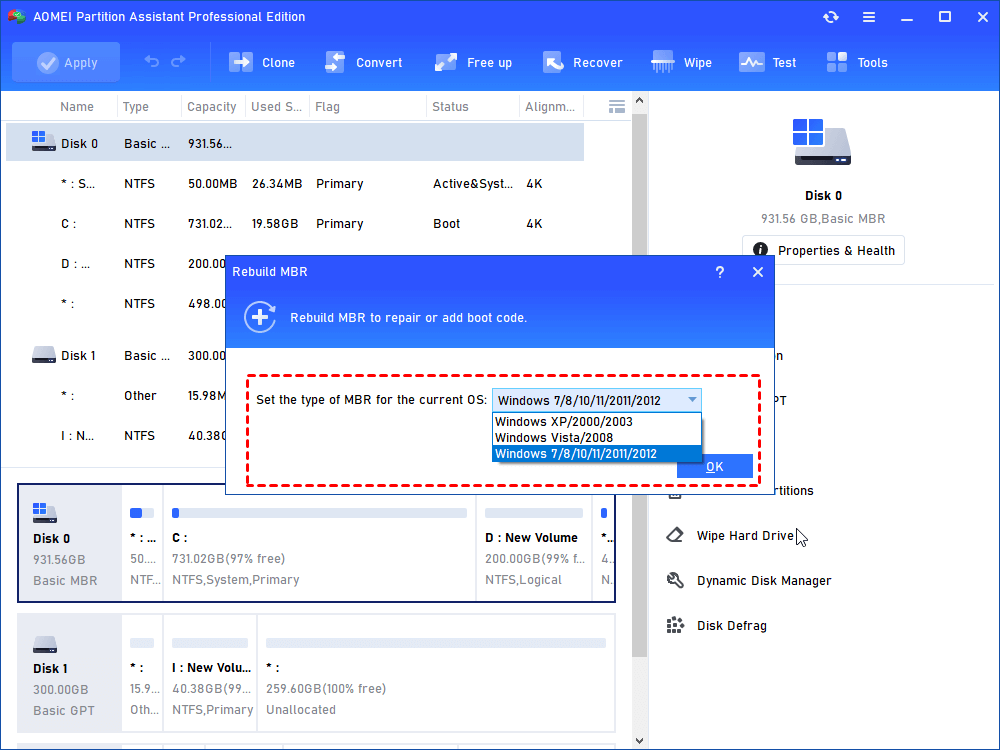
Step 1. Right-click the system disk and choose "Rebuild MBR".

Step 2. Choose a proper MBR type according to your operating system in the pop-up window. And then the program will set the type of MBR for your current OS.
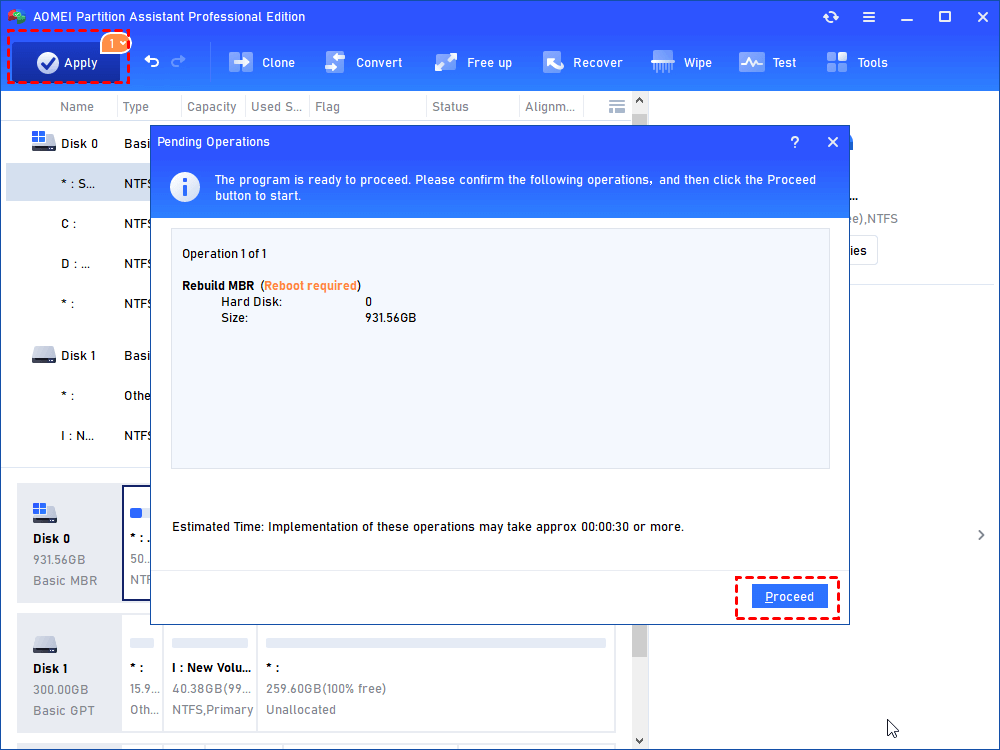
Step 3. Click "Apply" on the toolbar to commit the operation and click "Proceed" to confirm the task.
Repairing Windows boot issuevia AOMEI Partition Assistant is much easier and more convenient than using commands in Command Prompt. Besides, there are many other functions for Windows 10 startup repair, such as checking partition, formatting the partition, recovering lost partition, and so on. All these operations can be done with just a few clicks!
Method 5. Reinstall Windows (As a last resort)
Step 1. Download and use the Microsoft Media Creation Tool to make the installation media.
Step 2. When asked during the installation media, accept Microsoft software license terms and then select "Create installation media (USB flash drive, DVD, or ISO file) for another PC" before you click “Next” and follow the guides to finish creating Windows 10 installation media.
Step 3. Plug the installation disk into your computer. Shut down your computer, open its case, remove the old hard disk, and insert the SSD into the drive bay.
Step 4. Turn on your computer and press a specific key to boot into BIOS and modify the boot order to make your computer boot from the installation disk.
Step 5. When loaded, you need to verify “language to install”, “time and currency format”, and “keyboard or input method”. Then click “Next”> “Install now”.
Step 6. In this window, you will be asked to input the license key, type one, or skip it by clicking "I don't have a product key" and activate it after Windows installation completes.
Step 7. When asked “Which type of installation do you want?”, choose “Custom: Install Windows only (advanced).”
In this screen, select your SSD, which you plan to reinstall Windows 10 onto, and click “Next”. Then Windows will start the installation process automatically.
To sum up
When the BIOS recognizes the Windows Boot Manager but can’t boot into Windows, the issue often lies in misconfigured settings or damaged boot files. By following the troubleshooting steps above, you can often resolve the problem without data loss.
AOMEI Partition Assistant offers a safe, effective, and beginner-friendly way to repair boot issues. Beyond boot repair, this powerful tool also provides functions like disk cloning, OS migration, secure erase, disk conversion (MBR/GPT), and more.

