Why Your Mac Can’t Write to External Drive: Easy Solutions
Many users find that macOS cannot write to certain external drives due to format restrictions. This article provides simple steps to enable write access and resolve common drive connectivity problems on Mac.
By Irene / Updated on January 12, 2026
Why your Mac can't write to external drive?
It is a common issue discussed across many online forums, such as Reddit, Super User, and Apple Support Community, where users often ask why their Mac can’t write to external storage devices like SSD, HDD, SD card, and USB drive. In this situation, you can open the drive and view or copy files, but you cannot add new data or delete existing files or folders. This usually happens because macOS restricts write access to protect the drive. What causes a Mac to be unable to write to an external hard drive? Here are some widely encountered reasons.
| Reason | Explanation |
|---|---|
| Incompatible file system | Some formats, such as NTFS, are supported by macOS in read-only mode, which prevents writing by default. |
| Permission settings | The drive may not grant write permission to your current Mac user, especially if it was used on another computer. |
| File system errors | If macOS detects errors on the drive, it may mount it as read-only to avoid possible data loss. |
| Cross-platform usage | Drives used across different systems can carry permission settings that macOS cannot adjust automatically. |
With these common causes in mind, the next section will introduce effective and safe ways to restore full read-and-write access, helping you use your external drive normally again.
4 ways to fix macOS can't write to external drive
Way 1. Enable full read and write access on Mac for NTFS drive
If your Mac can open an external drive but won’t let you edit or add files, the drive format is often the root cause. You can right-click the drive and choose Get Info to check this. When the format is NTFS, the behavior makes sense. NTFS is built for Windows systems. While macOS can read files on an NTFS drive, it does not support writing to it by default.
To fix this limitation, you can use a reliable NTFS driver such as PartitionAssistant NTFS for Mac. This lightweight tool enables full read and write access to NTFS drives in just a few clicks. Once enabled, you can copy, delete, and manage files on NTFS devices as naturally as on a Mac-formatted drive. It also allows you to mount and unmount NTFS drives from the menu bar, offering a smooth, safe, and efficient way to work with NTFS on macOS.
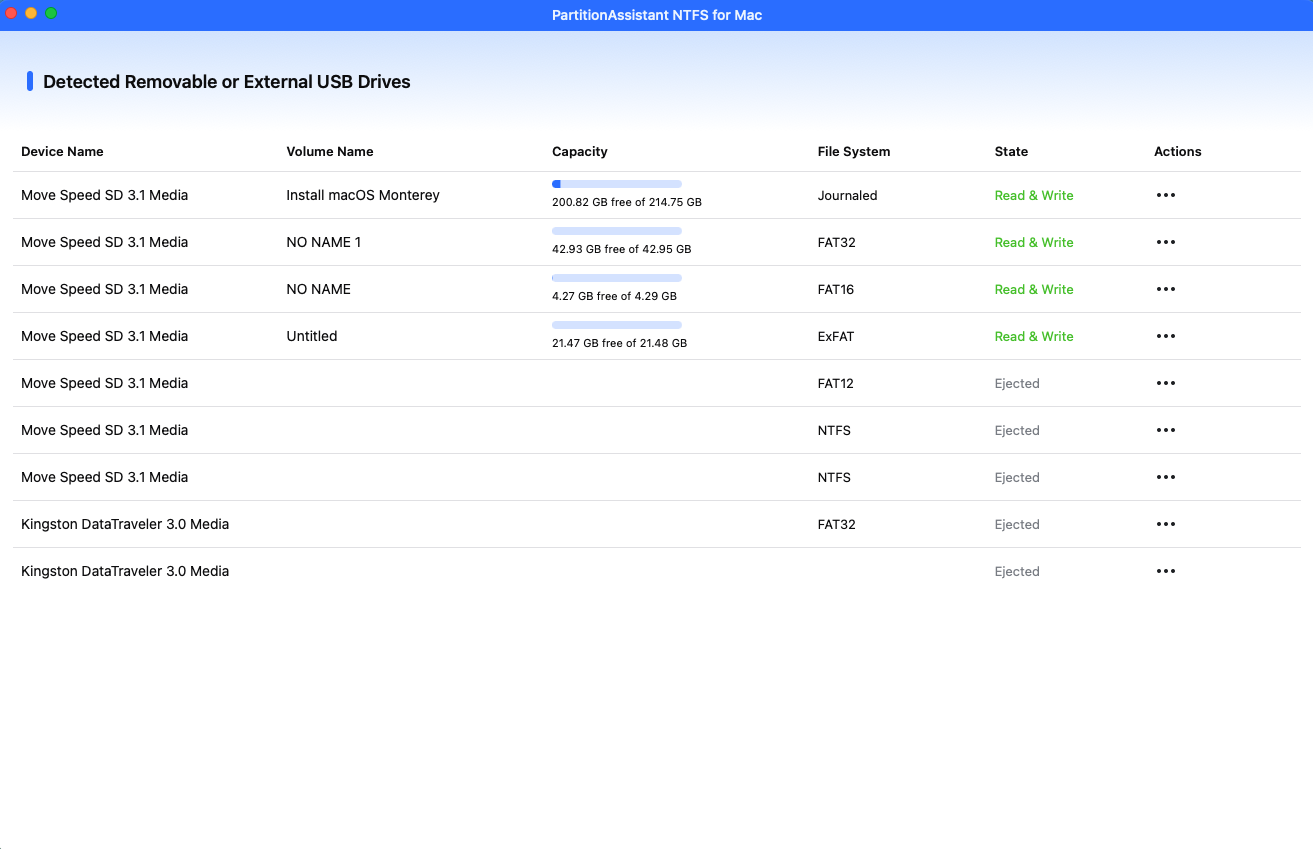
Step 1. Download and open PartitionAssistant NTFS for Mac. Insert your external hard drive into the Mac. The software will automatically detect and mount the devices.
Step 2. The software will display all of your drives on your Mac.
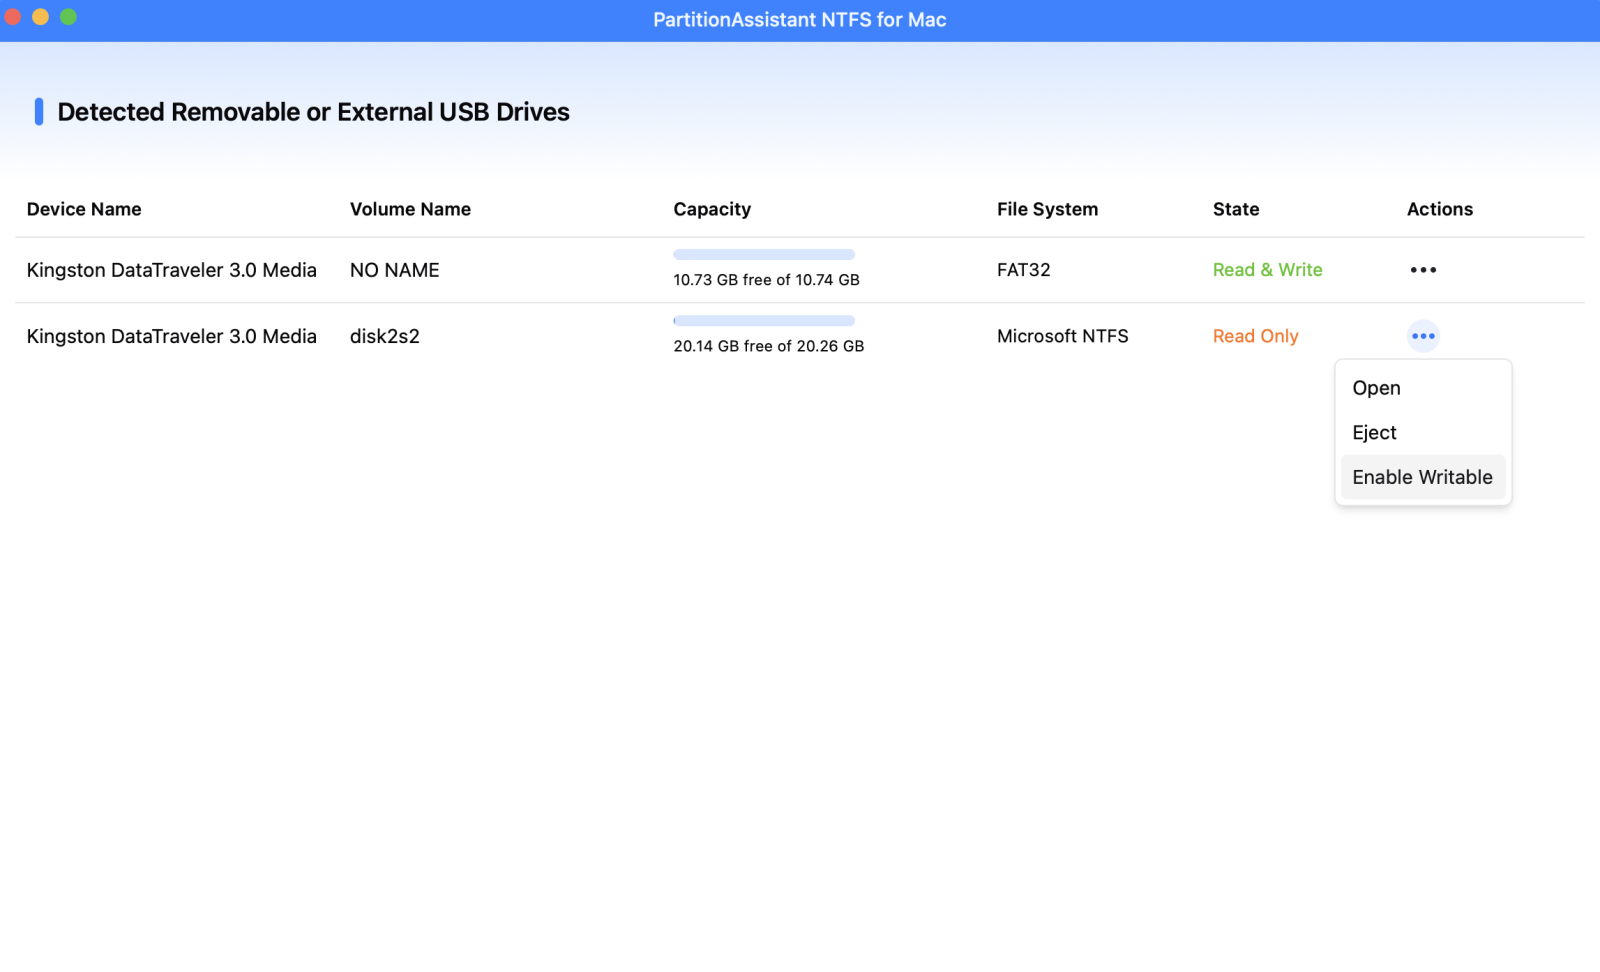
Step 3. If your external hard drive shows "Read Only", you can change the state manually by clicking"Enable Writable".
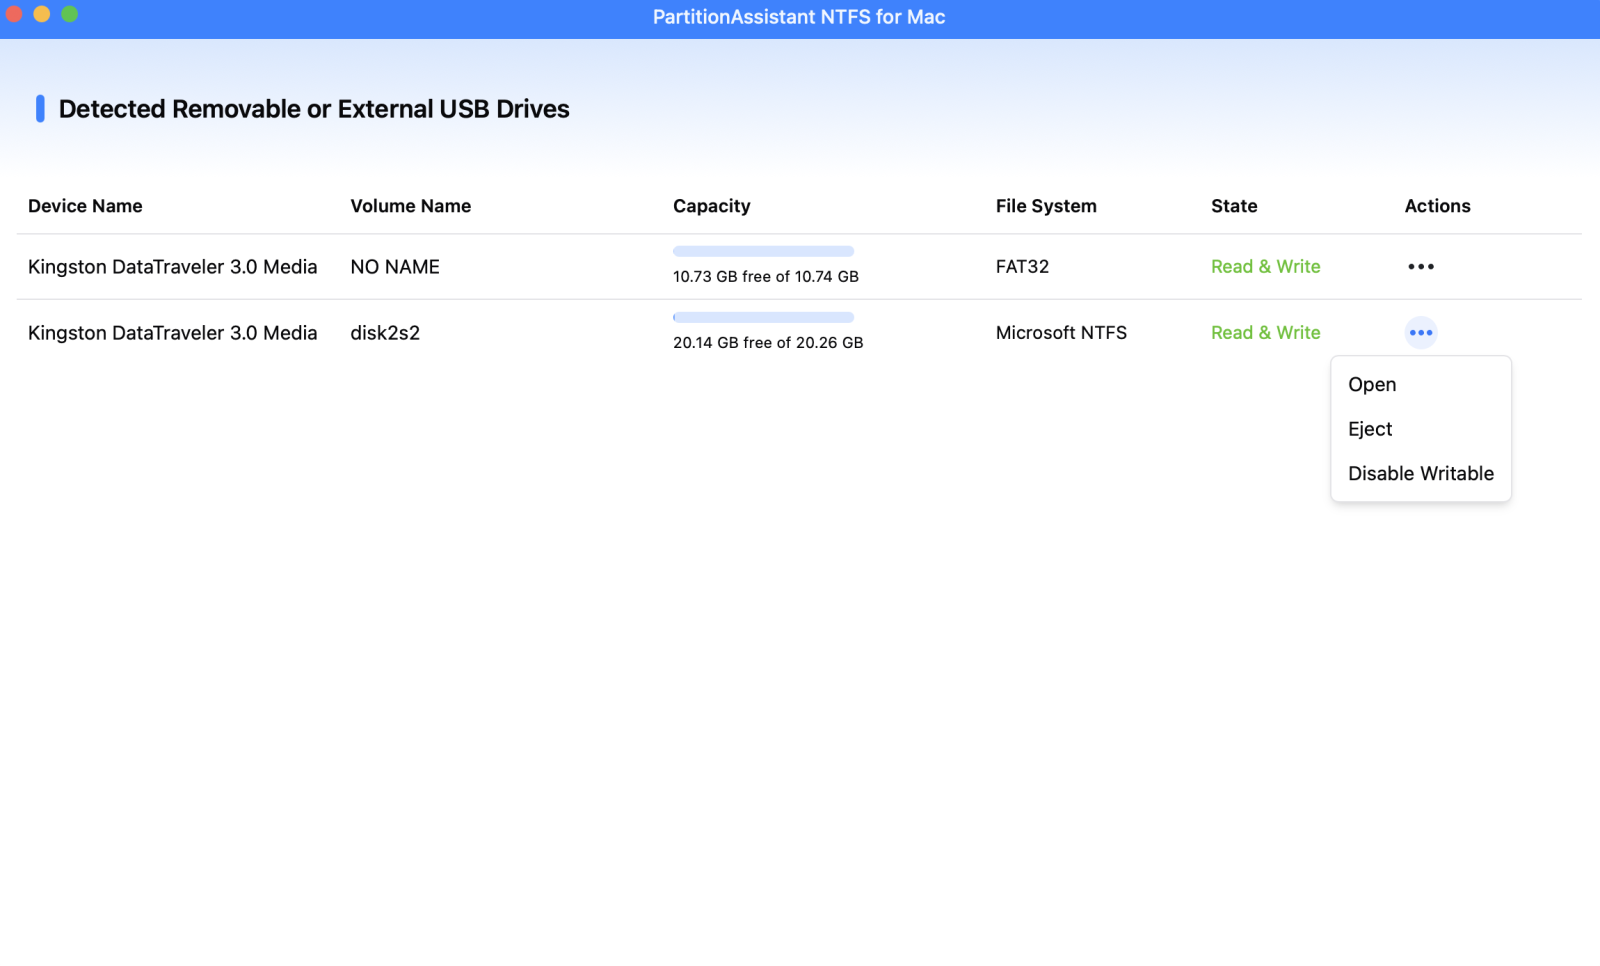
Step 4. You can now write data on your external hard drive on Mac once it is set to Read & Write.
Way 2. Reformat your external hard drive on Mac
If your external hard drive is empty or you have backed up all its contents, formatting it is an easy way to fix the read-only problem. Formatting will erase all data on the drive and give it a fresh file system, restoring read and write access. Choose a file system based on your needs:
| File System | Compatibility |
|---|---|
| APFS | Use on Mac with macOS 10.13 High Sierra or later. |
| HFS+ (Mac OS Extended) | Use on macOS Sierra and earlier; later versions include journaling for extra safety. |
| exFAT or FAT32 (MS-DOS) | Compatible with both Mac and PC. |
Once you’ve chosen a format, follow these steps:
Step 1. Open Finder, go to Applications > Utilities, and launch Disk Utility. In the left sidebar, select your external hard drive.
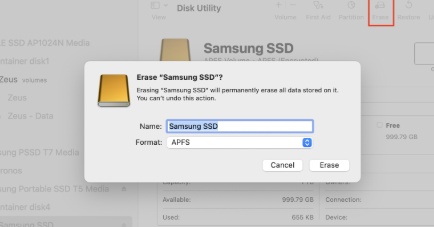
Step 2. Click Erase in the action pane.
Step 3. Choose the file system (APFS, Mac OS Extended, FAT, or exFAT) and the scheme (e.g., GUID Partition Map). Click Erase to start formatting.
After formatting, your external hard drive will no longer be read-only. You can now read and write files freely. If you backed up your data, you can transfer it back to the drive.
Way 3. Repair the read-only external drive with Disk Utility
If your external hard drive is showing as read-only, you can try repairing it using Disk Utility. This tool checks for formatting errors and other issues that might prevent writing.
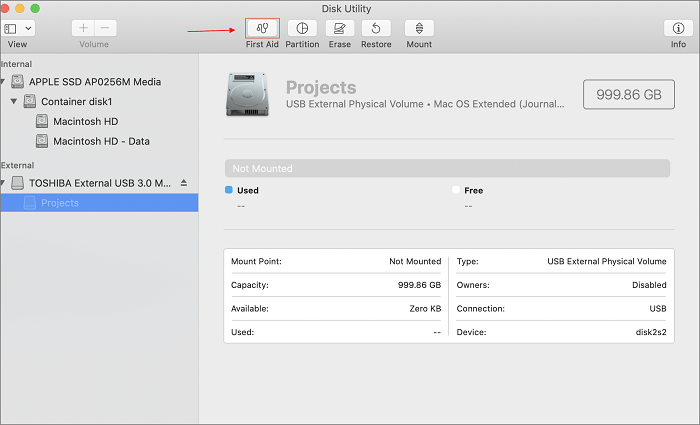
Step 1. Open Finder, go to Applications > Utilities, and launch Disk Utility.
Step 2. In the left sidebar, select your external hard drive.
Step 3. Click the First Aid button at the top of the window and then click Run.
Step 4. Disk Utility will check the drive for errors and attempt to repair them. This may take a few minutes.
Step 5. When the process finishes, a report will appear showing any issues found and actions taken. If it says the drive appears to be okay, the repair was successful. If it mentions problems that could not be fixed, you may need to reformat the drive or seek professional help.
Step 6. Click Done to close the First Aid window.
After this, your external hard drive should work properly, allowing you to read and write files. If problems continue, back up your data and consider reformatting the drive, or seek professional assistance if needed.
Way 4. Change the external hard drive read-only permission
If your external drive is compatible with Mac but locked due to user settings, you can easily ignore the permissions or change read write permissions with Terminal.
Step 1. Make sure the drive icon appears on your desktop or in Finder.
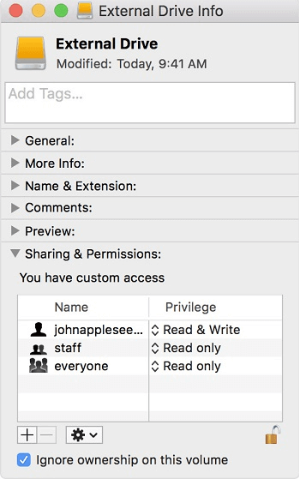
Step 2. Right-click (or Control-click) the drive icon and choose Get Info (or press Command + I).
Step 3. Scroll down to the Sharing & Permissions section. If the lock icon is closed, click it and enter your administrator password.
Step 4. Check the box labeled “Ignore ownership on this volume.” This makes all files on the drive owned by the current user, giving you immediate Read & Write access.
Conclusion
In summary, if your Mac can't write to an external drive, it is usually due to file system incompatibility, permission settings, or errors on the drive. By enabling full read and write access for NTFS drives with PartitionAssistant NTFS for Mac, reformatting the drive, using Disk Utility to repair errors, or adjusting permissions, you can restore normal functionality and safely manage your files. Following these steps will help ensure your external drive works smoothly on Mac and allows you to read, write, and organize your data without issues.
FAQs
🗨️ How to give write permission to external hard drive on Mac?
Right-click (or Control-click) the drive icon and choose Get Info. Scroll to Sharing & Permissions, click the lock and enter your password if needed, then check “Ignore ownership on this volume”. This gives your Mac full Read & Write access.
🗨️ How to enable write access to external hard drive?
If the drive is NTFS (Windows format), macOS can only read it by default. Use a reliable NTFS driver like PartitionAssistant NTFS for Mac to enable write access. For Mac-formatted drives, check permissions in Get Info or reformat the drive if necessary.
🗨️ Why can't I write to an external drive with a Mac?
Common reasons include incompatible file systems (like NTFS), restricted permissions, file system errors, or drives used across multiple platforms. macOS often sets these drives to read-only to protect data.
🗨️ Will any external drive work with a Mac?
Most external drives work with Mac, but file system compatibility matters. Drives formatted in APFS, HFS+, or macOS exFAT are fully compatible. NTFS drives require extra software for writing.
🗨️ How do I enable an external hard drive on a Mac?
Connect the drive, make sure it appears in Finder or on the desktop, and check permissions under Get Info. If it is NTFS, use an NTFS driver to enable write access. If it does not show up, see the next FAQ.

