Why Windows shows smaller size of hard drive after cloning?
It might be confusing that you cloned to a larger hard drive from smaller one, but not seeing more free space in Windows Explore. One of the Windows users says, “I was able to successfully clone my HDD, and am typing this post on my newly installed HDD. But if I click on the drive properties, the capacity still says 277 GB. What do I need to do so windows will recognize that I have a 1 TB drive?”
Does Windows “ate” or “cut” the missing space during cloning process? No! To follow the method that user mentioned or to check the disk space in Disk Management, you will find the lost space is still there, and showing as unallocated space. It just lacks of the right form to display in front of you, which makes you can’t use full HDD capacity after cloning. This results from byte by byte clone which gives you an exact duplication of the old drive. You cloned not only the contents of the drive but also the size of the drive. If you don’t choose Fit all partitions to destination disk option during the process, that’s what you ended up with.
How to recover “lost” space after cloning?
As a matter of fact, solution to solve this issue varies from one to another according to the location of the unallocated space. You can use either merely Disk Management to solve it or have to ask some partition tools for help. To be specific, if the unallocated space is next to one of your partitions on the right side, use Disk Management.
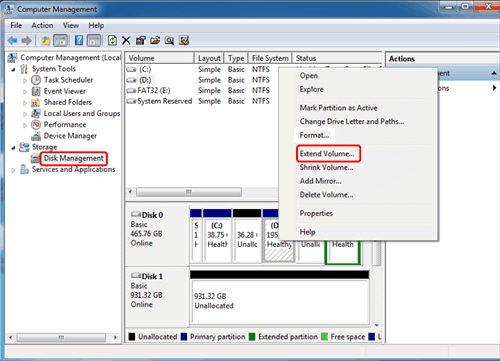
One possible way, type diskmgmt.msc in Run box to open Disk Management. Right click the nearest partition next to the unallocated space, and select Extend Volume. You are able to drag the arrow to the end of the box or resize the partition in next window. Alternatively, you can create new partition with this unallocated space to let it show up in Windows Explore. Right click the unallocated space and select New Simple Volume. The left to do is to follow the wizard. Learn more see unallocated space on external hard drive.
There would be another result of you cloned to a bigger drive, but not showing more free space. The lost space was located separately which lead to the unallocated space after and before your cloned partition. Here is the situation that you have to turn to third party software because you can’t expand partition to cover the unallocated space that in front of it. AOMEI Partition Assistant is professional partition manager that helps you manage your disk well. The Standard edition is free for Windows 10/8/7/xp/vista. It allows you to merge multiple unallocated spaces into one partition and create new partition with the unallocated space in one click as well. Download AOMEI Partition Assistant Standard and have a try.
Merge lost space after cloning HDD to larger drive
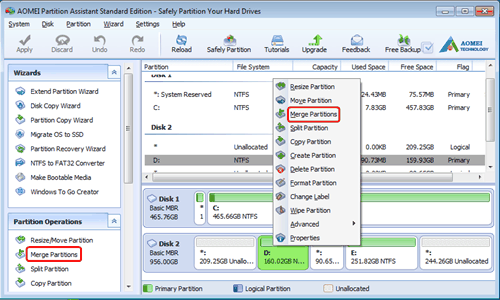
Step1. Install and start AOMEI Partition Assistant Standard. Right click the partition you want to merge to, and select Merge Partitions.
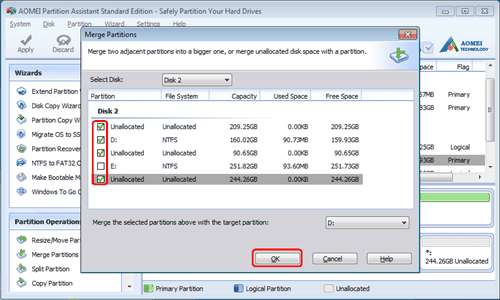
Step2. Check all the unallocated space.
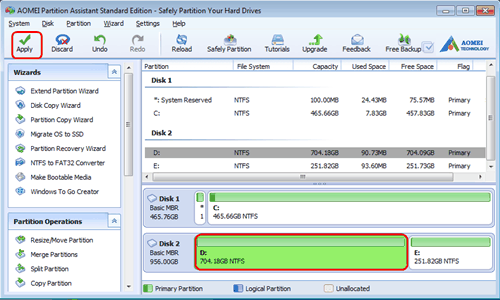
Step3. Click Apply to execute these operations.
Those free space that you cloned to a larger hard drive, but not seeing in Windows Explore have been utilized with the help of AOMEI Partition Assistant. Visit Windows Explore now, and you will find that all of them come back. With this freeware, you are able to do many other partition operations as you can see from the screenshots. For instance, reformat to FAT32, split partition, copy partition, quick partition, and create/format/delete partition and so on.