How to Open Flash Drive on a Mac and Format It?
You will learn how to open a flash drive on Mac systems. The guide also discusses methods to format a flash drive for Mac, including options for NTFS compatibility.
By Irene / Updated on January 27, 2026
In most situations, opening a USB flash drive on a Mac is straightforward. You plug it in, and it appears in Finder under Locations, ready to use. However, this simple process does not always work as expected. Many macOS users find that their flash drive does not show up at all, which is why questions like how to open a USB flash drive on a Mac are so common. Based on macOS storage behavior and widely reported troubleshooting cases, this issue is often caused by mounting errors, incompatible file systems such as NTFS, or Finder settings that hide external drives.
This guide focuses on solving that problem by showing you how to locate a flash drive on Mac using built-in system tools and how to format a flash drive on macOS, including NTFS, so it works properly with your Mac.
How to open a flash drive on a Mac
Part 1. Open a flash drive automatically or from Finder
Most USB flash drives are automatically detected by macOS as soon as they are connected. When this happens, you can open the drive directly from the desktop or Finder. This method works best when the flash drive is compatible with macOS and has no system errors.
Step 1. Insert the USB flash drive into the USB port of your Mac or connect it using a USB-C adapter if needed.
Step 2. Wait a few seconds and check the desktop. If macOS detects the drive correctly, its icon will appear automatically.
Step 3. Double-click the flash drive icon on the desktop to open it and access its files.
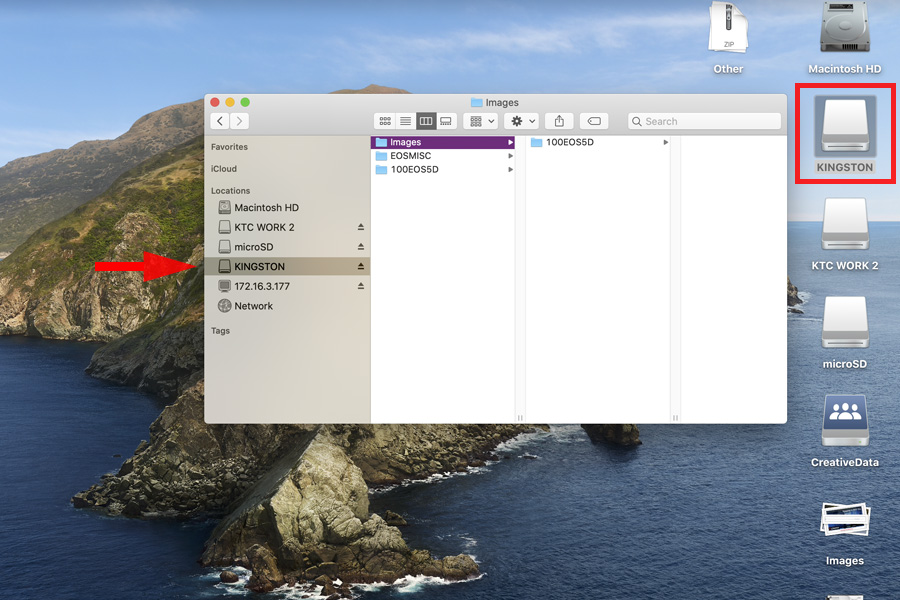
Step 4. If the icon does not appear, open Finder from the Dock and look for the flash drive under the Locations section in the left sidebar.
Step 5. Click the flash drive name in Finder to open it.
If the flash drive still does not appear in Finder or cannot be opened, the issue may be related to mounting, compatibility, or minor disk errors, which can be handled using Disk Utility.
Part 2. Mount the flash drive using Disk Utility
Sometimes a flash drive is connected but not mounted, which prevents it from showing up in Finder or on the desktop. Disk Utility allows you to manually mount the drive and check whether macOS can recognize it at the system level.
Step 1. Connect the USB flash drive to your Mac and wait a few seconds. Open Finder and select Applications from the left sidebar.
Step 2. Double-click the Utilities folder to view system tools. Then double-click Disk Utility to launch the app.
Step 3. Look for your USB flash drive in the left sidebar under External devices.
Step 4. Choose the flash drive name once to select it. Click the Mount button at the top if the drive is shown but not active. (Here we use a Seagate drive as an example. You can apply the same steps to your own flash drive.)

Step 5. Close Disk Utility and return to Finder to open the flash drive normally.
Once the flash drive is mounted successfully, it should remain accessible like any other external storage device, making it easy to view, copy, or manage files on your Mac. If the USB is not mounting on Mac, there is a guide to help you fix it.
How to fix flash drive not open on macOS?
When a flash drive doesn’t open properly on macOS, the cause is often related to file system compatibility. In many cases, the drive is formatted as NTFS, which macOS can read but not fully access, and this can be resolved either by using an NTFS for Mac tool or by reformatting the drive to a compatible format like exFAT or APFS.
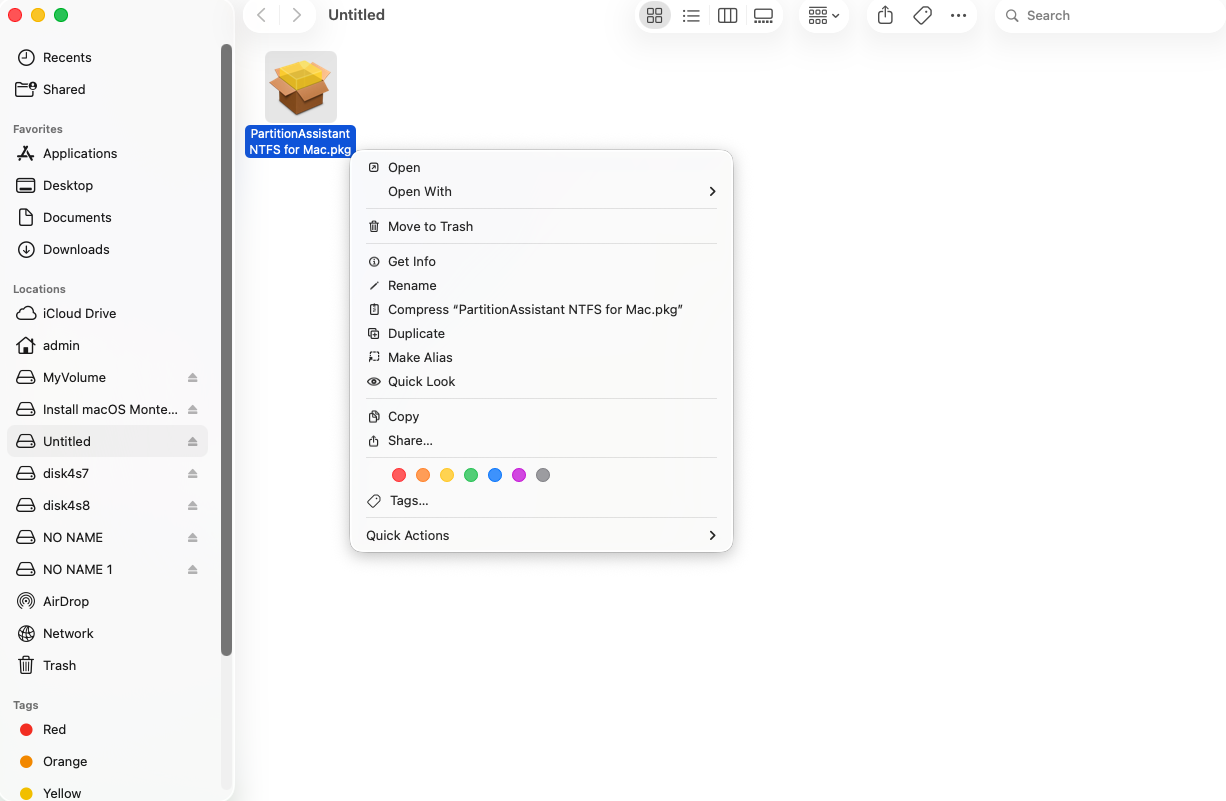
Fix 1. Run PartitionAssistant NTFS for Mac
If your flash drive refuses to open on a Mac, the issue often stems from the drive being formatted with the Windows NTFS file system, which macOS usually treats as read-only or fails to mount properly. Using a dedicated tool like PartitionAssistant NTFS for Mac offers a simple and effective solution to bridge this gap. This software works by automatically detecting the connected drive and mounting it with full read and write permissions, allowing you to access your files without any technical hurdles.
Once you launch the application, it identifies the external storage and provides a clear option to enable the necessary drivers. This process effectively bypasses the native limitations of macOS without requiring you to reformat the drive. It provides a stable connection so you can drag, drop, and edit files just as you would with any native Mac drive. By choosing this approach, you save time and avoid losing data, making it an ideal fix for anyone who needs a quick and reliable fix.
✔️Tip: You need to configure Security Policy in iOS Recovery Mode to set the access permission to a third-party tool.
Step 1. Run PartitionAssistant NTFS for Mac and connect your USB. The connected, removable, and external drives will be mounted and listed.
Step 2. Click the three dots of the target USB drive, select "Enable Writable“.
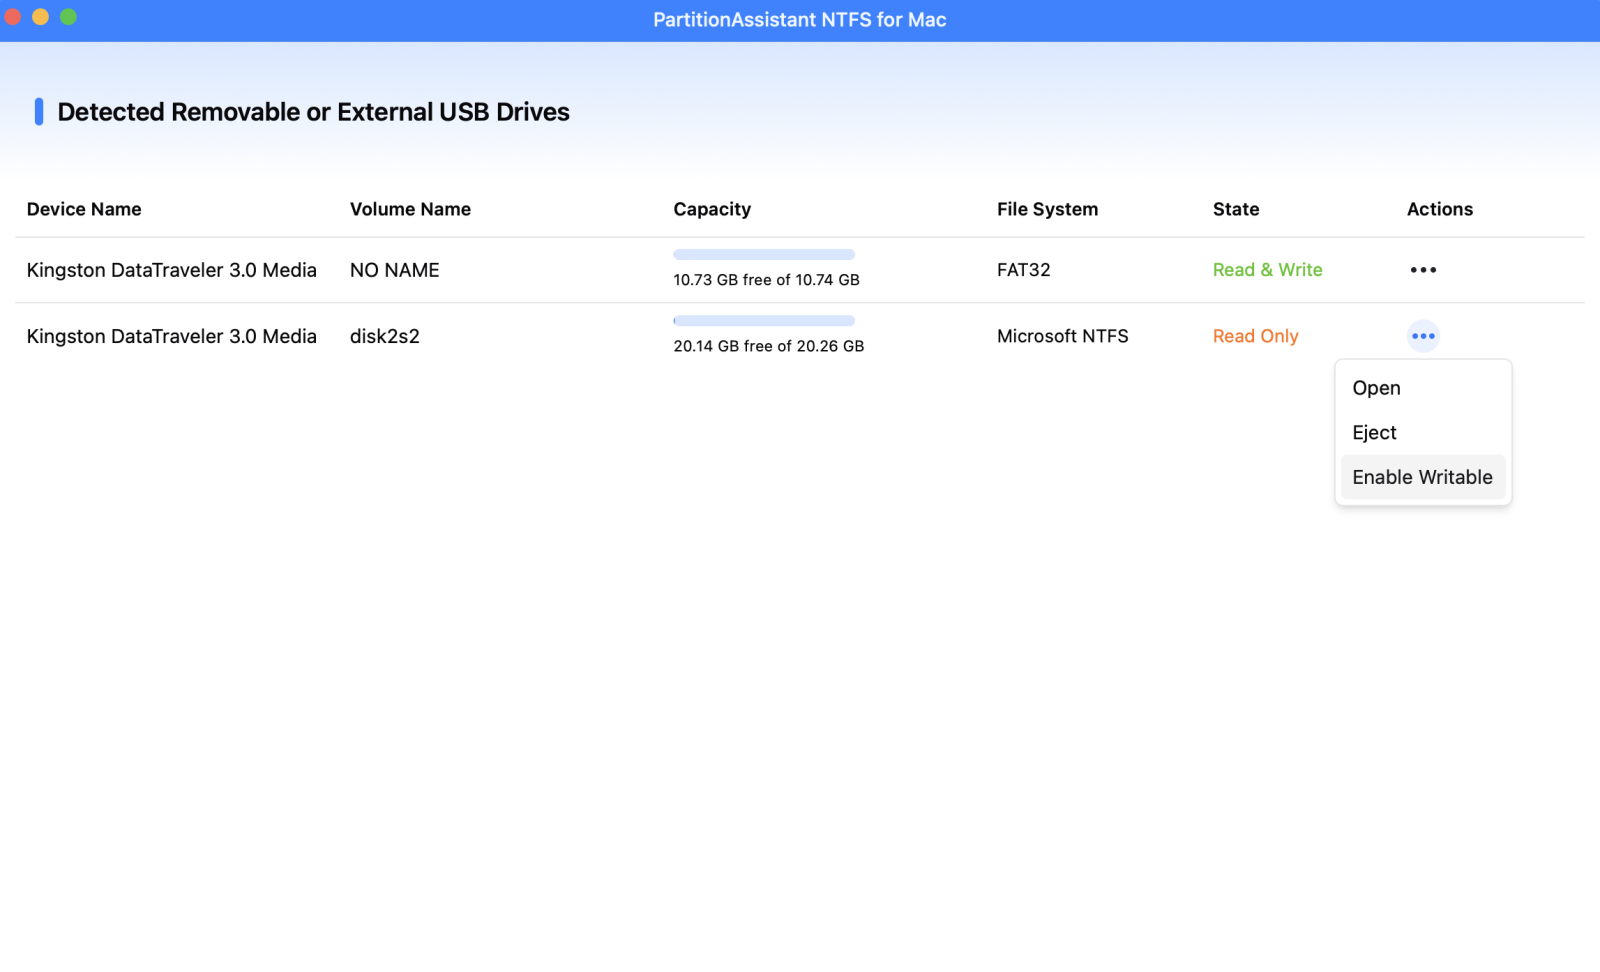
Step 3. Now you can open and write data to your USB on your Mac.
Step 4. After all operations are complete, please click "Eject" to disconnect the USB flash drive from your Mac. And your Mac can still read other NTFS devices.

Fix 2. Reformat to exFAT or APFS
Reformatting the drive to a Mac-friendly format like exFAT or APFS is also a good solution. You can do this easily by opening the Disk Utility application found in your Applications folder. Once you select your drive from the sidebar, click the erase button to choose a new format.
Choosing the right format depends on how you plan to use the device. If you need the drive to work seamlessly between both Windows and Mac computers, exFAT is your best option. NTFS offers advantages such as strong file security, support for very large files, and high stability on Windows systems. However, if you only intend to use the flash drive on Apple devices, APFS is the superior choice because it is optimized for flash storage and offers better encryption and speed.
You should keep in mind that reformatting wipes all existing data from the drive, so always ensure you have a backup of your important files before proceeding. After the process finishes, your Mac should recognize the drive immediately, allowing you to move files back and forth without any further errors.
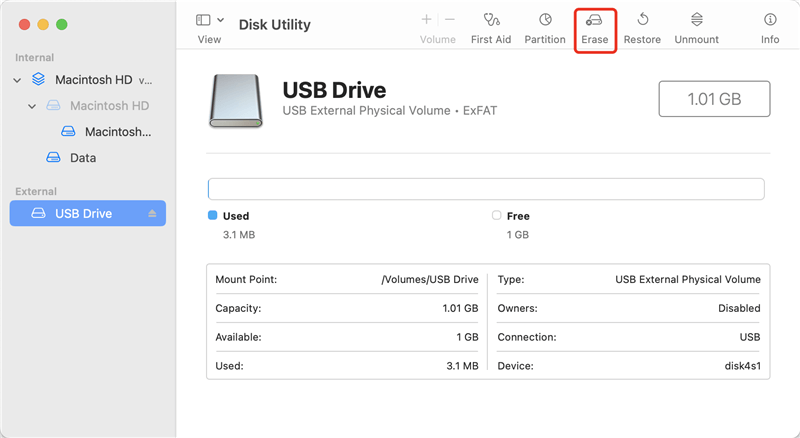
Step 1. Press Command + Space and type "Disk Utility," then hit Enter. In the left-hand sidebar, find the external USB drive you wish to format. Ensure you select the physical disk (the top level) rather than just the partition.
Step 2. Click the Erase button located in the top toolbar.
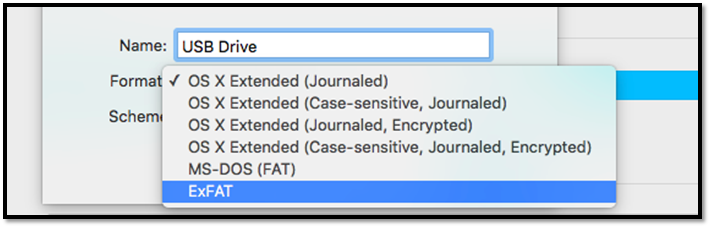
Step 3. Configure Settings, give your drive a title, select exFAT from the dropdown menu, and choose GUID Partition Map (recommended for modern Macs and Windows PCs).
Step 4. Mac OS will now wipe the drive and apply the exFAT file system.
Extra tip: Recommended formats for flash drives on Mac
Choosing the right file system is an often-overlooked step when using a flash drive on macOS, but it directly affects compatibility, performance, and whether you can read or write data smoothly. Different formats are designed for different use cases—some work best for Mac-only environments, while others are better suited for sharing files between macOS and Windows. Understanding these differences helps you avoid common issues like read-only drives or unsupported formats.
| Format | Best For | macOS Support | Pros | Cons |
|---|---|---|---|---|
| APFS | Modern Macs running macOS High Sierra or later | Full read and write | Optimized for speed and security on macOS; supports encryption and snapshots; ideal for SSD-based storage | Not supported by Windows without third-party tools; not suitable for cross-platform use |
| Mac OS Extended (HFS+) | Older Macs and legacy macOS systems | Full read and write | Stable and widely compatible with older macOS versions; good for Time Machine on older systems | Slower and less efficient than APFS; limited support outside macOS |
| exFAT | Flash drives used on both Mac and Windows | Full read and write | Natively supported by macOS and Windows; no file size limits like FAT32; ideal for sharing large files | Lacks advanced security features; slightly less robust than Mac-only formats |
| NTFS | Windows-focused storage devices | Read-only by default | Common default format for Windows drives; reliable for Windows environments | macOS cannot write without third-party NTFS drivers; inconvenient for frequent Mac use |
According to Apple File System documentation, exFAT is the recommended choice for users who need native, hassle-free compatibility between macOS and Windows. However, NTFS goes beyond exFAT in Windows-based environments and can also be a practical option for Mac users when paired with third-party NTFS software, which enables full read-and-write access on macOS. This makes NTFS suitable for users who primarily work on Windows but occasionally connect their flash drives to a Mac.
Conclusion
This article shares how to open a flash drive on Mac. By checking Finder, mounting the drive with Disk Utility, and addressing file system compatibility such as NTFS, most flash drive problems can be resolved without difficulty. Whether you choose to enable NTFS support or reformat the drive to exFAT or APFS, following the right method ensures your USB flash drive works smoothly and reliably on macOS.
FAQs
🗨️ How to get a USB drive to show up on Mac?
Plug the USB drive into your Mac and open Finder. Check the Locations section in the sidebar and make sure external disks are enabled in Finder settings. If it does not appear, open Disk Utility to see whether the drive is detected and try mounting it manually.
🗨️ How do I open a flash file on my Mac?
First, connect the flash drive to your Mac. When it appears on the desktop or in Finder under Locations, click the drive to open it, then double-click the file you want to access. If the file does not open, confirm that the app required to read that file type is installed.
🗨️ Why can't I open my USB on Mac?
This usually happens because the USB drive is not mounted, has minor disk errors, or is formatted with an incompatible file system such as NTFS. macOS may detect the drive but block full access, which prevents it from opening normally.
🗨️ Why is my flash drive not readable on my Mac?
Many flash drives are formatted as NTFS, which macOS can only read by default. In this case, the drive may appear but cannot be opened or edited. Disk corruption or a damaged USB port can also cause the drive to be unreadable.
🗨️ What to do if the USB is not opening?
Start by reconnecting the USB and checking Finder and Disk Utility. If the drive appears but does not open, try mounting it manually or running First Aid in Disk Utility. If file system compatibility is the issue, use an NTFS for Mac tool or reformat the drive to exFAT or APFS after backing up your data.

