Best Free Partition Tool Windows 7 Download (64 bit and 32bit)
Here, you can free download a powerful Windows 7 partition tool, with which you can manage disk partition easily and flexibly in Windows 7, Windows 8/8.1, Windows 10 32/64 bit, or Windows 11.
By AOMEI / Updated on December 12, 2023
Why need a partition tool for Windows 7?
Nowadays, the Windows 7 operating system is still a popular choice for computer users despite the rapid growth rate of Windows 11/10 installation. No matter which operating system you are using now, the hard disk is an indispensable component of a computer. You need to install and run OS from it, and it offers the necessary space for you to store all kinds of data.
To make the fullest use of the disk space, you had better create several partitions for different purposes. The typical strategy is to create a C partition for OS, D partition for applications/programs, and other partitions for personal data. Thus, you need a partition manager for Windows 7 to better manage your disk partition and optimize disk space usage without data loss.
Windows 7 native partition tool-Disk Management
To manage disk partitions in Windows 7 64-bit and 32-bit, you can first try the Windows 7 built-in partition tool-Disk Management. It can help you do some basic disk management such as creating volume, deleting volume, formatting volume, changing drive letters, setting active partition, and more.
Part 1. To open Windows 7 Disk Management, there are 3 ways you can try:
1. Right-click "Computer"> "Manage", and select "Storage">"Disk Management" in the submenu.
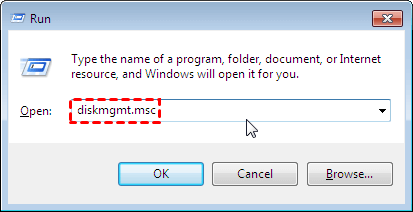
2. Press “Windows and R” together on the keyboard, type “diskmgmt.msc” and press “Enter”.
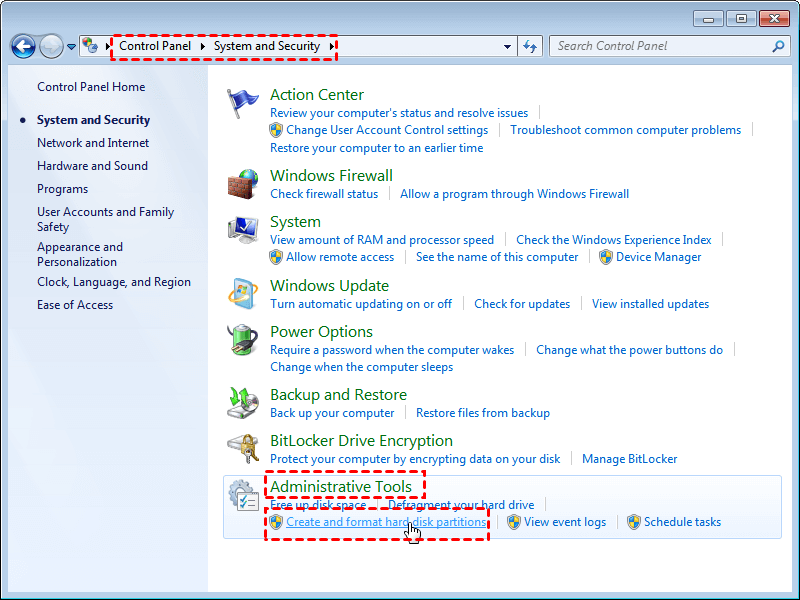
3. Click "Start" >"Control Panel" > "System and Security" > "Administrative Tools", then choose “Create and Format Hard Disk Partitions”.
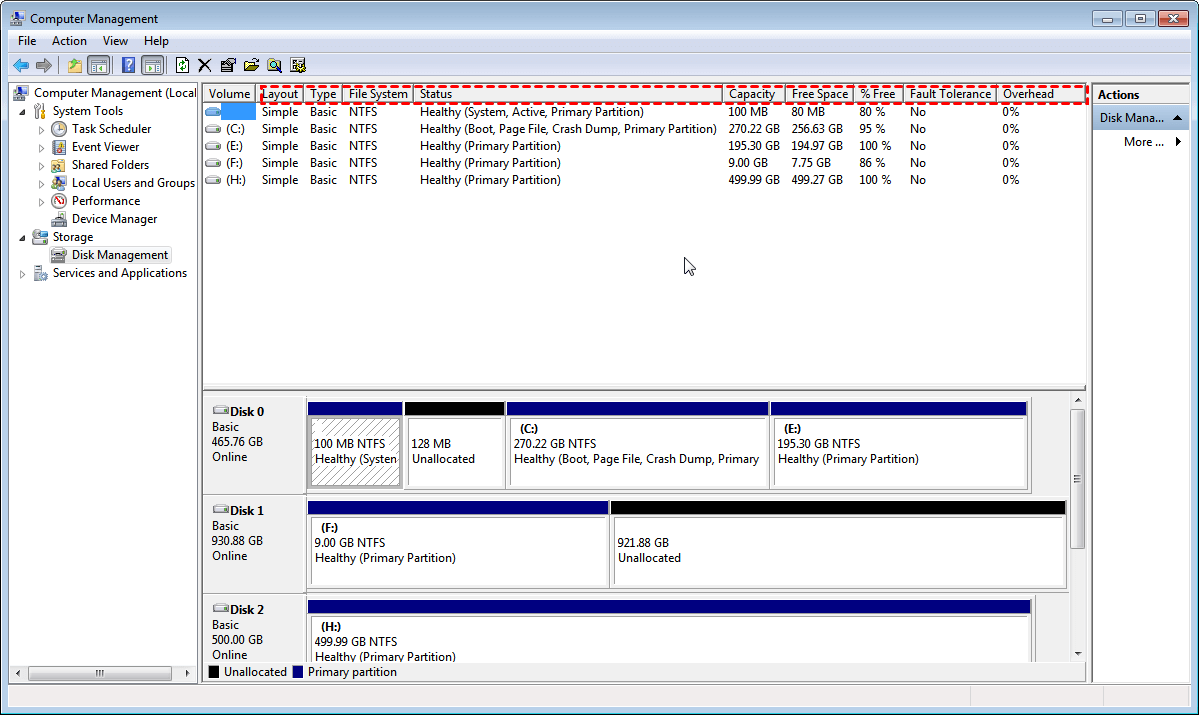
In Windows 7 Disk Management, you'll see all connected hard disks with detailed partition information (type, file system, status, capacity, free space..).
Part 2. What Windows 7 built-in partition manager can do for you?
To see what you can do to your disk partition via Windows 7 Disk Management, right-click any partition. Compared with Windows XP, Windows 7 Disk Management has added the “Shrink Volume” and “Extend Volume” options, which allow users to resize the partition.
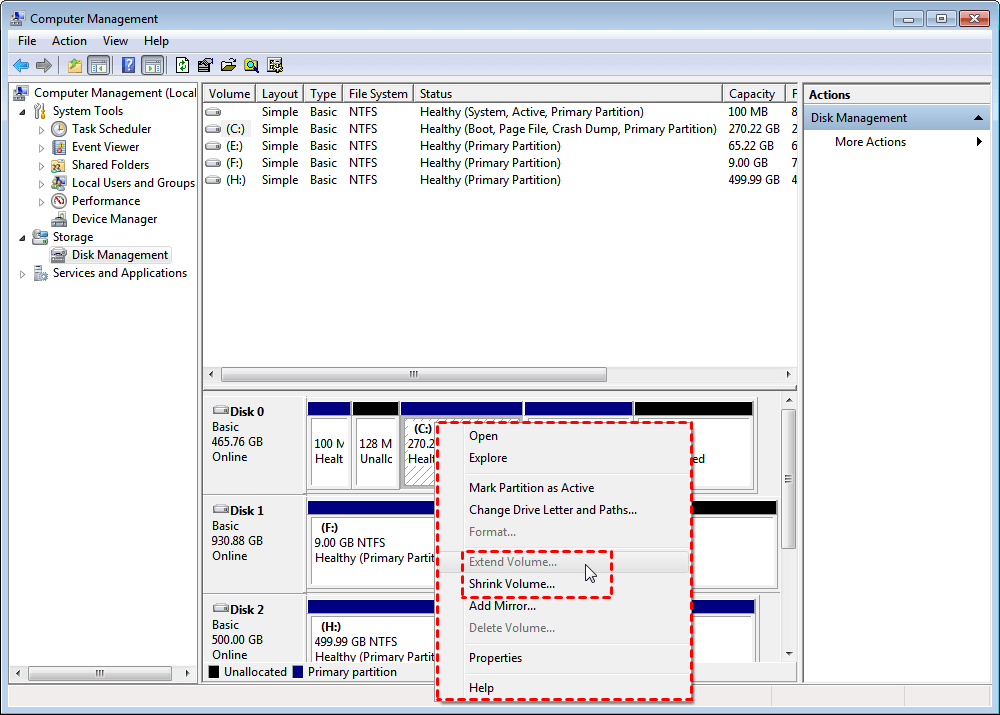
Shrinking volume is easy to finish: right-click the partition, select “Shrink Volume” from the drop-down menu, and follow the onscreen instructions to complete this operation. But for the “extending volume” task, the Disk Management might let you down because this function only works with a precondition-the partition you are going to extend must be followed by an allocated space on its right side. Otherwise, the “Extend Volume” will become grayed out and unclickable (as shown below).

This restriction bothers most Windows 7 users when they want to extend C drive to fix the common low disk space issue on the system drive. To extend C drive without unallocated space on its right side, deleting the neighboring volume (usually D drive) is a guaranteed solution. But that will remove everything inside as well. In this situation, a more powerful partition tool Windows 7 is necessary.
What is the best free partition tool for Windows 7?
There are tons of partition managers for Windows 7, but finding out the best one will cost much time and effort. So we have done that for you and picked out the best free partition manager for Windows 7 64-bit and 32-bit: AOMEI Partition Assistant Standard.
Best Free Partition Tool Windows 7 | AOMEI Partition Assistant
Manage partition and disk on Windows 11/10/8/7 64 bit or 32 bit easily and flexibly.
With this Windows 7 partition manager, you can perform not only the basic operations (like in Disk Management) but also many other advanced operations (Disk Management does not offer). You can free download the Windows 7 partition manager, install and launch it on your PC. To check all available operations on a partition, you can right-click the target partition.
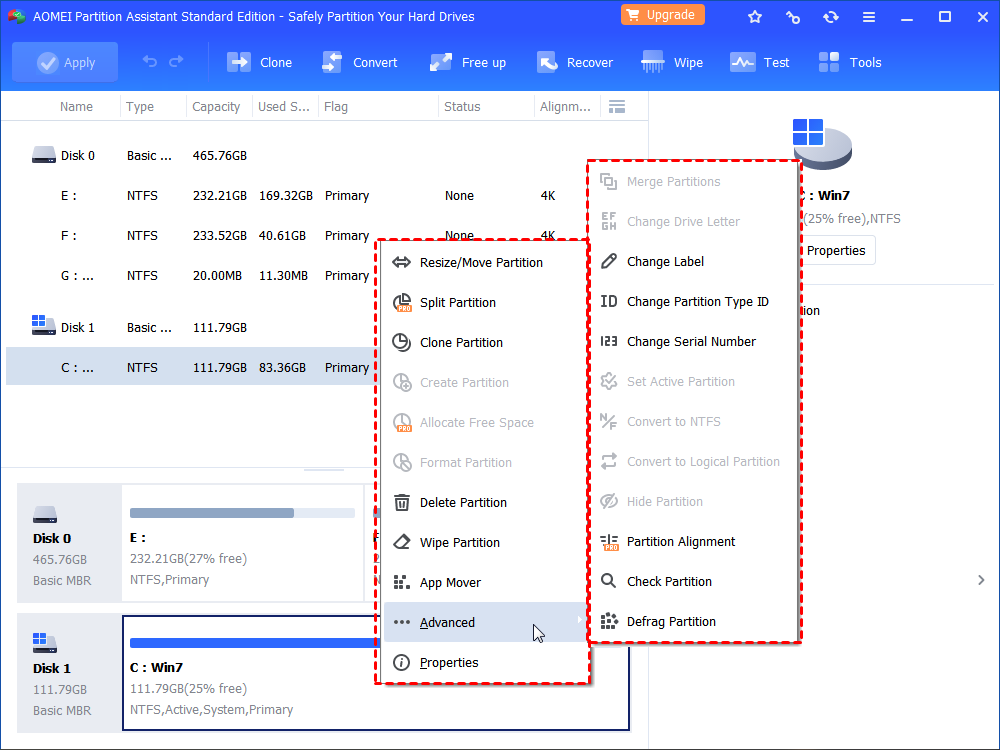
From the screenshot above, you can see it has many more new and advanced functions to manage partitions than Windows 7 native partition tool including:
❤Resize Partition: shrink or extend a partition as you need.
❤Move Partition: move a partition from one location to another, with which you can move the unallocated space next to the partition you need to extend.
❤Merge Partitions: merge two adjacent partitions and merge one, two, or more unallocated spaces into a partition.
❤Clone Partition: copy partition to unallocated space on the same disk or another hard disk on the computer.
❤Change Label: add or change the name of the partition.
❤Wipe Partition: wipe data from the selected partition securely and permanently.
❤Convert to FAT32 from NTFS or to NTFS without formatting/losing data.
❤Check Partition: check the partition for errors/bad sectors and fix them if necessary.
❤Convert primary partition to logical and vice versa without losing data.
Besides the above partition operations, you can also enjoy the following disk operations:
❤Copy disk: clone a hard disk to another smaller or larger disk (HDD/SSD).
❤Surface Test: scan the entire hard disk for errors.
❤Rebuild MBR: rebuild Master Boot Record, quite helpful for Windows boot issues.
❤Convert MBR to GPT/GPT to MBR without deleting existing partitions (only supports data disk).
❤Delete all partitions: quickly clear the hard disk.
Example study: extend C drive in Windows 7 easily
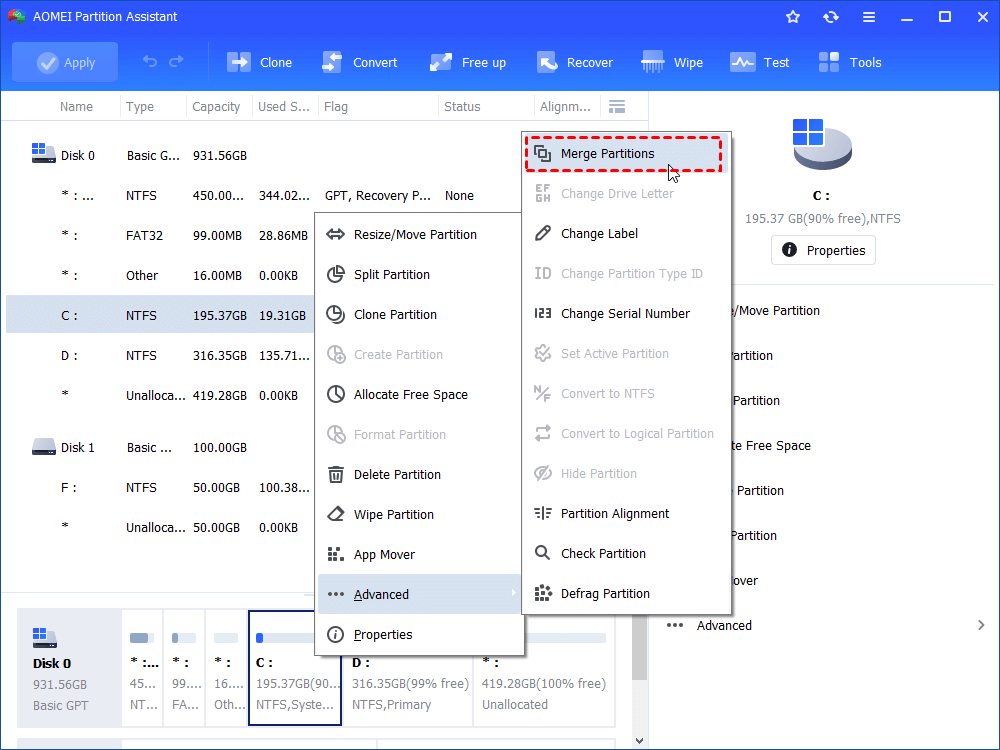
As mentioned above, the Windows 7 native partition tool cannot extend the C drive or other partitions when there is no unallocated space. Now, with the recommended free partition tool Windows 7-AOMEI Partition Assistant Standard, you can do that without any hassle. Here we will show how to increase C drive space in Windows 7 when the unallocated space is not adjacent to C drive. In this situation, we can use the “Merge Partitions” function, see how:
Step 1. Right-click C drive, select "Advanced" and then hit “Merge Partitions” from the drop-down menu.
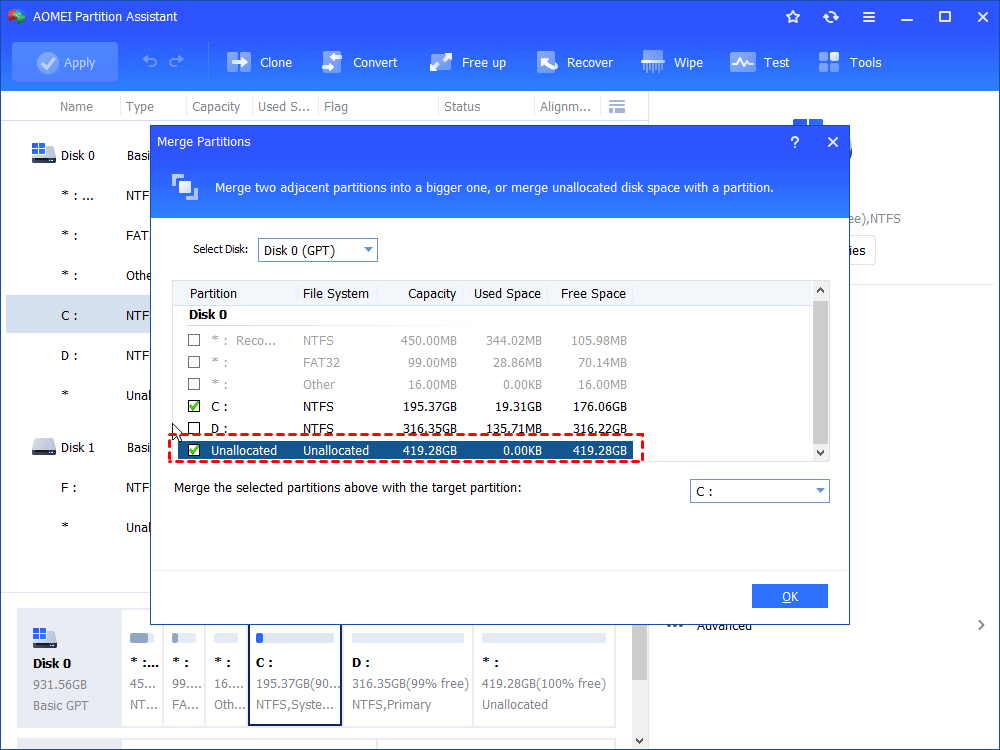
Step 2. In this window, you just need to tick the unallocated space and the C drive is chosen automatically.
Step 3. Back to the main interface, click “Apply” to commit the pending operation.
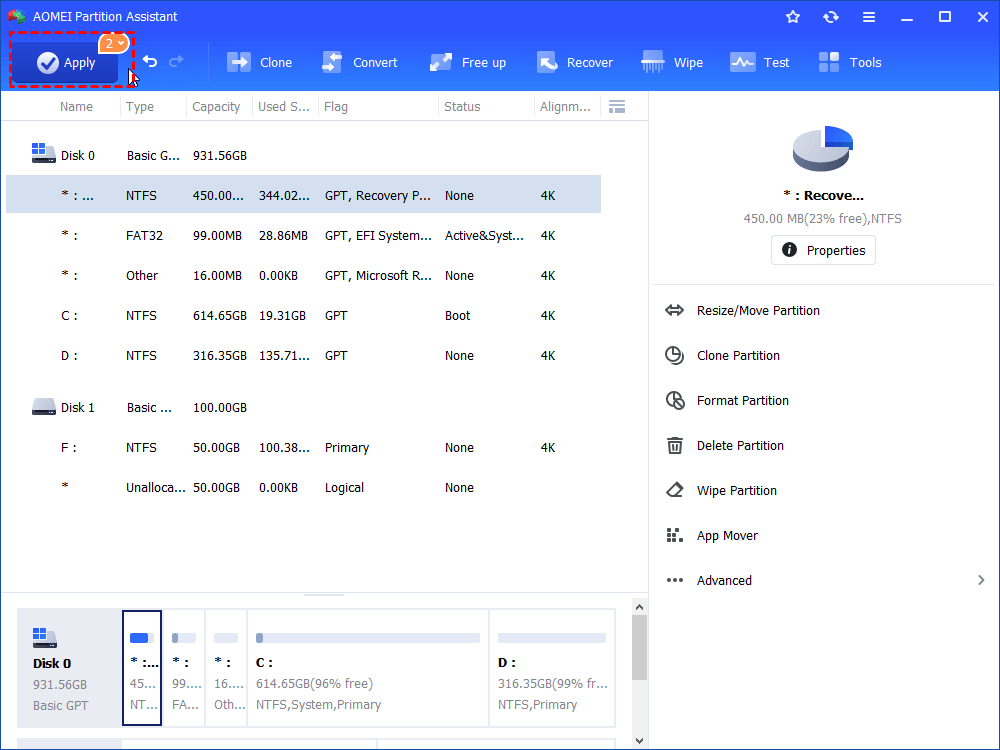
Then you can see the unallocated space has been added to the system drive successfully.
Note:
If there is no unallocated space available, you can first shrink another partition and then merge it into the aim partition as above. Or you can upgrade to AOMEI Partition Assistant Professional, which comes with “Allocate Free Space”, allowing you to directly assign some free space from one partition to another in 3 steps.
Conclusion
The free partition tool Windows 7 (AOMEI Partition Assistant Standard) can meet most user requirements for managing the partition conveniently. To enjoy more advanced functions such as quickly partitioning a hard drive without formatting, splitting a large partition into two smaller ones, changing the serial number, and more, try AOMEI Partition Assistant Professional. If you are looking for a partition manager for Windows Server, you can make use of the AOMEI Partition Assistant Server.

