Installation and Login
Get Started
Basic Partition Options
Basic Disk Operations
Change Partition Size
Clone
Partition Converter
Disk Converter
Disk Free Up
Partition/Data Recover
Wipe Partition/Disk
Disk Test
Useful Tools
More Knowledge
FAQ and Error Codes
Installation and Login
Get Started
Basic Partition Options
Basic Disk Operations
Change Partition Size
Clone
Partition Converter
Disk Converter
Disk Free Up
Partition/Data Recover
Wipe Partition/Disk
Disk Test
Useful Tools
More Knowledge
FAQ and Error Codes
How to Quickly Partition a Hard Drive with AOMEI Partition Assistant?
This paper illustrates how to quick partition / one-click partition a hard drive in Windows under the help of AOMEI Partition Assistant.
Updated July 23, 2026
Overview of Quick Partition
"Quick Partition" in AOMEI Partition Assistant is especially designed to quickly repartition a hard drive, which runs smoothly in PC, Server and Windows PE systems. It applies to partition a new hard drive or repartition a hard drive that contains partitions already. Users can specify each partition size, type, volume label, etc. With only a few easy operations, a hard drive will be partitioned and formatted. If you don't want to change the default partition count, type, label, open "Quick Partition" window and click "Start Partitioning", and then the disk will be repartitioned and formatted quickly.
How to Quick Partition a Hard Drive in Windows 10/8/7?
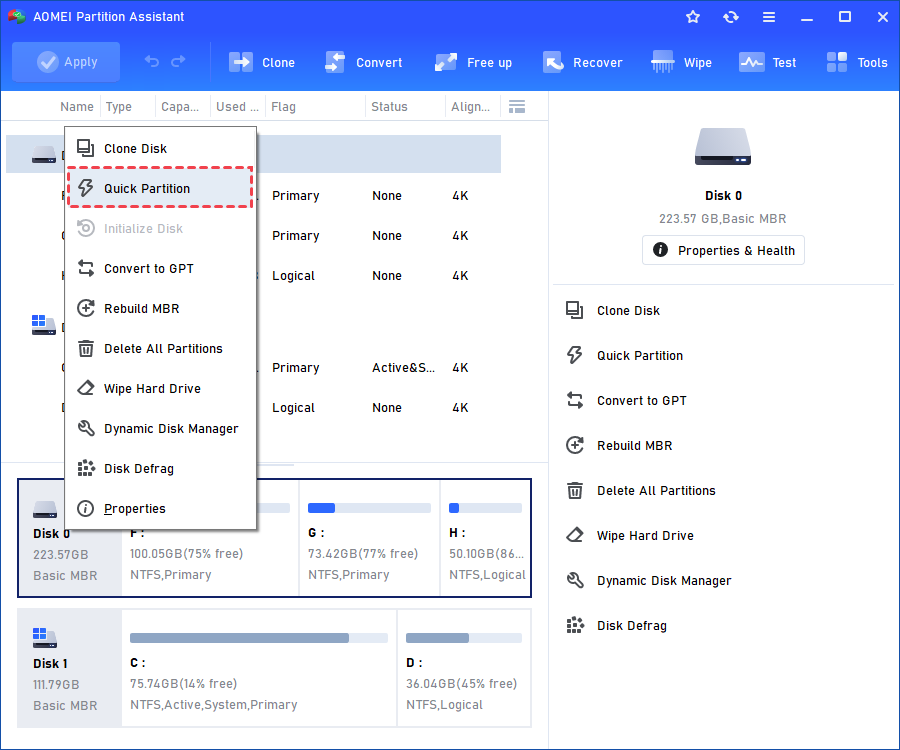
To use this function, instlall and run AOMEI Partition Assistant Professional firstly. (If you need to it in Windows Server, choose AOMEI Partition Assistnat Server) Right-click the disk you want to partition and then select "Quick Partition" in the drop-down menu.
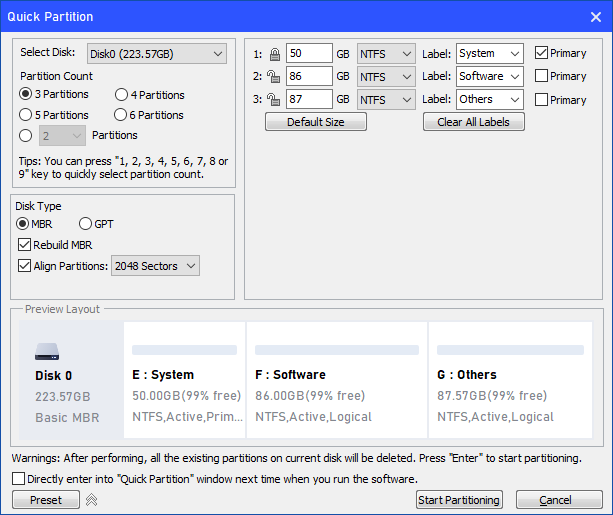
Then the "Quick Partition" window shows as below:
The Specific Instructions:
1. Select Disk
You can re-select a disk to do quick partition without going back to the home screen of AOMEI Partition Assistant. Under Windows environment, AOMEI Partition Assistant doesn't support to directly repartition current system disk. It suggests that create an AOMEI Partition Assistant Bootable Media, and then boot your computer from it to quickly partition system disk.
Warnings: After performing the operation, all the existing partitions on current disk will be deleted if there are partitions on the disk you selected.
2. Partition Count
Under "Select Disk", choose the partition count as you want.
You can press "1, 2, 3, 4, 5, 6, 7, 8 or 9" key to quickly select partition count.
You can also select partition count by mouse click.
After selecting, the corresponding partition count will be immediately shown at the right side of dialog box.
3. Disk Type
At this panel, you can choose the disk style after being partitioned between MBR and GPT, decide whether or not check "Rebuild MBR", and select which sectors to align partitions.
MBR: It supports disk space up to 2TB in size. It will cause disk space wasted if you choose MBR for a disk that has more than 2TB.
GPT: It suggests that select GPT for disks larger than 2TB or computers that support UEFI/EFI boot mode.
Rebuild MBR: If there is boot manager based on MBR on this disk and it needs to be reserved, do not check this option.
Align Partitions: Generally, for solid state drive (SSD) select 4K alignment, namely 8 Sectors. This option does not have many effects on hard disk drive, you can just leave it.
4. Partition Parameters
"Partition Parameters" shows the basic parameters of every partition including type, size, label, and whether primary partition or not.
Adjust partition size: The program will set a default size for every partition according to the disk size. You can also manually enter a specified partition size for each. Click "Default Size", and then it will become the default size.
Choose partition file system: NTFS and FAT32 are available to choose. FAT32 does not support a partition with more than 2TB space, nor can it store a file more than 4GB in size, but is has good compatibility. NTFS is more stable and secure, and it supports partitions more than 2TB and storing files more than 4GB. It suggests that use NTFS file system in general.
Choose volume label: The program sets a label for each partition by default. Users can manually choose or modify, and also remove all volume labels by clicking "Clear All Labels" and then set labels by yourself.
Primary partition or not: If you want it to be a primary partition, check "Primary Partition"; leave it if otherwise. On MBR disk, if you want to create 4 partitions, you set them all as primary, and If you want to create more than 4 partitions, you can set at most 3 primary partitions. This option is invalid for GUID partition table, because all partitions on GPT disk are assigned as "Primary".
When all the settings are done, the partition layout of the disk after being partitioned will be presented visually down the preview window. click "Start Partitioning" button to perform one-key quick partition. If there are old partitions in the disk, a message box will show up (no message if there is no partition on the disk) as below:
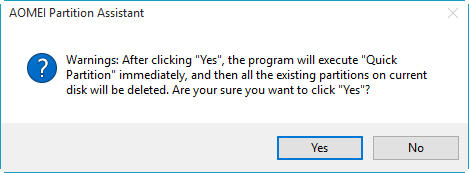
Click "Yes" to continue, or click "No" to cancel.
5. Preset
For those users who often use quick partition, check the option - Directly enter into "Quick Partition" window next time when you run the program, after which it will directly enter into "Quick Partition" window every time when the program starts. In the meantime, click "Preset" button, so you can preset the partition count and size. It is quite convenient for those who need to partition a hard drive regularly or create the same partition layout for large quantities of computers. Those workers who often partition hard dives and install Windows can save the desired partition count and size in the Preset, so they can directly use the saved settings next time to perform quick partition. The interface of the Preset shown as below:
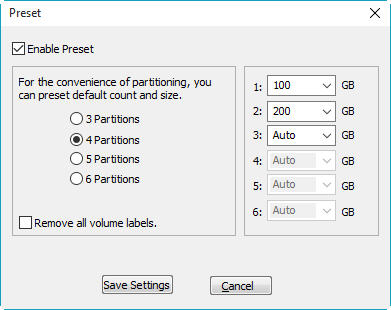
"Preset" applies to changing the default settings of "Quick Partition". In the left column, you can set partition count. For example: if you enable Preset and select "6 Partitions", then "Quick Partition" panel will select 6 as partition count by default. In the right column, you can adjust the first 5 partitions, and the size of the last partition is the remaining disk space. You can also adjust some of the partition size, and the rest will keep the default size.
"Remove all volume labels" option applies to clear all the default labels of each partition, such as System, Software, Docs, etc. If you check "Remove all volume labels", the program will not assign any label for you. You can assign volume labels by yourself.
After finishing settings, click "Save Settings", and then the system will save the preset. The profile (part.ini) of this Preset will be saved to the installation directory of AOMEI Partition Assistant. If the computer boots from bootable media, this file will be saved to the root directory of the bootable device (usually a USB flash drive).
Notes: If Preset is enabled, the last partition size will be set automatically, which means you are unable to specify its size. For example, if you preset to create 3 partitions, then you can specify the size of the 1st and 2nd partition, the last 3rd partition will automatically use remaining disk space as it size.
6. Others
There is an icon  behind the "Preset" button. If you click it, the program will enter the Lite Mode of quick partition as the picture shown below. It looks leaner and fresher.
behind the "Preset" button. If you click it, the program will enter the Lite Mode of quick partition as the picture shown below. It looks leaner and fresher.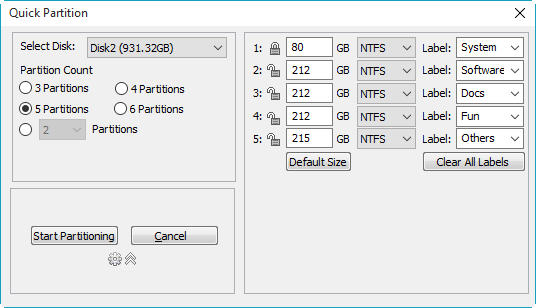
Under the Lite Mode, you can select the disk to be partitioned, partition count, partition size, file system and partition label, and the rest settings keep as default. In the meantime, you can click  icon to preset. If you want to go back to full mode, click the same icon again.
icon to preset. If you want to go back to full mode, click the same icon again.