[Clear Guide] How to Create Windows 11 Boot USB
This article will share 2 methods on how to create Windows 11 boot USB. Also you can learn to boot from the Windows 11 bootable USB.
By Irene / Updated on July 18, 2025
In October 2021, Microsoft has released Windows 11, the latest Windows operating system with many intriguing updates. It builds upon the previous versions of Windows, but features a redesigned interface that offers a more modern and streamlined user experience.
For example, as we can see, the Start menu has been redesigned, with a centered layout and personalized recommendations, making it easier to find and access frequently used apps and files. The operating system also includes fresh multitasking features like Snap Layouts and Snap Groups. With that, users can quickly organize and switch between multiple windows.
The updates are novel for older Windows system users. But some Windows 10 users put that they still cannot decide whether to upgrade to Windows 11. On the one hand, some of their devices can’t meet the minimum hardware requirements for upgrading. On the other hand, others fear that the new functions are not as good as expected. Things may be trouble once they hope to roll back to Windows 10.
If you have similar worries as them, you can try a popular and useful solution — create a Windows 11 boot USB.
Reasons for creating boot USB Windows 11
Creating a portable bootable USB to boot Windows 11 can provide many benefits, including but not limited to:
• Convenience: By creating Windows 11 boot USB, you can avoid installing the operating system on devices. Furthermore, the system will boot from the bootable USB to start the installation process, which allows you to bypass the hardware requirements, and enjoy the system anytime and anywhere.
• Repair system boot issues: Once you encounter Windows 11 OS failure, a Windows 11 boot USB allows you to install the system and boot from it to repair system issues easily and conveniently.
• Speed: Using a boot USB drive can make booting the operating system much faster than traditional installation methods.
• Enhanced Security: Booting from a portable USB drive can provide enhanced security measures without Windows 11 Bitlocker, as it helps to isolate the operating system from any potential malware or virus attack.
In the next part, we will share how to create Windows 11 boot USB. You can keep reading and follow the step-by-step guidance.
2 ways to create Windows 11 boot USB
Generally, there are 2 common ways to make Windows 11 boot USB. If you are quite familiar with computer techniques, you can try to create one with Command Prompt. But the second method is the most recommended for most of users, which is the most efficient and safe way to create Windows 11 boot USB without the risk of data loss.
Way 1. Create Windows 11 boot USB with Command Prompt
Apart from the knack of command lines, using Command Prompt to make Windows 11 boot USB also requires your patience of the long process. After creation, you can use it to install the Windows 11 system.
Note: Before the creating process, please prepare a USB that is no less than 8GB and ensure the important data on it is made a backup.
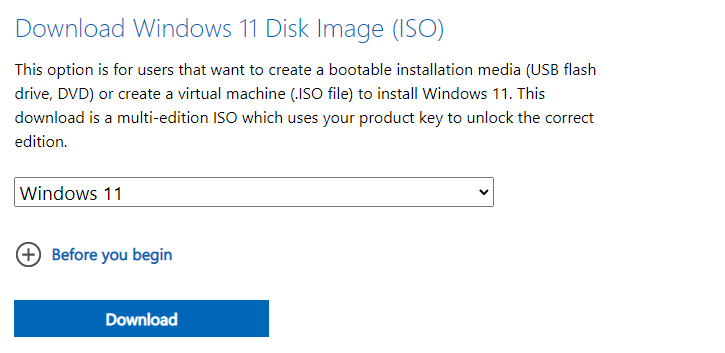
Step 1. Go to the Microsoft official website to download Windows 11 ISO files.
Step 2. After download, click the “Start” button on the desk top and search for “Command Prompt”. Right-click the best match, and choose “Run as Administrator”.
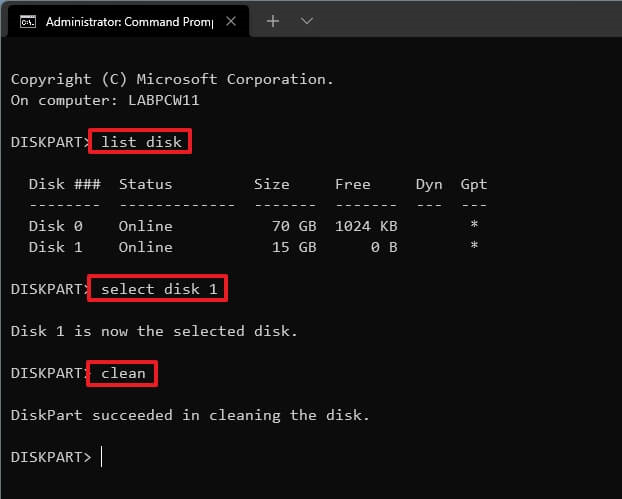
Step 3. Type “diskpart” and press Enter. Then type commands in turn to wipe the data on your USB drive. Please press the "Enter” key after typing every order.
• select disk X (X is your USB drive letter)
• clean
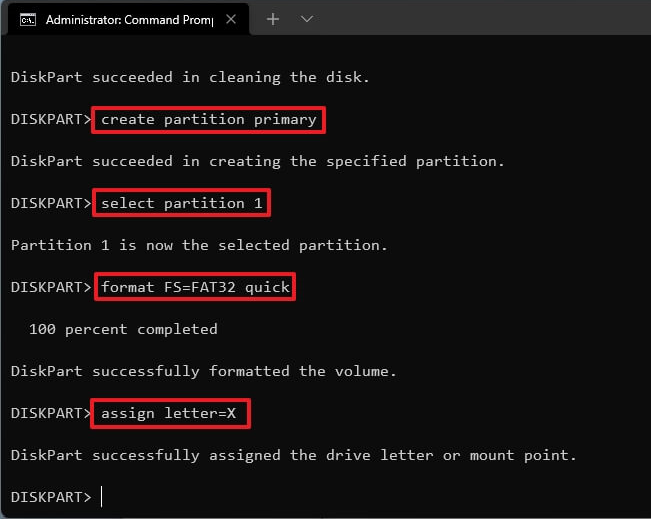
Step 4. Then input the following order to create a primary partition
• select partition 1
• format fs=ntfs quick (If you want to create UEFI bootable USB, type “format fs=fat32 quick”).
• assign letter=X (X is the letter of the partition, change it to the letter you wish to use.)
Step 5. Type “exit” and hit “Enter” to quit the tool.
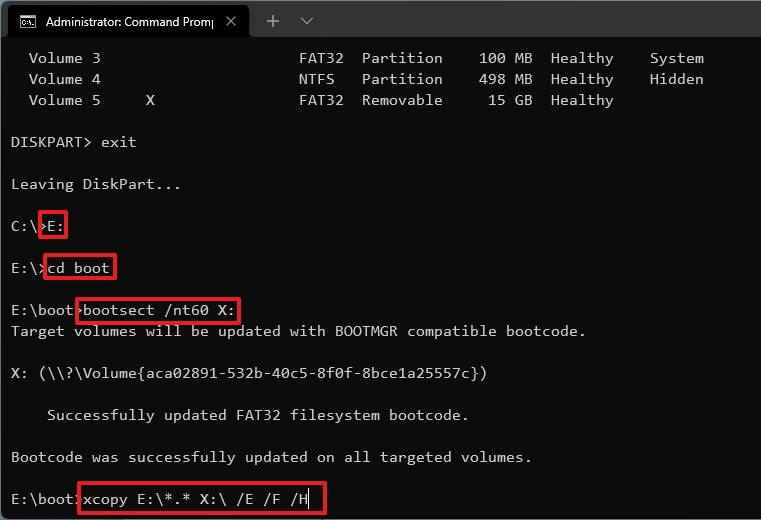
Step 6. Now, we need to continue to open CMD again and type specific command lines to move ISO files to USB.
• diskpart
• list volume
• exit
• E:
• cd boot
• bootsect /nt60 X:
• xcopy E:\*.* X:\ /E /F /H (Change E and X to the drives with Windows 11 ISO image and your USB)
Now, you have already successfully created a Windows 11 boot USB.
Way 2. Make Windows 11 boot USB with a handy tool
The boot USB created by Command Prompt is practical for people who expect to do a fresh installation or repair the system boot issues. However, some users still hesitate to decide whether to upgrade or not, especially those whose devices cannot meet the hardware requirements. Besides, part of people are afraid that they may be strange to the new operations but expect to have a fresh experience.
Things can be perfectly solved if you choose AOMEI Partition Assistant Professional. It allows you to create a portable Windows 11 without hardware requirements. Also, you do not have to do the installation process like using Command Prompt. With the feature “Windows To Go Creator”, you can directly boot from the Windows 11 boot USB and then relish from the customized OS no matter wherever you are at any time.
It can support not only Windows 11/10/8.1/8/7 bootable USB creation but also all Windows editions. Moreover, you can use it to make Windows 11 boot USB for personal computers and even MAC computers.
Step 1. Insert the USB drive into a USB 3.0 port on the computer. Wait for it to be detected. If it failed, you can ask the solutions for help.
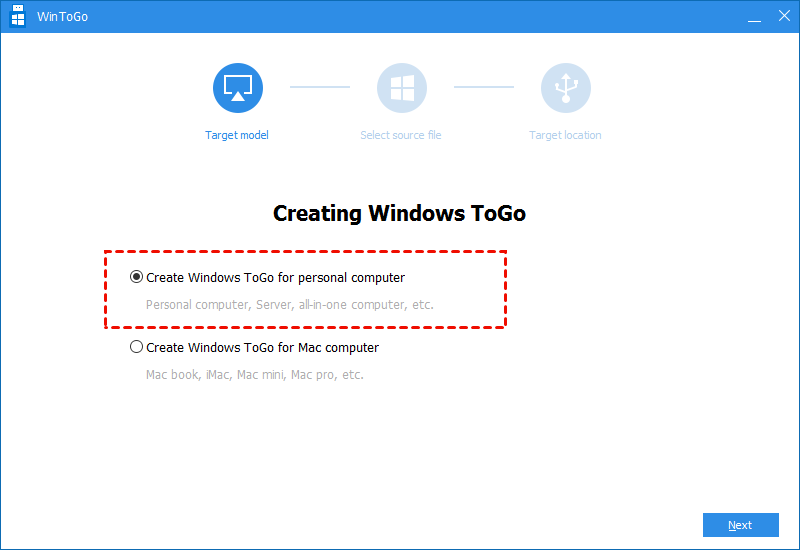
Step 2. Run the software. Click “All tools” > “Windows To Go Creator”.

Step 3. Click “Create Windows To Go for personal computer” > “Next”. You can click the second option “Create Windows To Go for Mac computer” if you are a Mac user.
Step 4. Click “Create Windows To Go with system disc/ISO”. Usually, the ISO file will be automatically detected. If not, please select the folder icon to manually click the target file with pressing “Next”.

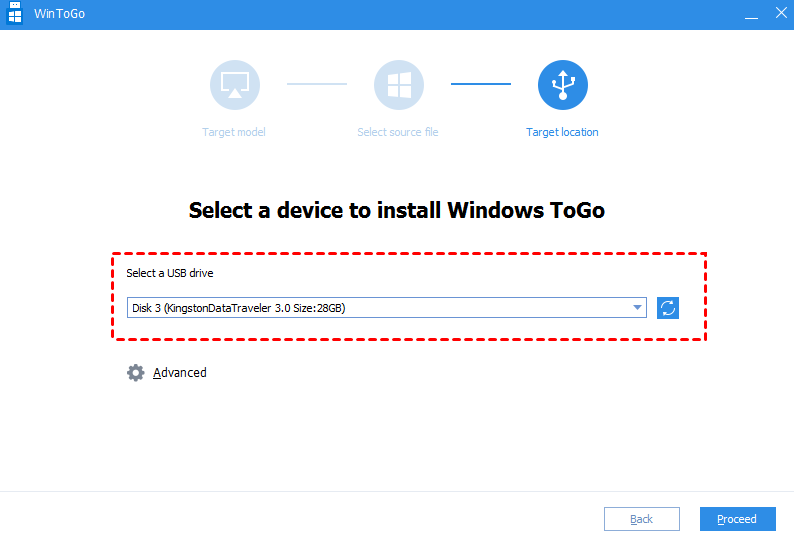
Step 5. Select the USB drive as target and click “Proceed”.
Step 6. There will be a notice that all data on the USB will be erased. Select “Yes” and unplug the US. Try to boot it on another computer.
How to boot from the Windows 11 bootable USB
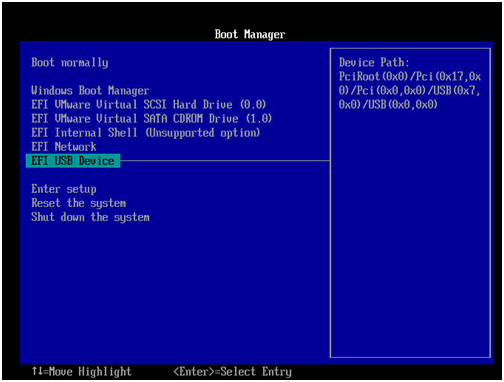
Step 1. Insert the created boot USB into your computer. Then boot the device and press the specific key to enter BIOS to change the boot order.
Note: The key to enter BIOS/UEFI differs from computer brand. You can try F10, F2, F12, F1, or DEL.
Step 2. Choose USB Device and press the “Enter” key to boot from the Windows 11 bootable USB.
To sum up
In this post, we share 2 ways to create Windows 11 boot USB. For people who hope to save time and energy, AOMEI Partition Assistant is a good choice.
It is also recommended to migrate OS to SSD, converting between GPT/MBR, and moving apps to another drive with this easy-to-use tool. And Windows Server users can choose the Server Edition to manage the devices effectively.

