Securely Clone IDE Hard Drive to SATA (SSD) in Windows 11, 10, 8, 7
Are you looking for a way to clone IDE hard drive to SATA in Windows 11, 10, 8, 7? Read this article to learn how to do it easily and safely.
By AOMEI / Updated on September 14, 2024
IDE vs SATA: Why clone IDE hard drive to SATA SSD?
IDE (also known as PATA, Serial ATE) and SATA (or Serial ATA) are 2 types of interface standards for the connection of storage devices. SATA is a serial connector, while IDE is a parallel connector. SATA is new and it was designed to overcome the limitations of IDE. So as a new standard, SATA has the technologies that IDE can’t provide and owns below advantages over IDE:
● Faster speed: Data transferring speed of IDE interface is up to 133 MB/S while SATA data transferring speed is up to 6 GB/S. Apparently, today 133 MB/S can’t meet the demands of computer users.
● Better performance: SATA is more suitable for performing intense I/O tasks than IDE. Actually, IDE should not perform intense I/O tasks, otherwise, your computer would become really slow.
● Better compatibility: IDE can’t run on new operating systems like Windows 11, Windows 10, Windows 8 while SATA can. Using IDE with old OS makes it very inconvenient to operate advanced and even normal programs.
● Easier connection: IDE needs jumper setting to operate and if it is set incorrectly, an IDE drive would not be recognized.
Due to these advantages, SATA hard drives generally replaced IDE. If your computer with IDE hard drive becomes very slow, you can try to clone IDE hard drive to SSD (with SATA port). But how to securely clone IDE hard drive to SATA without boot issues in Windows 11/10/8/7? Follow this article, and let’s find out.
Find out a proper IDE to SATA cloner-AOMEI Partition Assistant
To clone IDE hard drive, simple copy-and-paste operation does not work out. Because copy and paste can only operate on some simple files, the limitations are very obvious. Copy and paste actually just copied the files on the surface, and did not copy other data used to find and access these files. For system files, the MBR and file allocation table will not be copied to the new hard disk, which will cause the system to fail to boot.
Therefore, I recommend you to use IDE to SATA cloner named AOMEI Partition Assistant Professional, which provides various features to meet different demands:
● Full-featured: A great hard drive cloner should be full-featured to meet different needs of cloning, such as cloning larger drive to smaller drive, cloning only one or two partitions to another different disk.
● Bootable clone: A great IDE to SATA cloner enables users to clone both data disk and system disk, and keep the cloned data valid as well. If it clones the system disk, all boot related data should be cloned, otherwise, the cloned drive won’t boot.
● Compatible: It should support different Windows operating systems. Whether a user’s operating system is Windows 11/10/8/7, Vista or XP, disk can be cloned successfully.
● Intuitive and easy-to-use: It should have an intuitive and lucid interface. Either computer rookies or experts can easily understand how to perform cloning tasks.
● Partition alignment: A great IDE to SATA cloner should support partition alignment that can improve the reading and writing speed of data on SSD drive after cloning, and the performance of your computer will be improved.
Step-by-Step: How to clone IDE hard drive to SATA in Windows OS
Connect SATA hard drive to your PC, and you can click AOMEI Partition Assistant Demo version and follow the steps to see how to clone IDE hard drive to SATA in details.
✍ Note: If your computer motherboard doesn’t support SATA, you need to buy an IDE-to-SATA adapter or connector to connect it.
Step 1. Set the SATA drive to IDE mode
SATA drives are newer than IDE, some old operating systems won’t recognize SATA hard drive. If your SATA drive can’t be recognized by the system, you can refer to the following text and set SATA to IDE mode.
1. If you use Windows 8 and later systems. Press and hold the “Shift” key, click “Restart”. If you use Windows 7 and older systems, restart the PC and press the “F8” immediately.
2. Navigate the following path in the window:
Troubleshoot>Advanced Option>Startup Settings>Restart
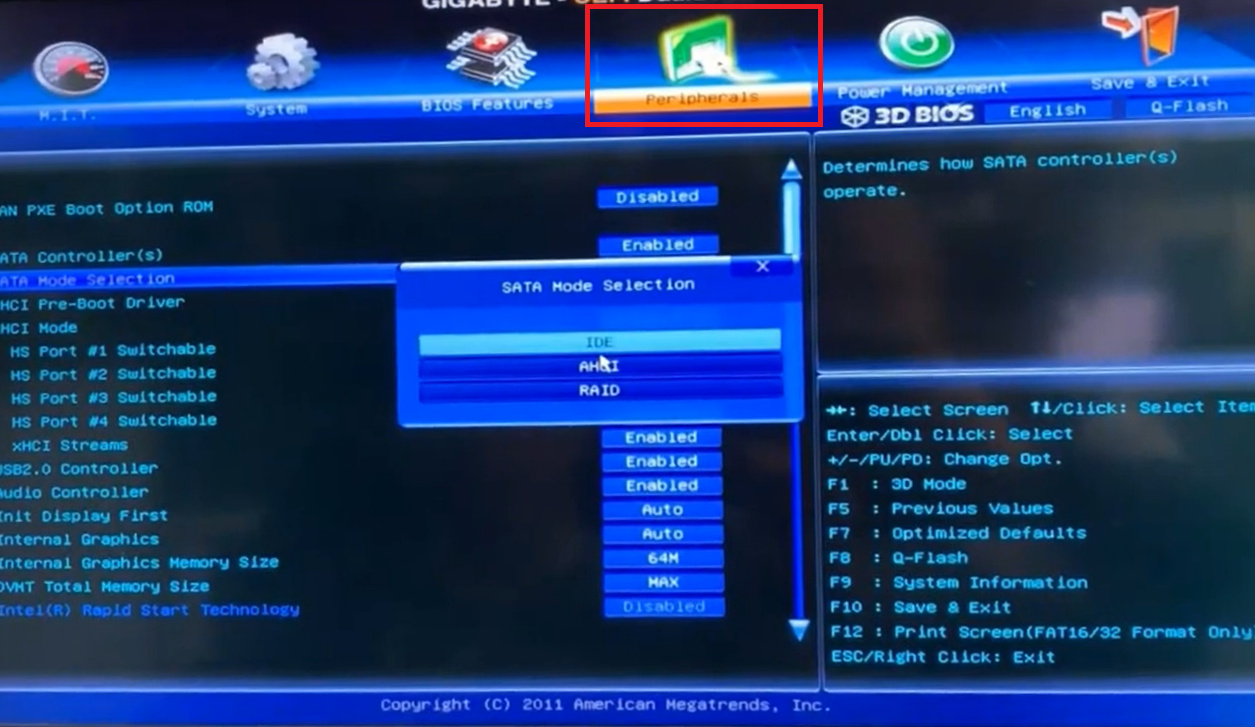
3. When the computer restarts, press the “Delete/F2” to enter BIOS, select an option such as “Advanced”, “Integrated Peripherals” or “Main” or a similar option. And switch SATA mode to IDE.
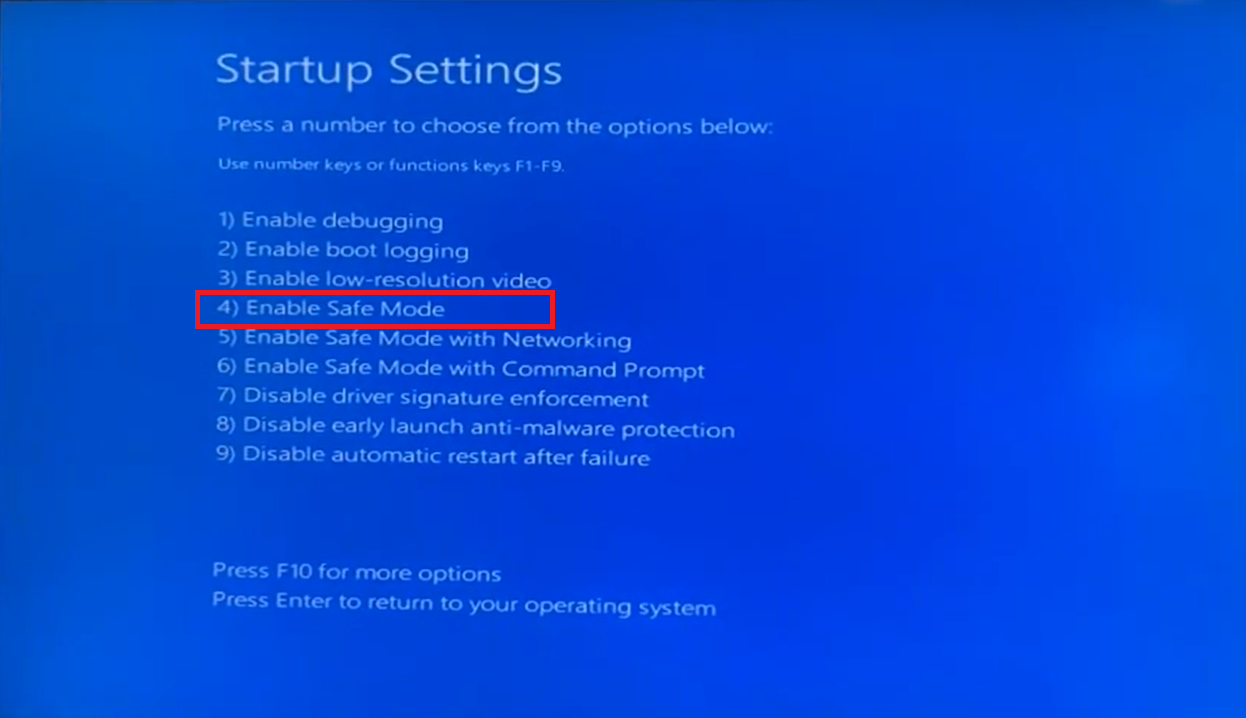
4. Press “4/F4” to select “Enable Safe Mode”.
5. Just restart your computer and finish the operation.
Step 2. Start cloning IDE hard drive to SATA via AOMEI Partition Assistant
Now, the IDE hard drive is recognized by your computer, open AOMEI Partition Assistant and start the process to clone IDE hard drive to SATA.
✍ Attentions:
-
The data on the SATA hard drive will be deleted after cloning, please make a backup of them with AOMEI Backupper beforehand.
-
GPT partition table and UEFI boot mode can bring a SATA SSD good performance when it is used as a bootable disk. And according to Microsoft's latest requirements, upgrading to Windows 11 also requires UEFI and GPT. But you must verify your motherboard supports UEFI boot mode before cloning MBR system disk to GPT SATA SSD since you have to change BIOS to UEFI afterwards.
Step 1. Click "Clone" in the main interface, and select "Clone Disk".

Step 2. Choose the IDE hard disk as the source disk and click "Next".

Step 3. Select the SATA drive as the destination disk, and then click "Next".

Step 4. Then, you can check the source and destination disk in the next window or change to "Sector to Sector clone", and click the "Confirm" button to continue if there is no problem.

Here, you can also click the "Settings" button to adjust the partition size on the destination disk or tick "4k alignment" to improve the reading and writing speed of the SSD if the SATA disk is SSD.

Step 5. In the main interface, click “Apply” and “Proceed” to start transferring data from IDE to SATA.

Step 3. Boot from the SATA SSD
Follow the following steps, and restart your computer to set the SATA SSD as the boot drive.
Step 1. During the process of restarting, long press “F2” to “Enter Setup”.
Step 2. And “Change boot order” then set the cloned SATA SSD drive as boot drive.

Step 3. Press "Enter". Now you can boot the computer from the SATA successfully.
Conclusion
This is how to clone IDE hard drive to SATA and boot PC from the cloned SATA drive in Windows 11/10/8/7. Besides, AOMEI Partition Assistant is not only can assist you in cloning hard drive, but also have other features can help you manage your computer and disk, such as migrating OS to SSD or HDD, and securely wiping data on SSD, etc.
If you're running Windows Server operating system, you can clone IDE to SATA with AOMEI Partition Assitant Server Edition.

